Hengshi Documentation
Table of Contents generated with DocToc
- Application Settings
- Read-Only Mode Interaction Settings
- Drill-Down
- View Data
- Download Data
- Data Permissions
- Application Author
- Dataset Author
- Users
- Row-Level Security
- Add Rule
- Edit Rule
- Delete Rule
- Union of Rules
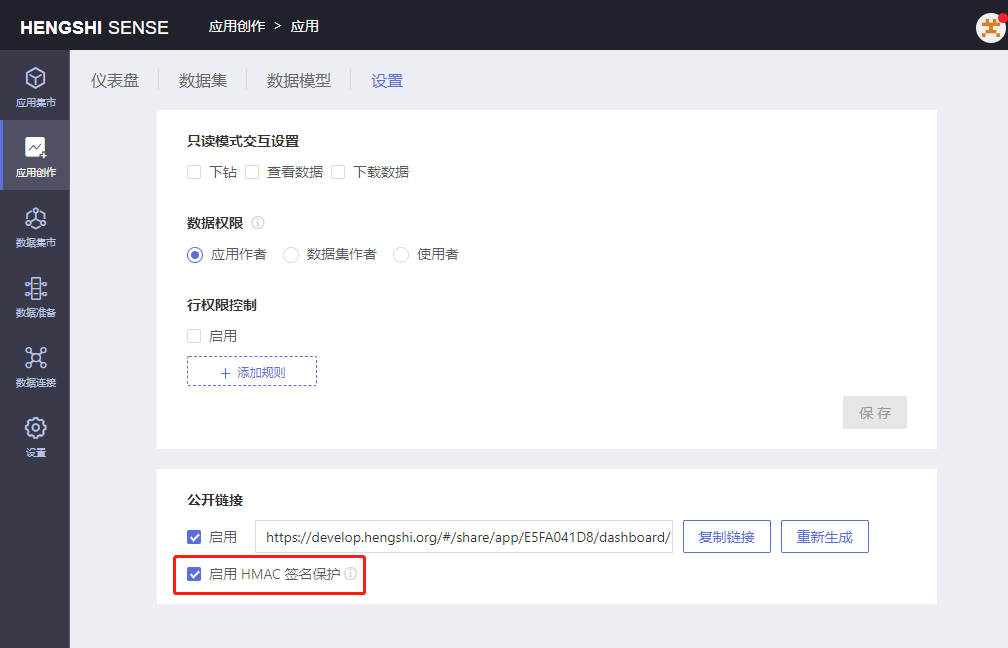
- Public Link
- HMAC Signature Protection
- Relationship Among Connection Permissions, Data Permissions, and Row-Level Security
- Email Push
- Email Push Settings
- Email Push Schedule
- Email Push Record
Application Settings
Each user has a settings menu for the applications they have the authority to manage (specifically, their applications in the personal area, and applications in shared spaces and data markets). In the settings menu, data permission modes can be set for the app, and row permissions can be set for the datasets. The app settings also allow the enabling of shareable links for the app, along with the setting of chart interactions within the shareable link.
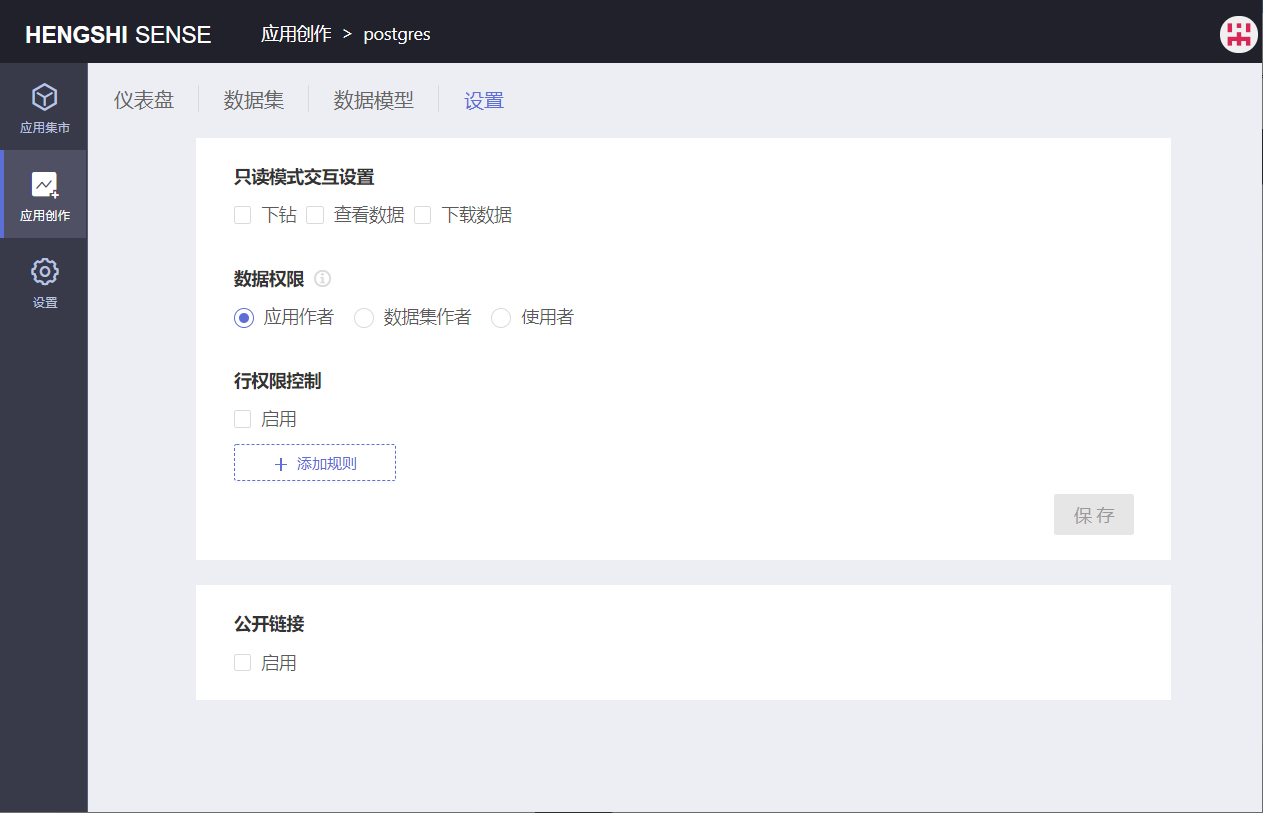
Read-Only Mode Interaction Settings
When sharing a public link, the interaction permissions that can be set include: Drill-Down, View Data, Download Data;
By default, when sharing a public link, interaction permissions are: Drill-Down not allowed, View Data not allowed, Download Data not allowed. The drill-down, view data, and download data operations will not be available in the shared link if the default setting is used for sharing.
Drill-Down
Whether a chart in a public link can be drilled down depends on:
- Whether the drill-down interaction permission is checked and saved when sharing;
- Whether a drill-down path was added when creating the chart;
- The Chart Click Interaction Behavior selected in the chart’s
interactioncolumn (pop-up menu/drill-down/no response).
- If a drill-down path is preset for the chart and Chart Click Interaction Behavior is set to pop-up menu or drill-down, the drill-down interaction can be activated in the shared link following the preset path when shared with the drill-down interaction permission.

If no drill-down path is preset for the chart and if Chart Click Interaction Behavior is set to pop-up menu or drill-down
In the absence of a preset drill-down path, if the drill-down interaction permission is selected upon release, the drill-down operations for drilling down on dimension groups in the shared link will be disabled when clicked.
View Data
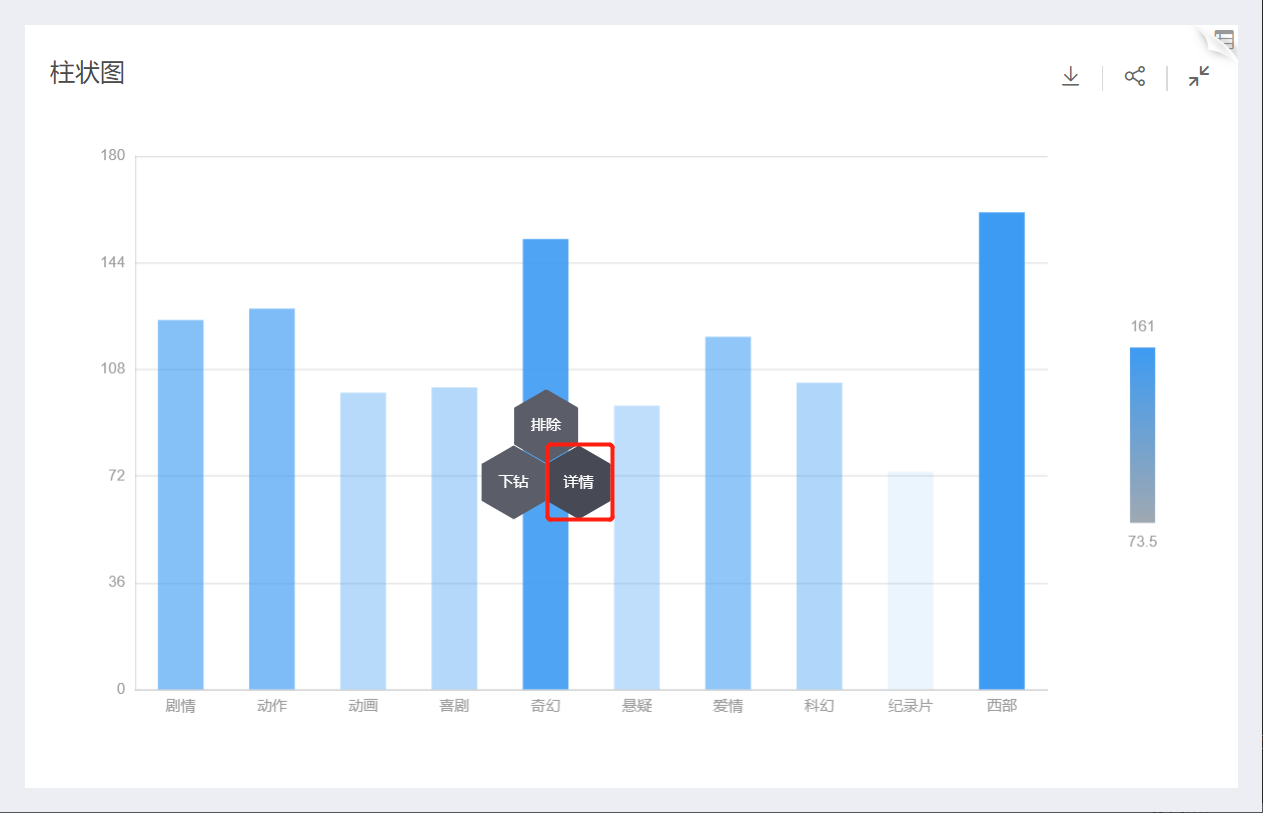
When the interaction permission "View Data" is selected, there are two ways of viewing data in the chart via the shared link:

The first method: Select a dimension group, click to bring up the Details option to view the data details of the current group; for example, to view the details of the "Action" group:
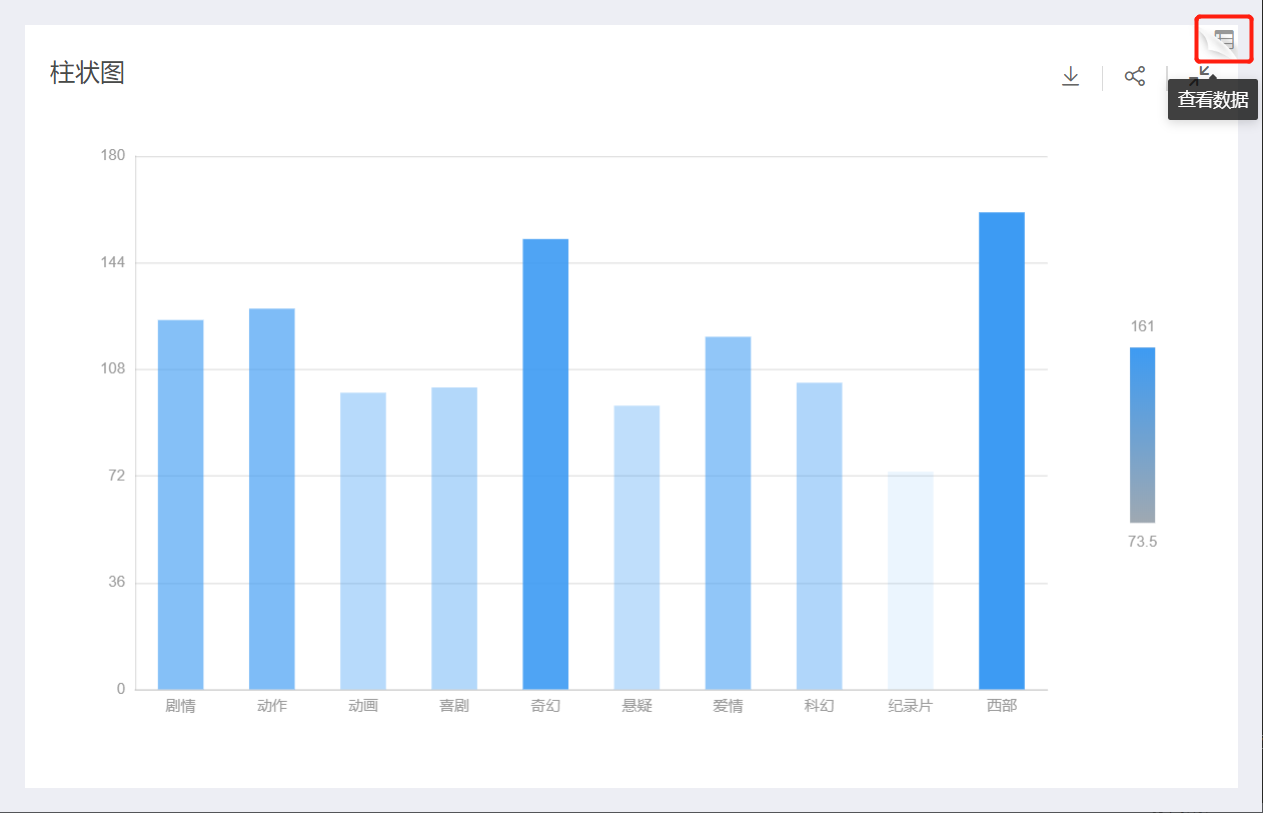
The second method: Click the View Data button on the top right corner to view detailed data of fields used in the current chart:
When Chart Click Interaction Behavior is set to no response, regardless of whether View Data or Drill-Down is checked when the app is published, clicking on the chart dimension group in the shared link will not respond, meaning the hexagonal menu does not pop up.
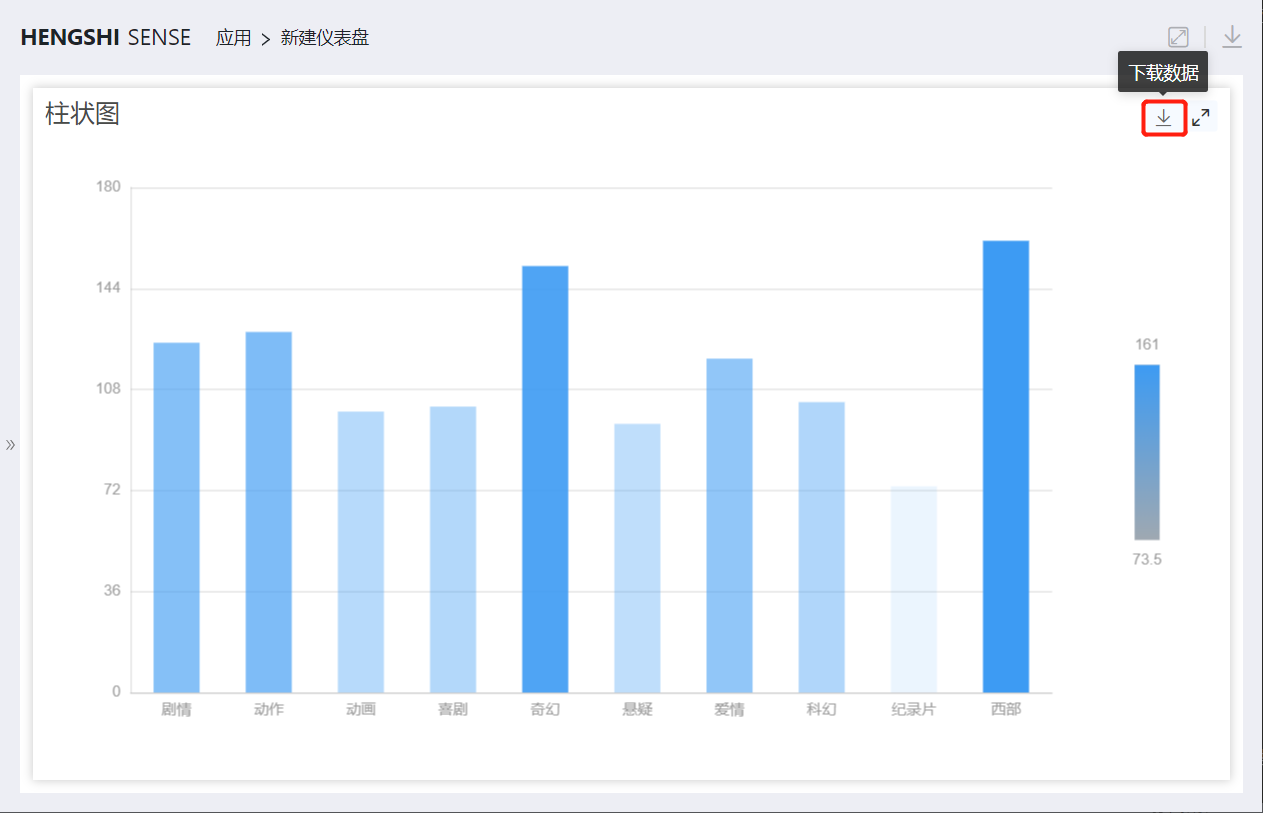
Download Data
When the interaction permission Download Data is checked, it is possible to download both aggregated and detailed data from the chart in the shared link:

Download data from the chart on the dashboard
In the dashboard, select a chart, click Download Data, and the aggregated data of the chart can be exported in Excel format:
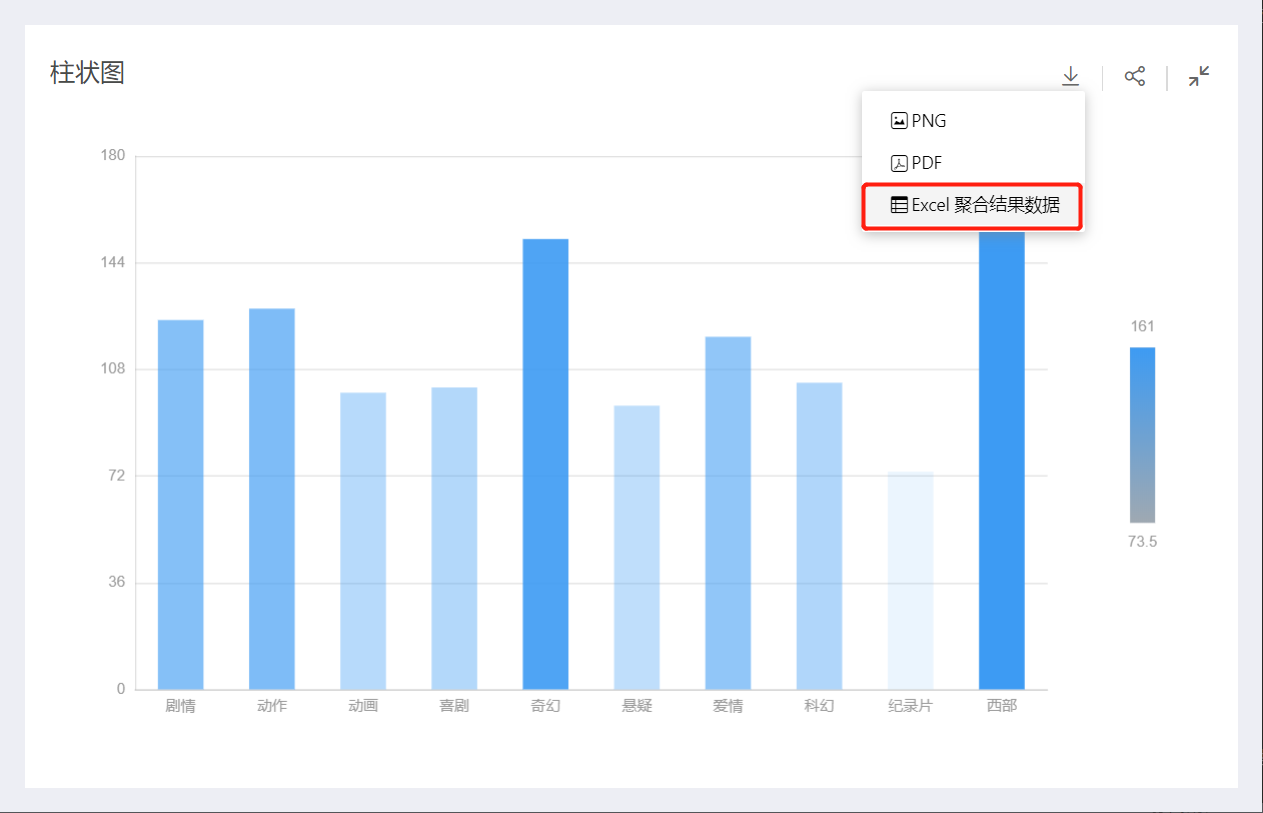
Export aggregated result data in Excel from the export dropdown in the chart
In the chart, click the export button to expand the dropdown, choose Excel Aggregated Result Data to export the aggregated result data of the chart:
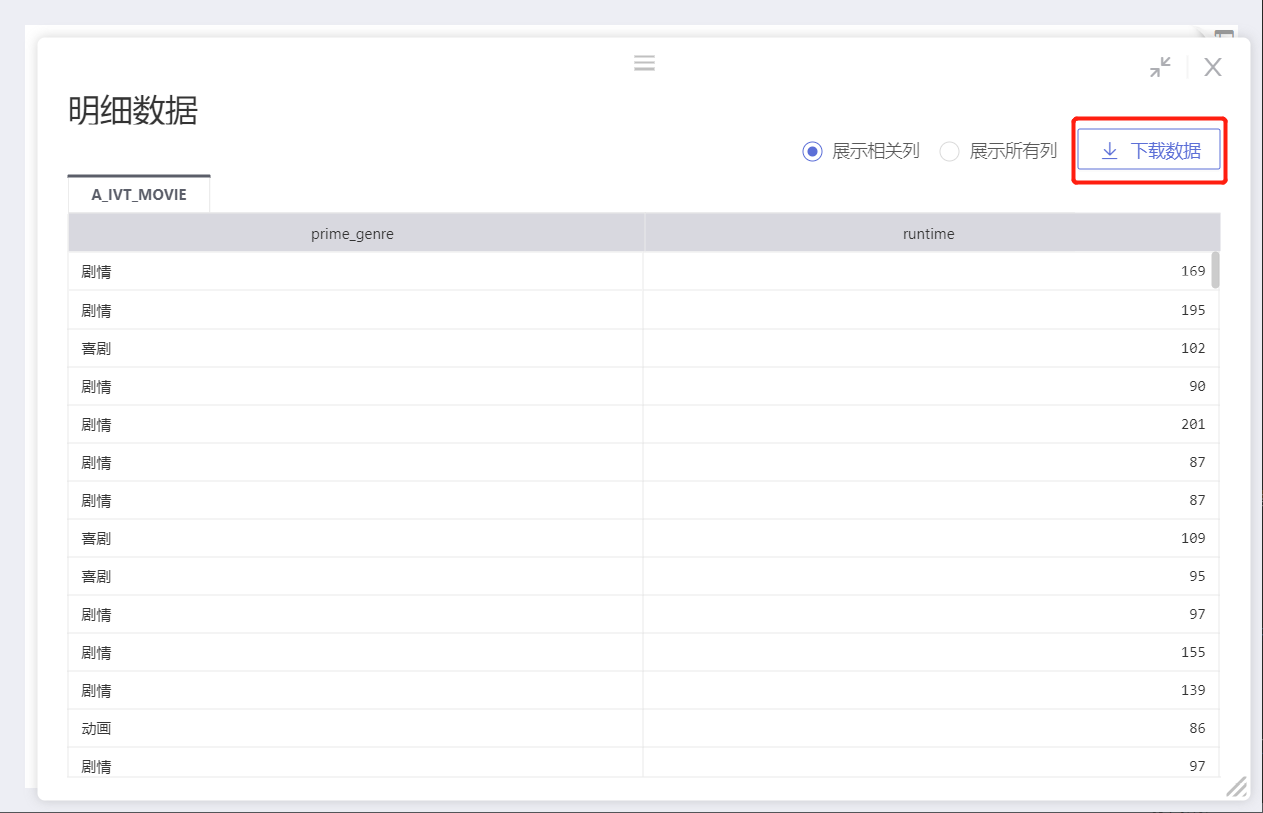
Download data from View Data in the top right corner
In the chart, click View Data in the top right corner, in the pop-up window select Download Data to download the detailed data of the chart:
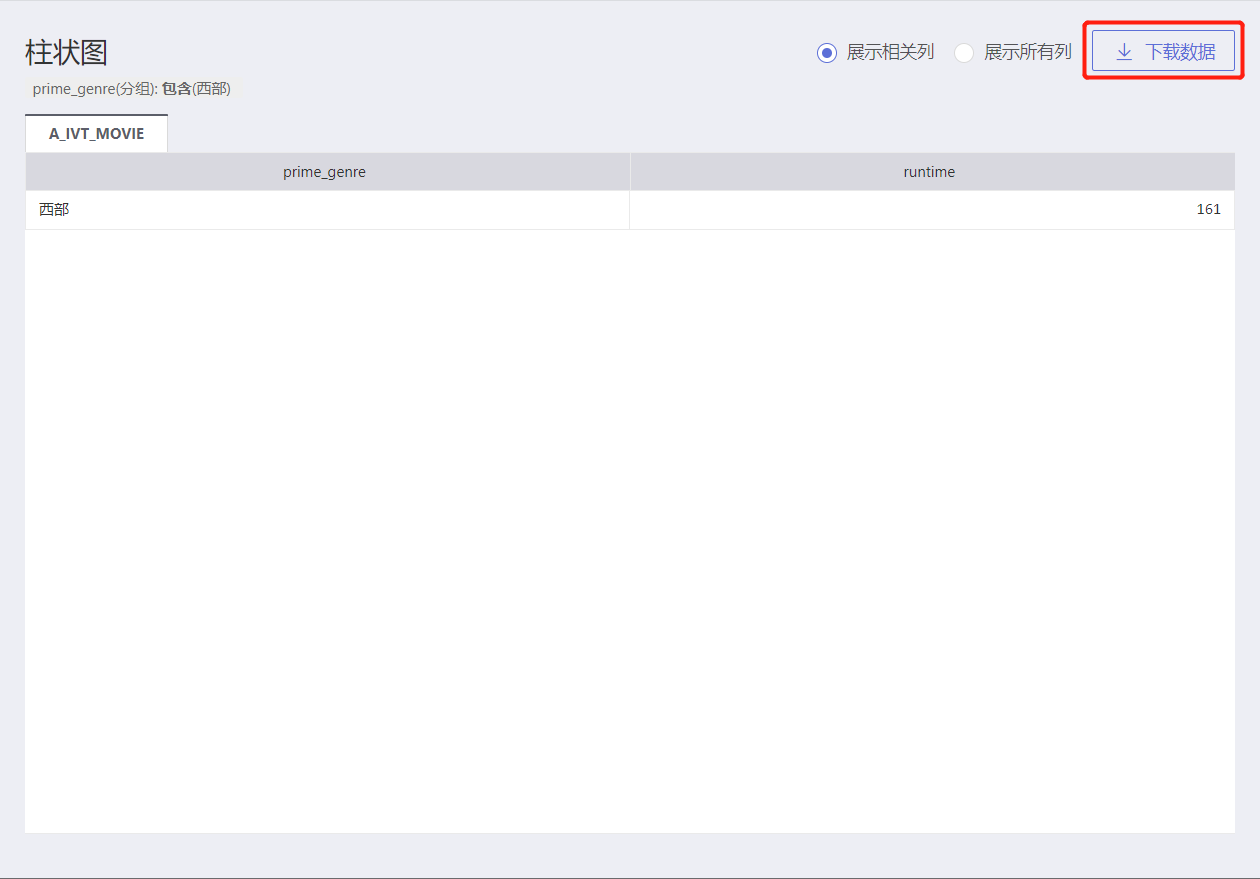
Download data from Details of the chart group view
In the chart, select a dimension group click Details, in the pop-up window select Download Data to download the detailed data of the selected group, such as when viewing data for the “Action” group:
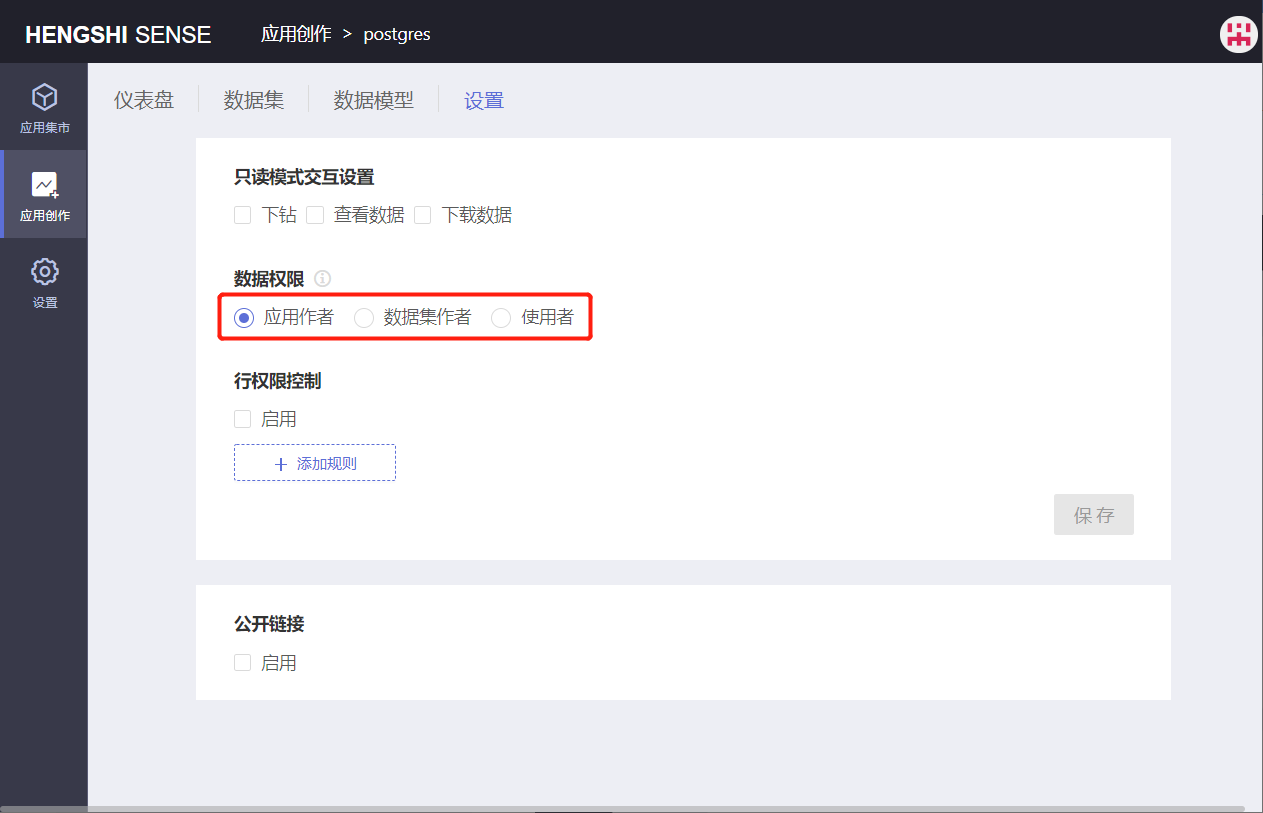
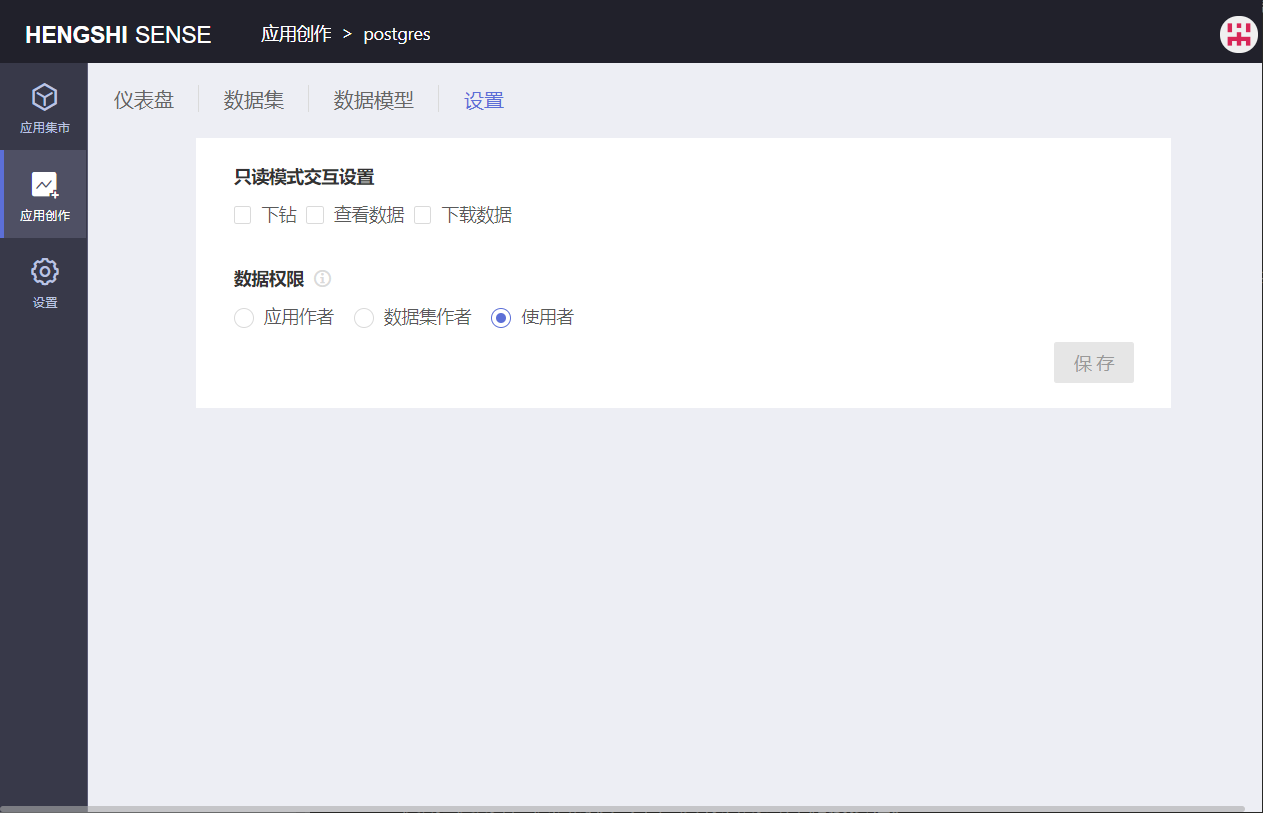
Data Permissions
Data permission settings for an application allow users to view and use data within a permitted scope, accomplishing data distribution. Administrators can decide what data users can see when they access the application.
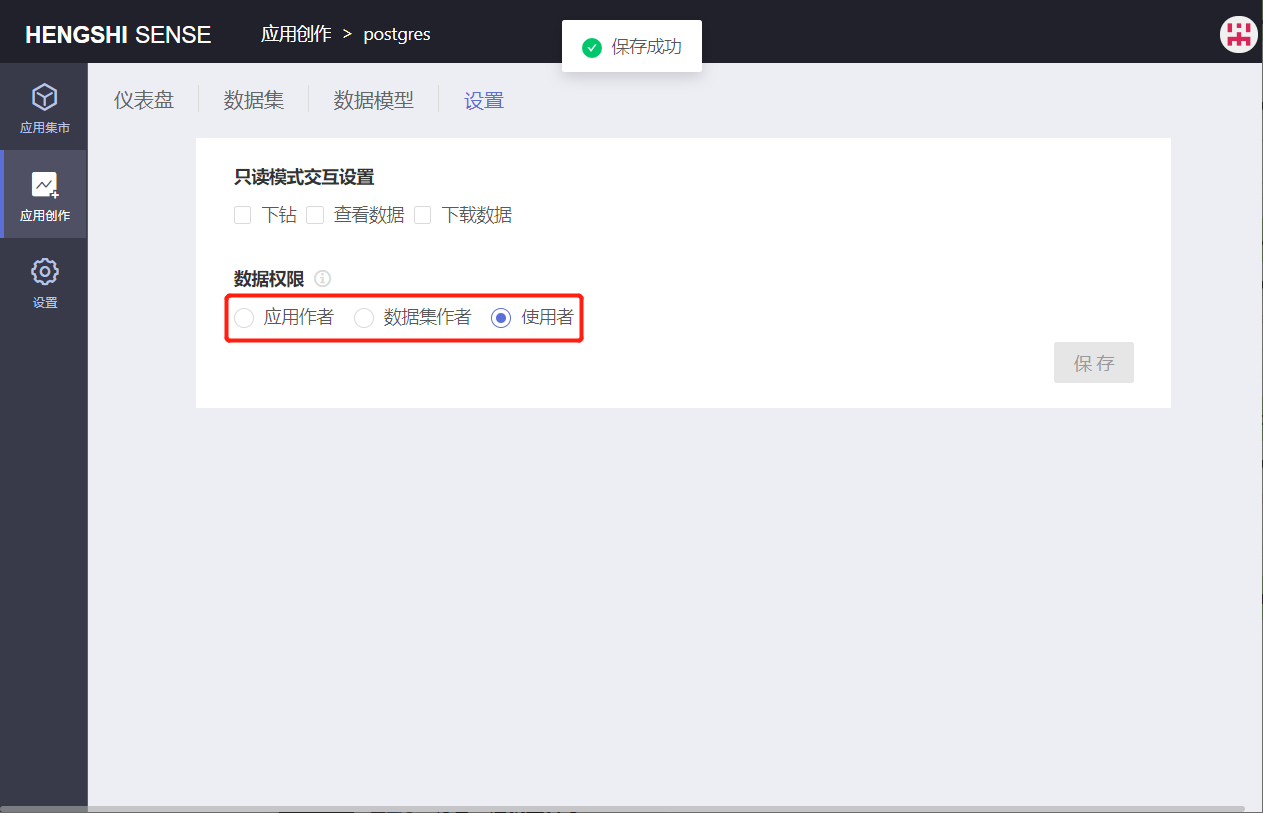
There are three types of data permissions: Application Author, Dataset Author, and Users. When an application is created, it defaults to Application Author permissions.
Application Author
The Application Author permission is mainly used in scenarios where analytical personnel have built an analysis model, and all users within the system who have the right to access the application can view the complete data in the application without the need for additional permission settings.
All accounts with permission to access the application will see data identical to what the application creator sees.
The administrator of the application can set row permissions for datasets to limit data, and for those that have row permissions set, the accounts with access to the application will see data based on the data seen by the application's owner, with added row permissions.

Dataset Author
The Dataset Author uses the creator’s data to publish the application and achieves reporting and sharing of operational metrics so related teams can detect and adjust strategic directions promptly.
Using Dataset Author permissions also represents sharing within the system. Publishers can set access control in the application to specify accessible accounts for the application and the data access scope for each account. This way, reading rights for the app can be authorized to specified users.
The administrator of the application can add rules to the dataset, whereas other non-administrator accounts with access to the application will see data based on the dataset owner’s data with added row permissions.

Users
Using user data, through the control of data access scope on data connections, enterprises can simply build a wealth of data applications integrated into different business systems with HengShi products.
Using user data is another form of internal sharing. The publisher only needs to specify accessible accounts for the application within the application, and the visible data scope for accounts in the application is controlled by connection permissions.
In Users mode, engine functionality is not available. Moreover, in this mode, row permissions are ineffective. Instead, the current account's connection permissions control data viewing.
If there are datasets imported from the engine in the application, switching to
Usersis not allowed.
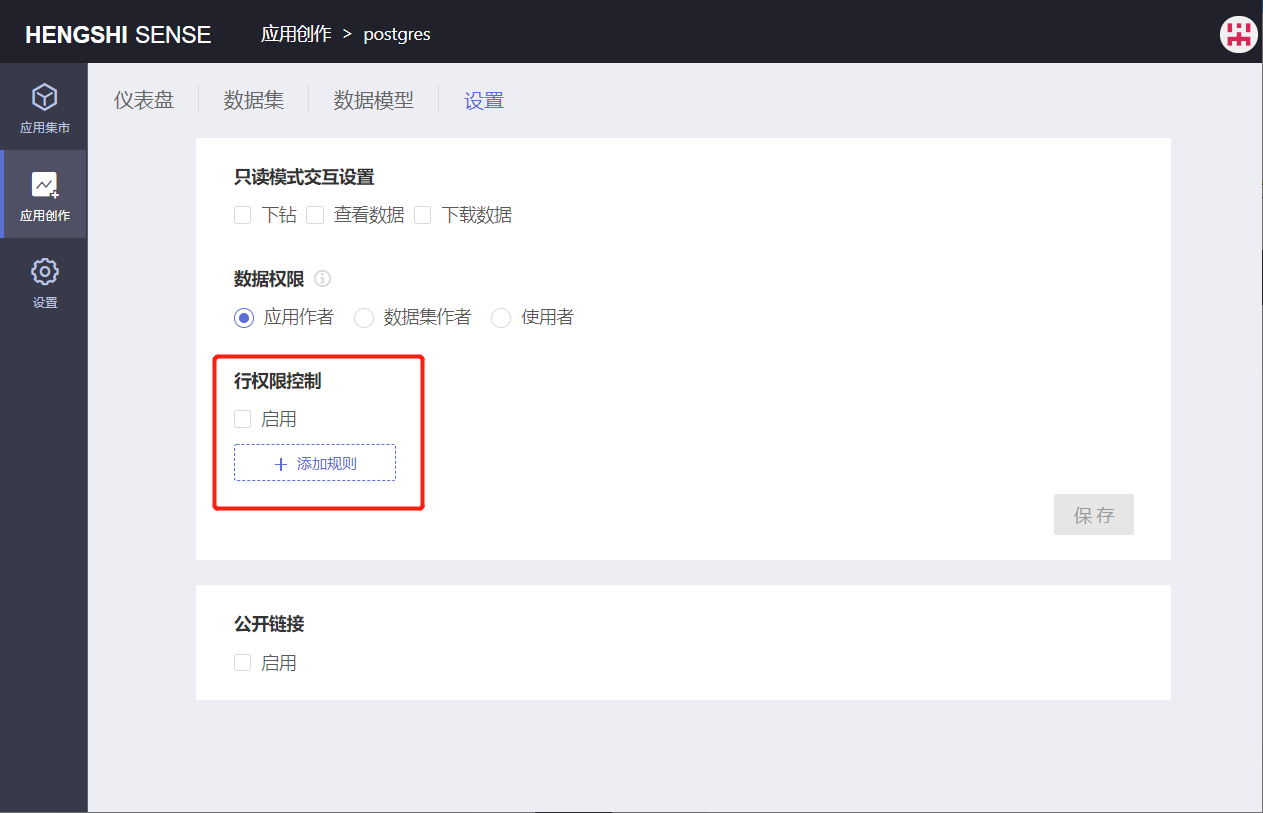
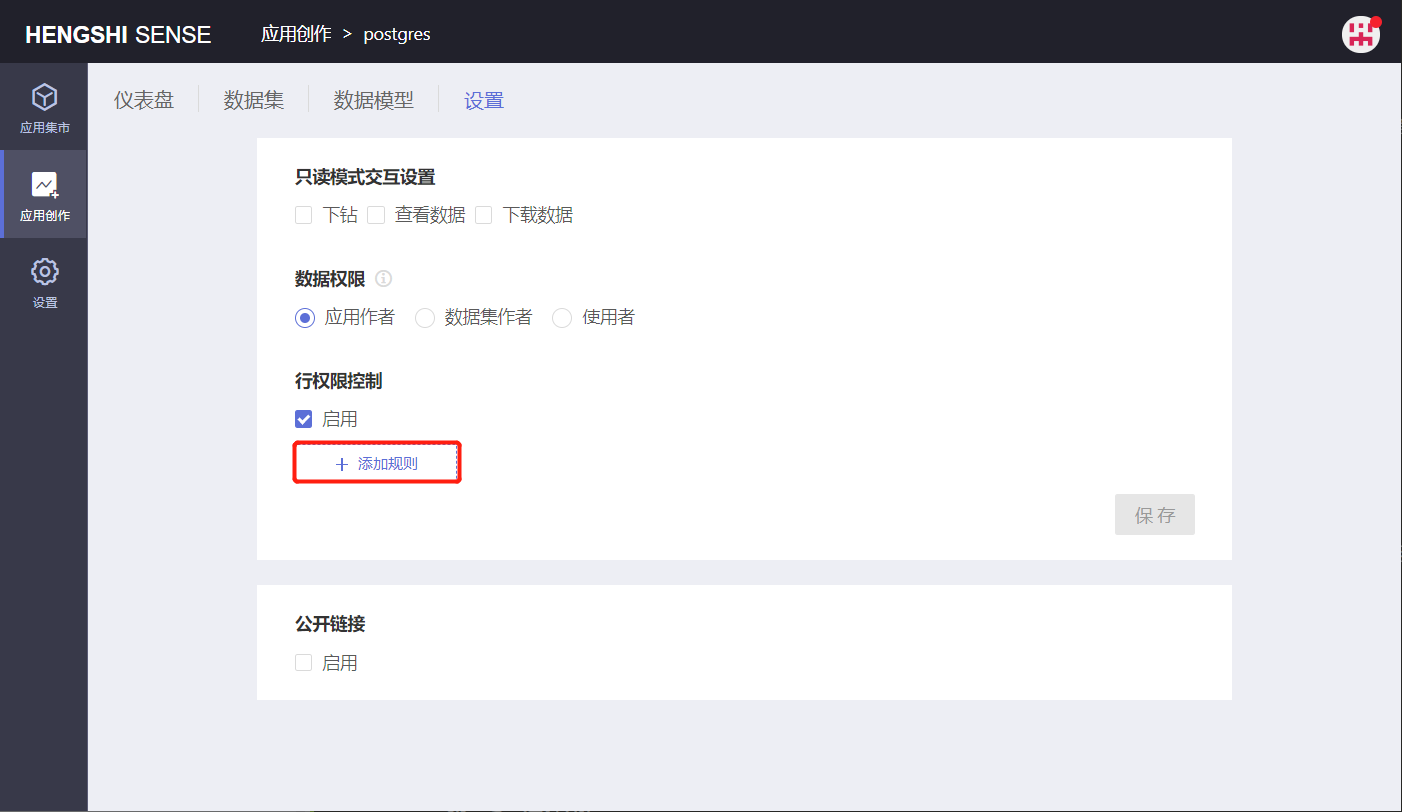
Row-Level Security
Row permissions can only be set and used in the Application Author and Dataset Author modes. All users with administrative permission for the application can view and modify all row permissions for that application.
Row permission buttons are not enabled in the Users mode.

Add Rule
After enabling row-level security control, click the button below to Add Rule:
Open the permission control settings page, where users can be chosen in Users, and row permissions can be added to datasets in Data.

Step 1: Select Users
Choose the users that this rule will apply to. Scroll through the vertical scrollbar, click the checkboxes at the end of the user column to select users, or use the search box to find the users you want to tick. Users can be classified and viewed using the dropdown in the upper right corner:

Step 2: Add Permission Control
Click on Data to jump to the row-level security page. Comparison values in row permissions can be parameter values, and in some cases, user attributes can also be selected.
Row permissions may choose user attributes for comparison conditions:
Text: All comparison methods except "is null"/"is not null" can choose user attributes for comparison values.
Numeric: "Equals"/"Does not equal" comparison methods can choose user attributes for comparison values.
Date: "Equals"/"Does not equal" comparison methods can choose user attributes for comparison values.
You can select multiple datasets and add row-level permission controls for each. Such row permissions can have "and" or "or" relationships. In the first dropdown, select the dataset to which you want to add row permissions; in the second dropdown, select a field and specify the comparison method and value.
- Parameter Value
Choose parameter value for the comparison method:
For example, adding row permissions for the users selected in
Usersfor two datasets:
Dataset A_IVT_MOVIE: Only the rows where the "prime_genre" field equals the "Parameter Value" "Animation" will be visible.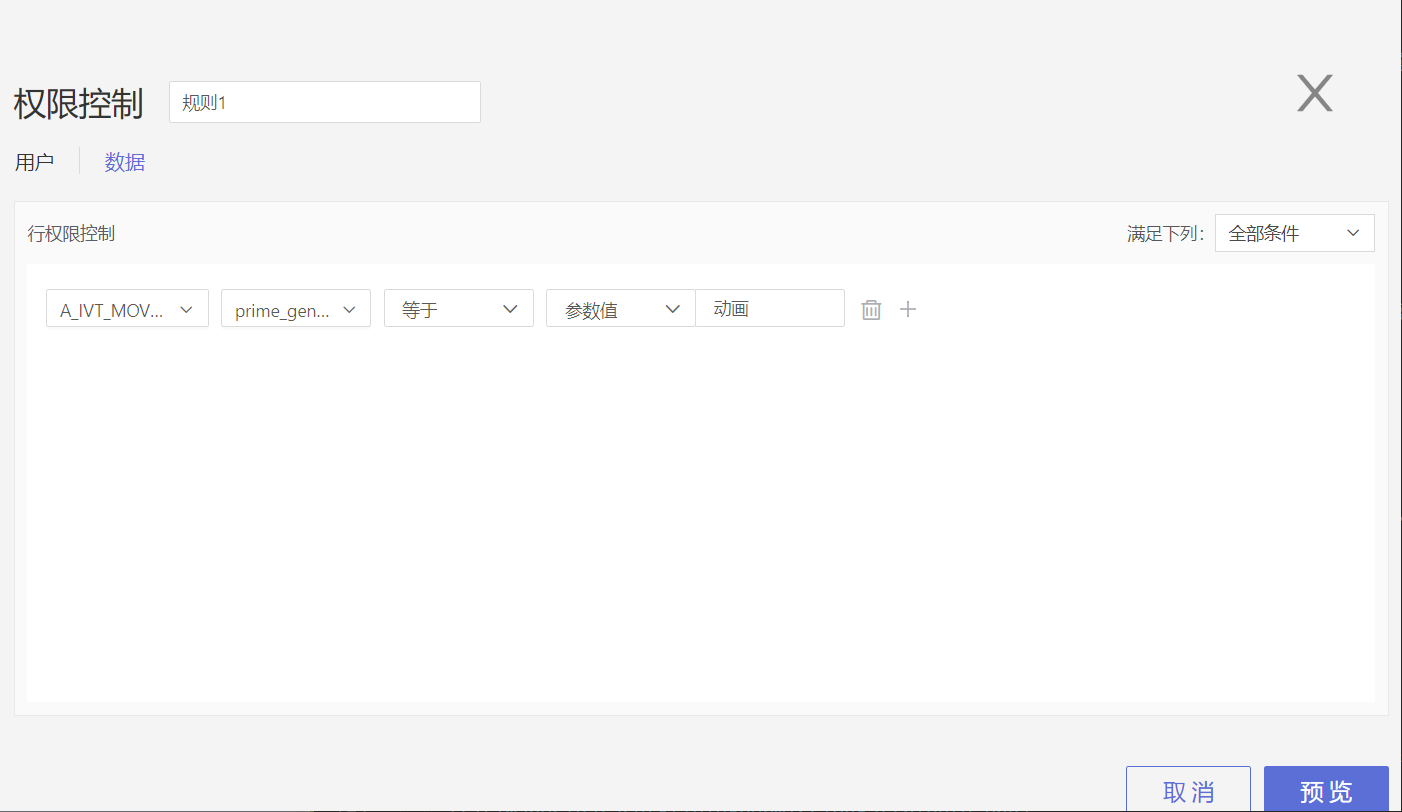
- User Attribute
Choose user attribute for the comparison method (user attribute settings can be found in User Management):
For example, adding row permissions for users selected under the "Regional Managers" rule:
Dataset
User Attribute: The field "city" equals "User Attribute"; all system-wide user attributes will be listed in the connected dropdown: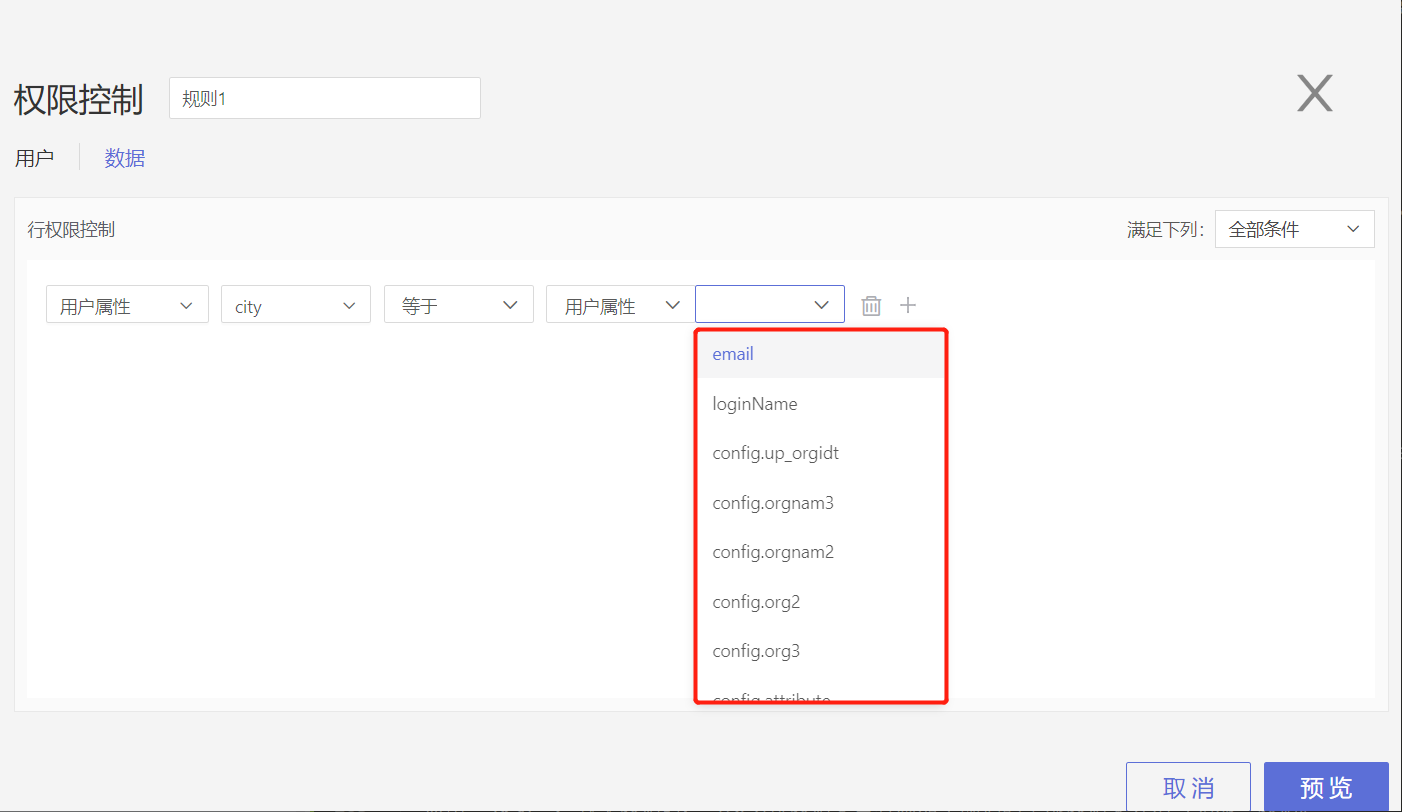
Selecting user attribute config.org3:
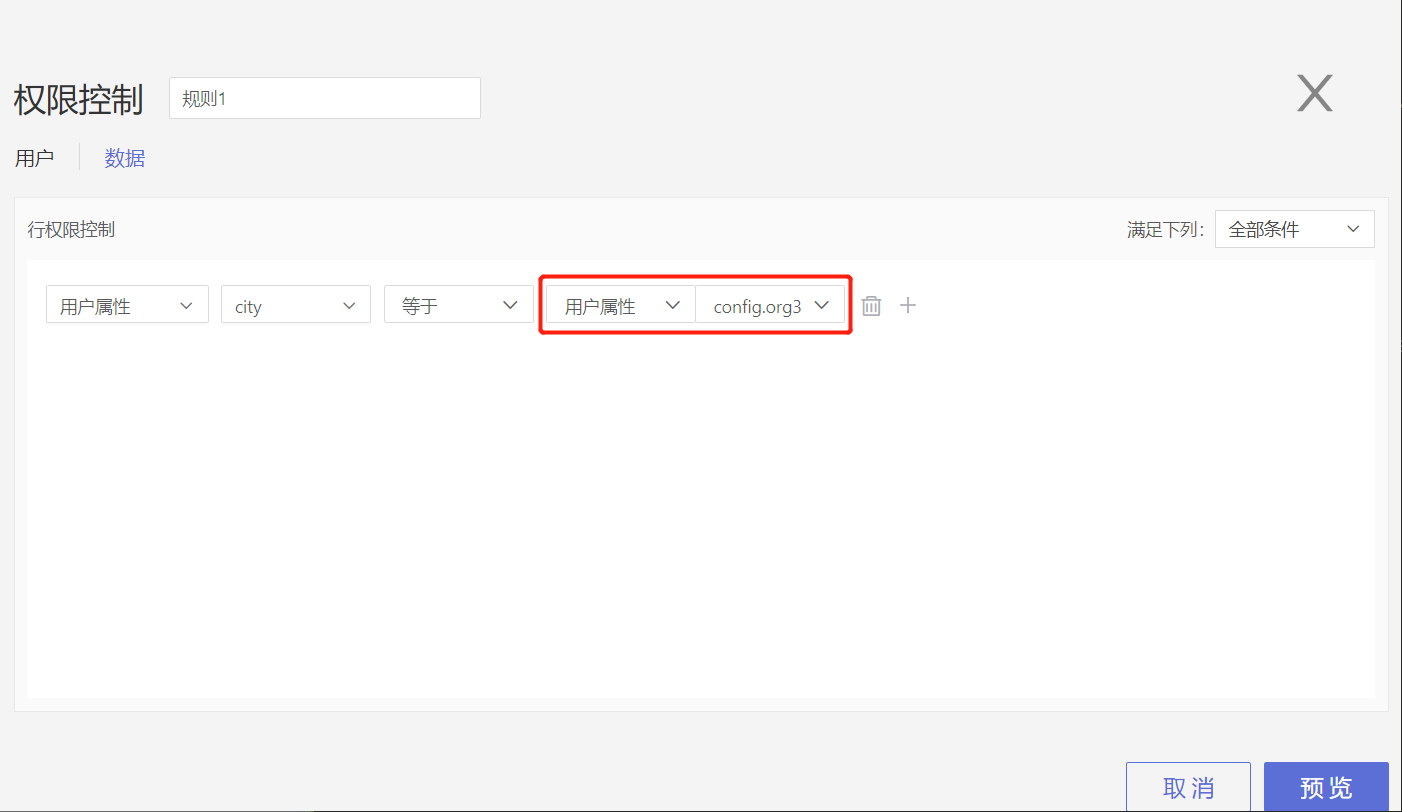
Users within this rule will only be able to access rows of data in charts that rely on the
User Attributedataset and have a "city" field value that equals the value of their user attribute config.org3 when visiting the application.Step 3: Preview
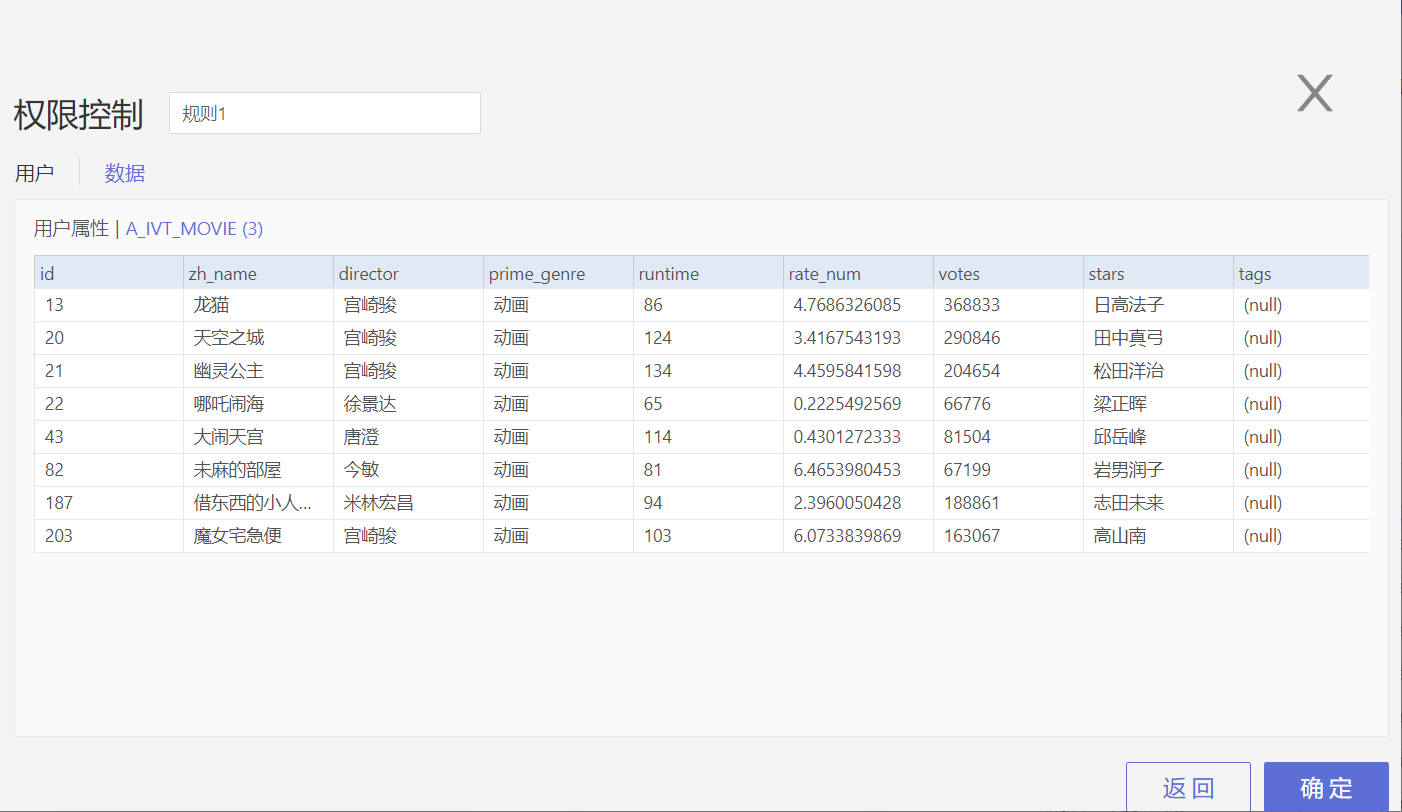
Click Preview to see which data is visible upon adding a rule, you can switch datasets to review all datasets that have rules added.
Step 4: Save
Click save, and the rule is added successfully, closing the window.
Edit Rule
Click the Edit button on the rule to view and edit the set permission rules.
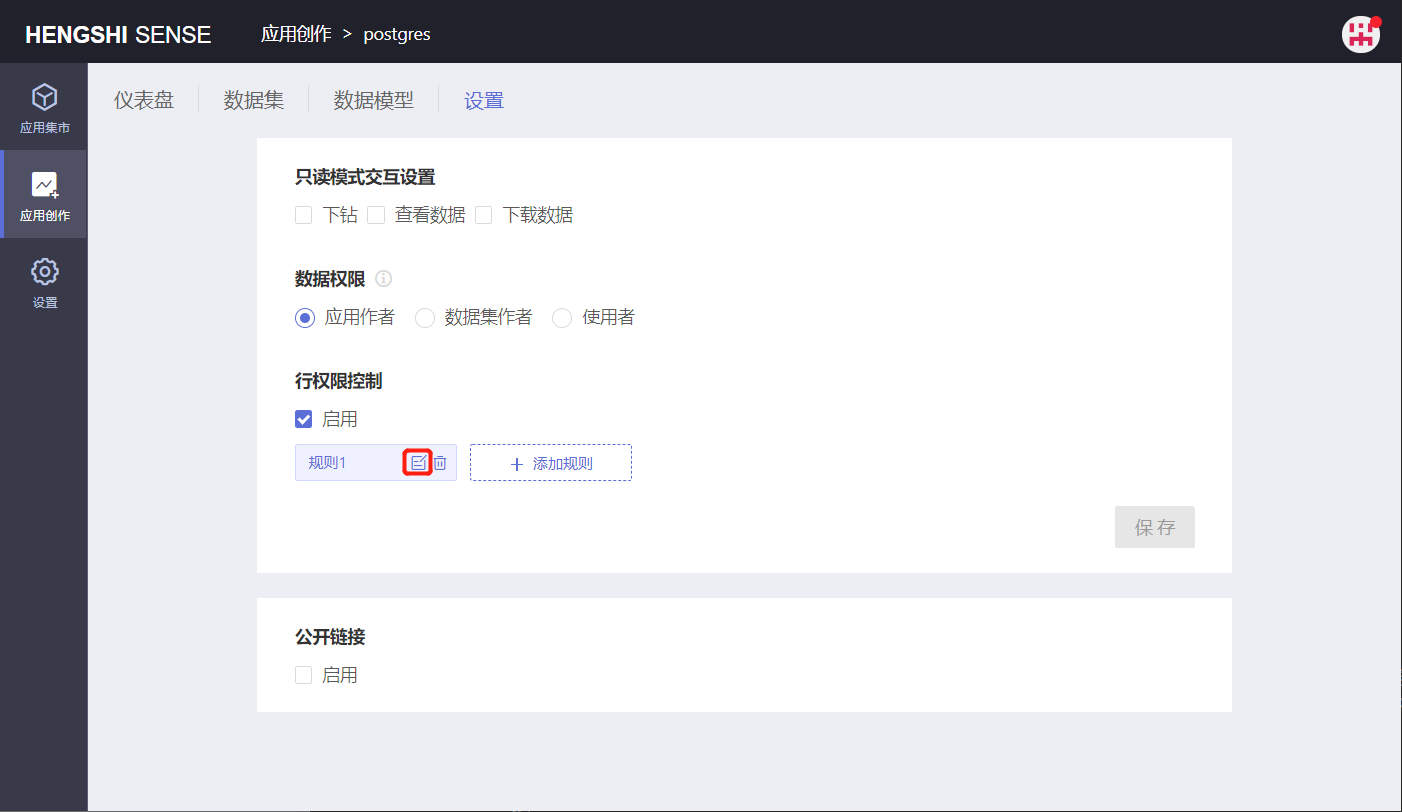
Delete Rule
Click the Delete button on the rule to delete the set permission rules.

The row permissions set for an account are a preview effect and do not limit data visibility; hence, row permissions set for a dataset do not propagate downstream. For example:
dataset C = A join B, and row permissions are set separately on dataset A and B: A where a = $user.a and B where b= $user.b,
then the tableSql for C will be A join B, not A where a = user.a join B where b= $user.b
If users need to control permissions, they must set row permissions on C separately.
Union of Rules
For the same user and the same dataset, if multiple rules are created, the resulting effective permission will be the union of the rules.
For instance, if Rule 1 authorizes User A to access data from the "Beijing City" area, and Rule 2 authorizes User A to access data from the "Shanghai City" area, ultimately User A will have access to both "Beijing City" and "Shanghai City" data.
Public Link
When using either Application Author or Dataset Author permissions, it is possible to generate a shareable link (not possible with Users), which system users or users not logged in can view through the shared link.
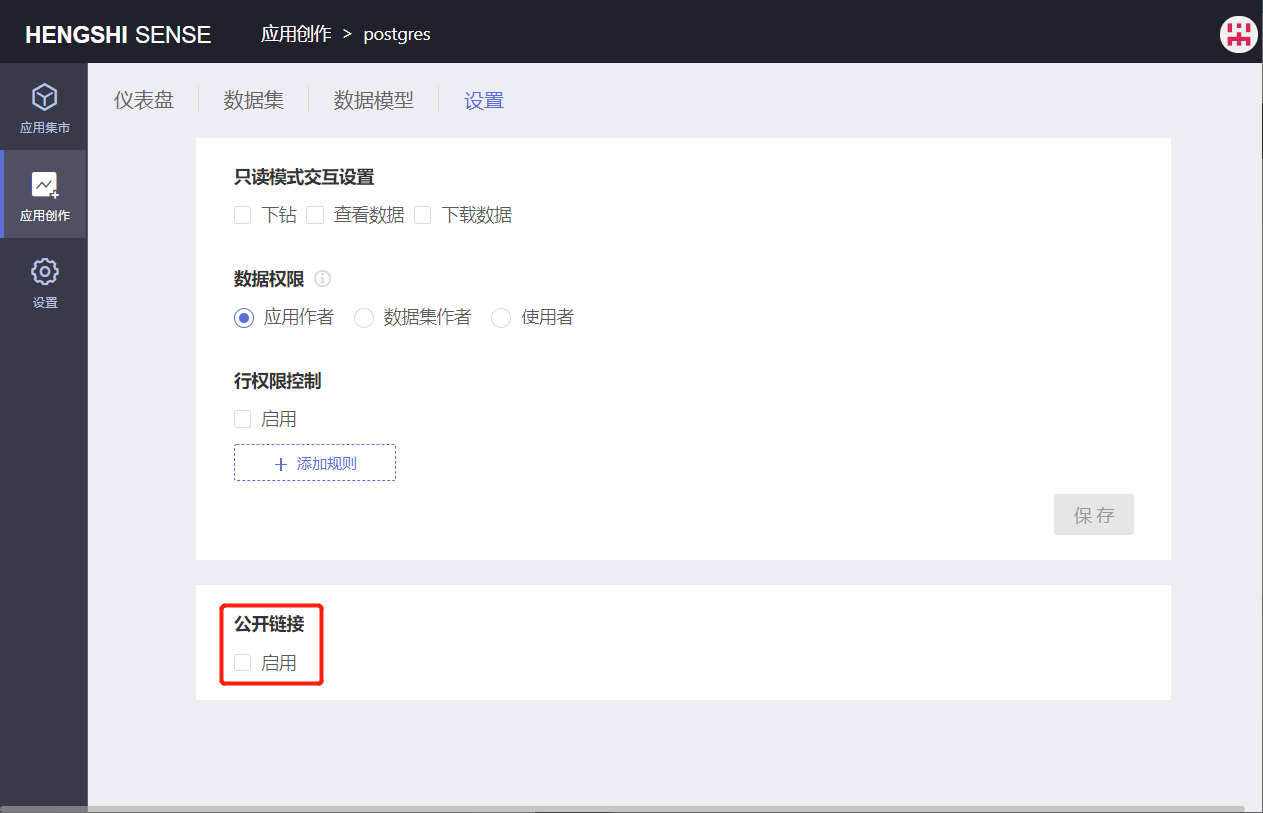
There is no public link button enabled in the Users mode.
Public links are not subject to the Row-Level Security Control in Application Settings. That means, regardless of whether the user is logged in, viewing charts through the public link will display data filtered by Dataset Author or Application Author data connection permissions, with row permissions not being effective.
HMAC Signature Protection
Many companies are very sensitive about their data and do not want it to be viewed randomly. Therefore, to ensure the security of the URL filters shared, we have added an HMAC hash check function in Application Settings -> Public Link.
The specific steps are as follows:
- System administrators enable HMAC Signature Protection in
Settings->Security Policy->Data Privacy Protection.
Users can see and copy the key only if HMAC Signature Protection is enabled in Settings -> Security Policy -> Data Privacy Protection.
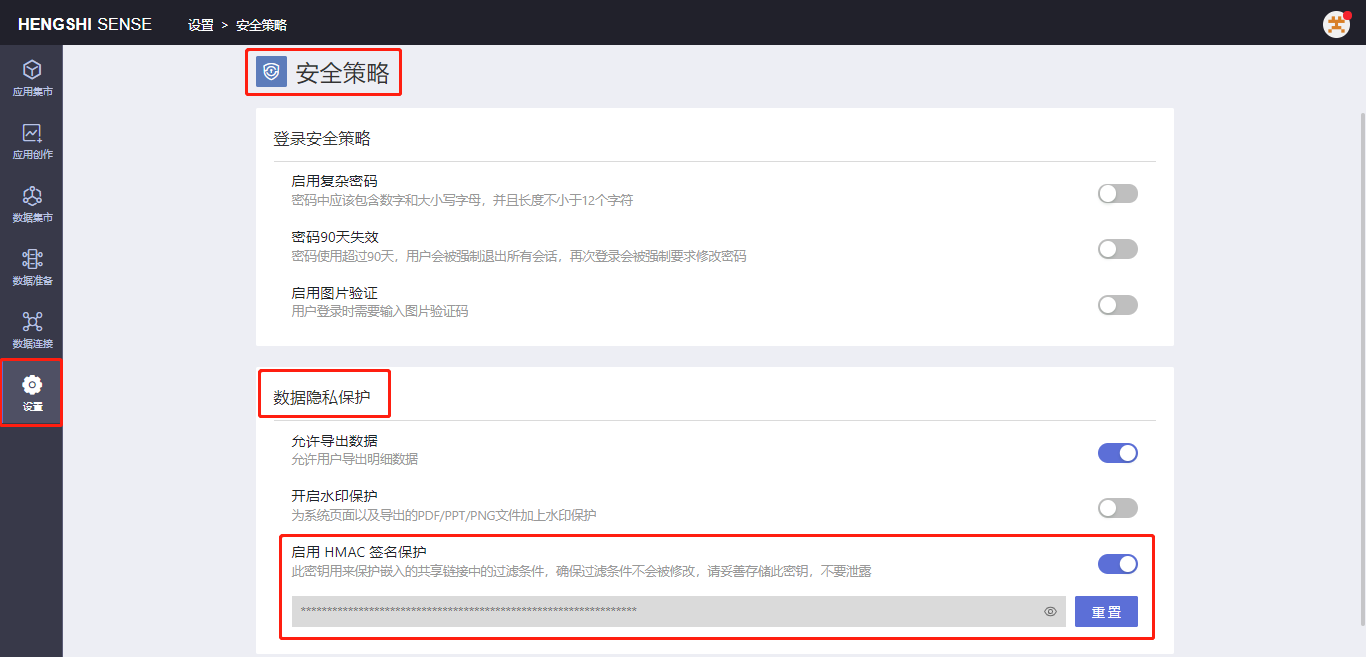
- Users in
Application Settings->Public Linkenable both Public Link and HMAC Signature Protection.
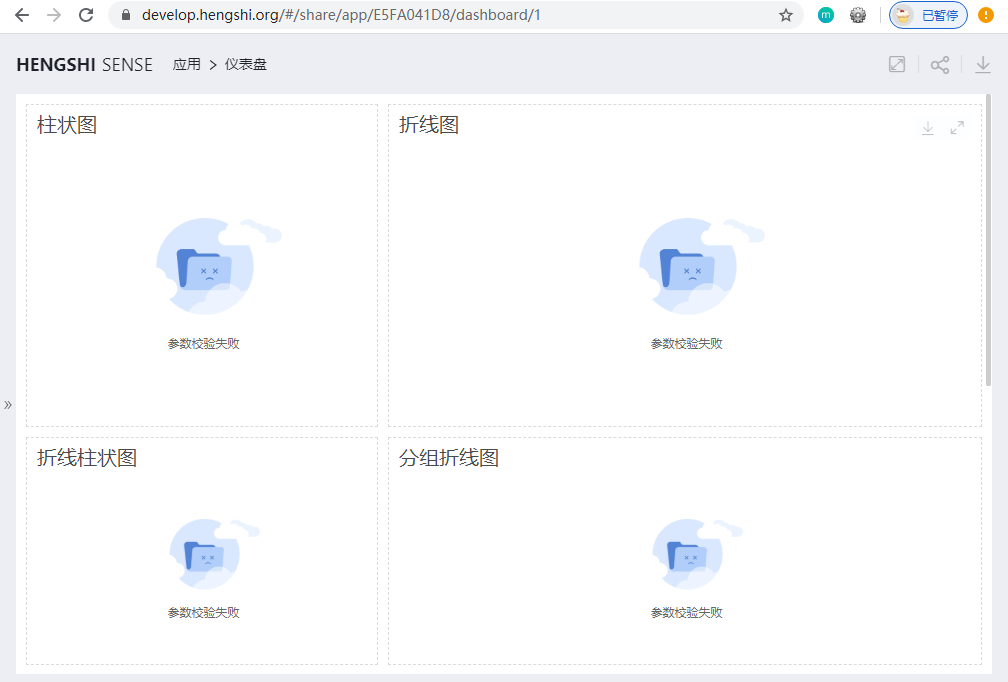
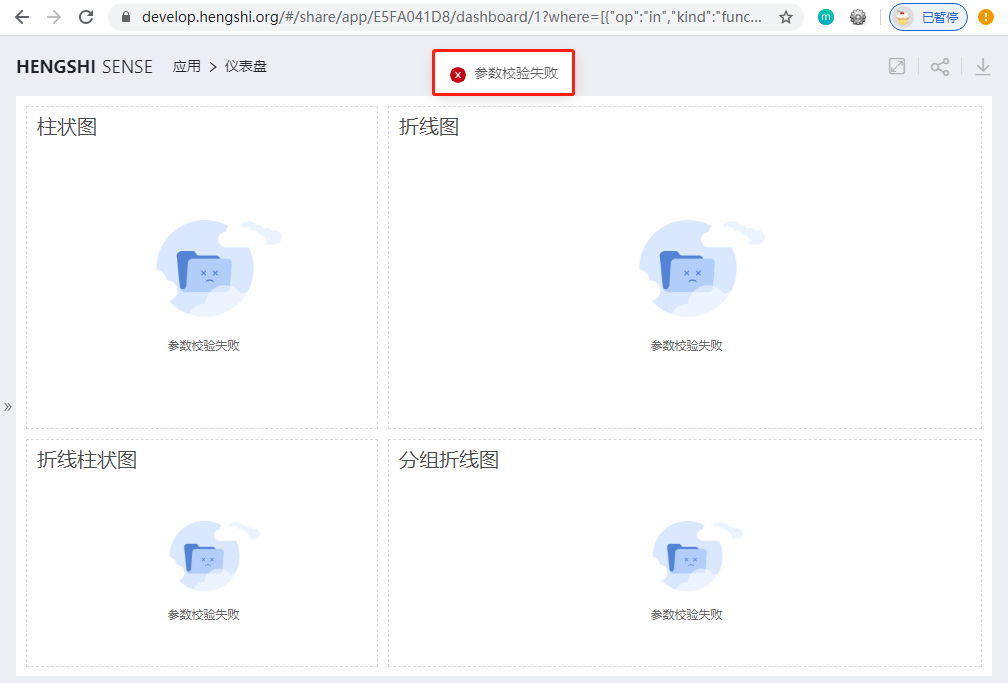
- Non-logged-in users will receive a prompt "Parameter check failed" when accessing the public link.
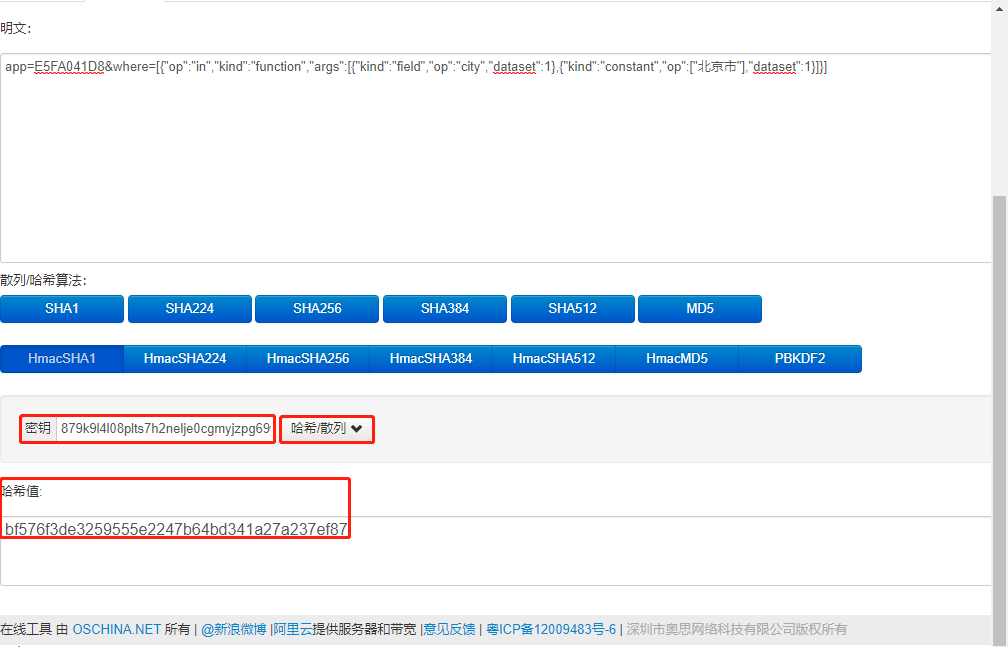
- When a user visits a public link, they must implement their logic to compute the signature. Currently, we only support generating a valid hash by using hmacKey + appHash + queryParameter (which can be empty).
Users visit the website https://tool.oschina.net/encrypt?type=2 and select “Hash/Hash”.
Enter the string to be encrypted: app={appHash}&having={having}&where={where}—where or having can be empty and are not included in the encryption process.
For example: app=E5FA041D8&where=[{"op":"in","kind":"function","args":[{"kind":"field","op":"city","dataset":1},{"kind":"constant","op":["Beijing"],"dataset":1}]}])
Choose HmacSHA1, fill in the 64-bit hmacKey (stored in
Settings->Security Policy->Data Privacy Protectionunder HMAC Signature Protection), e.g., 879k9l4l08plts7h2nelje0cgmyjzpg69yim2wr8lvkr93o80t27hdpz2rz5oljg.Click the “Hash/Hash” button to obtain the hash, e.g., bf576f3de3259555e2247b64bd341a27a237ef87.

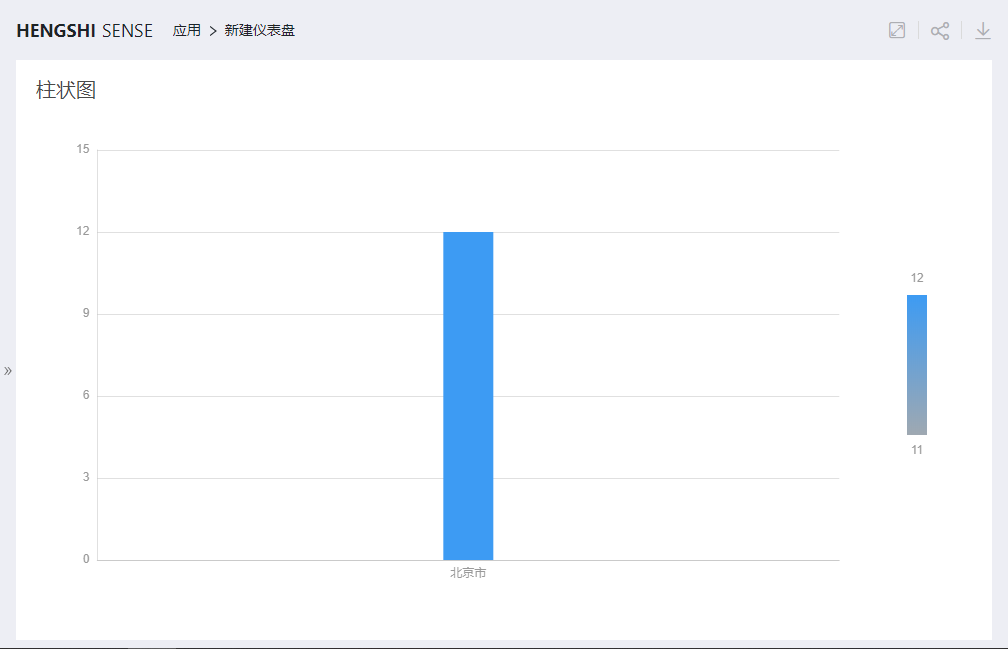
- The format for embedding the shared URL is: shareUrl?where={where}&having={having}&signature={signature}.
Example:
- Non-logged-in users access the link (with HMAC hash check enabled) with the signature parameter added. If "Beijing" is changed to "Shanghai," no data will be visible and the system will prompt "Parameter check failed":
https://develop.hengshi.org/#/share/app/E5FA041D8/dashboard/1?where=[{"op":"in","kind":"function","args":[{"kind":"field","op":"city","dataset":1},{"kind":"constant","op":["Beijing"],"dataset":1}]}]&signature=bf576f3de3259555e2247b64bd341a27a237ef87
System administrators can reset the HMAC key in the system settings, and users must also update the key (64-bit hmacKey) used to generate the "hash value" in their logic.
Relationship Among Connection Permissions, Data Permissions, and Row-Level Security
Connection permission control is the first line of defense, controlling who can access the data connection and what data is accessible when the data connection is accessed.
Data permissions control what data a user should see when accessing the application's datasets: the Application Author's, the Dataset Author's, or the user's own data.
Row-level security is about further controlling the distribution of dataset data after determining the data permission mode of the application, i.e., the data of the dataset.
Email Push
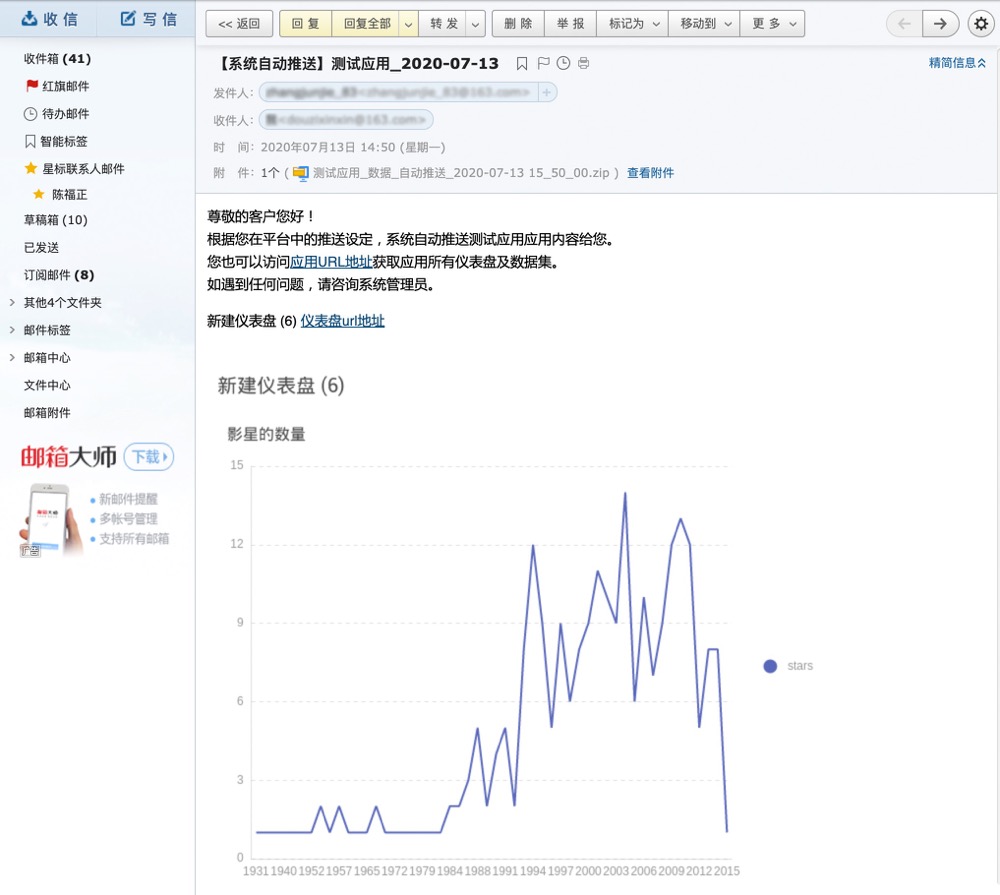
You can immediately push or schedule push dashboard applications to internal and external users of the organization, so target users can promptly view the business indicators they need as a basis for conducting business and timely respond and adjust business directions.
Email Push Settings
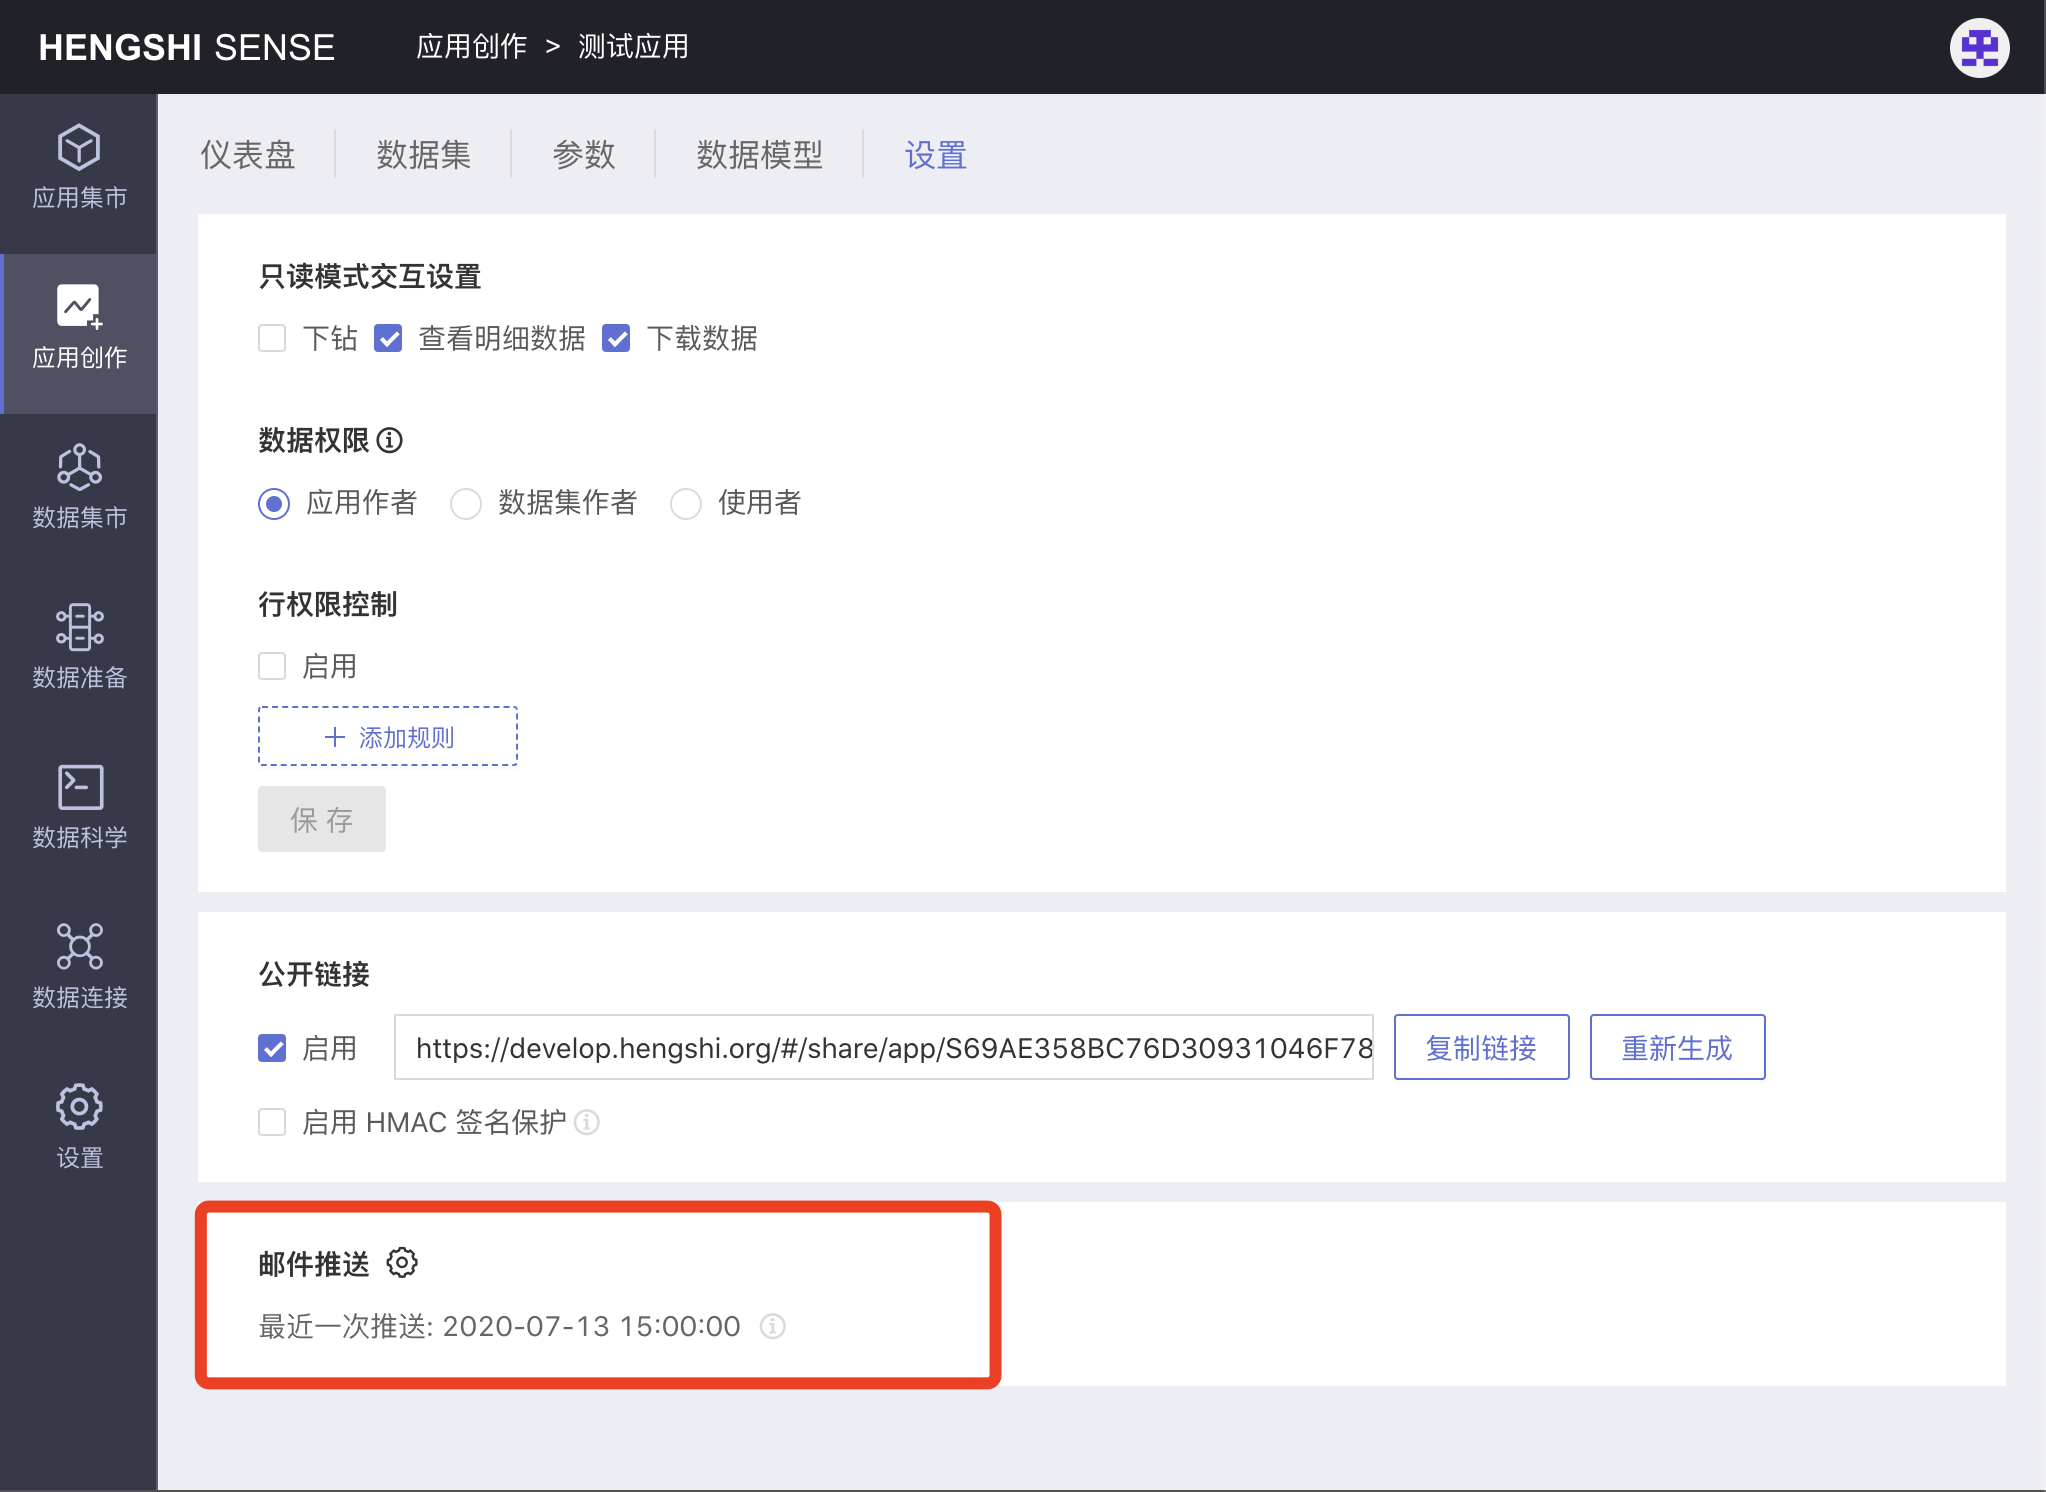
Click Application -> Settings -> Email Push -> ⚙ Icon to enter the email push settings page. Fill in the necessary recipient information, determine the content and form of the push to complete the email push settings.

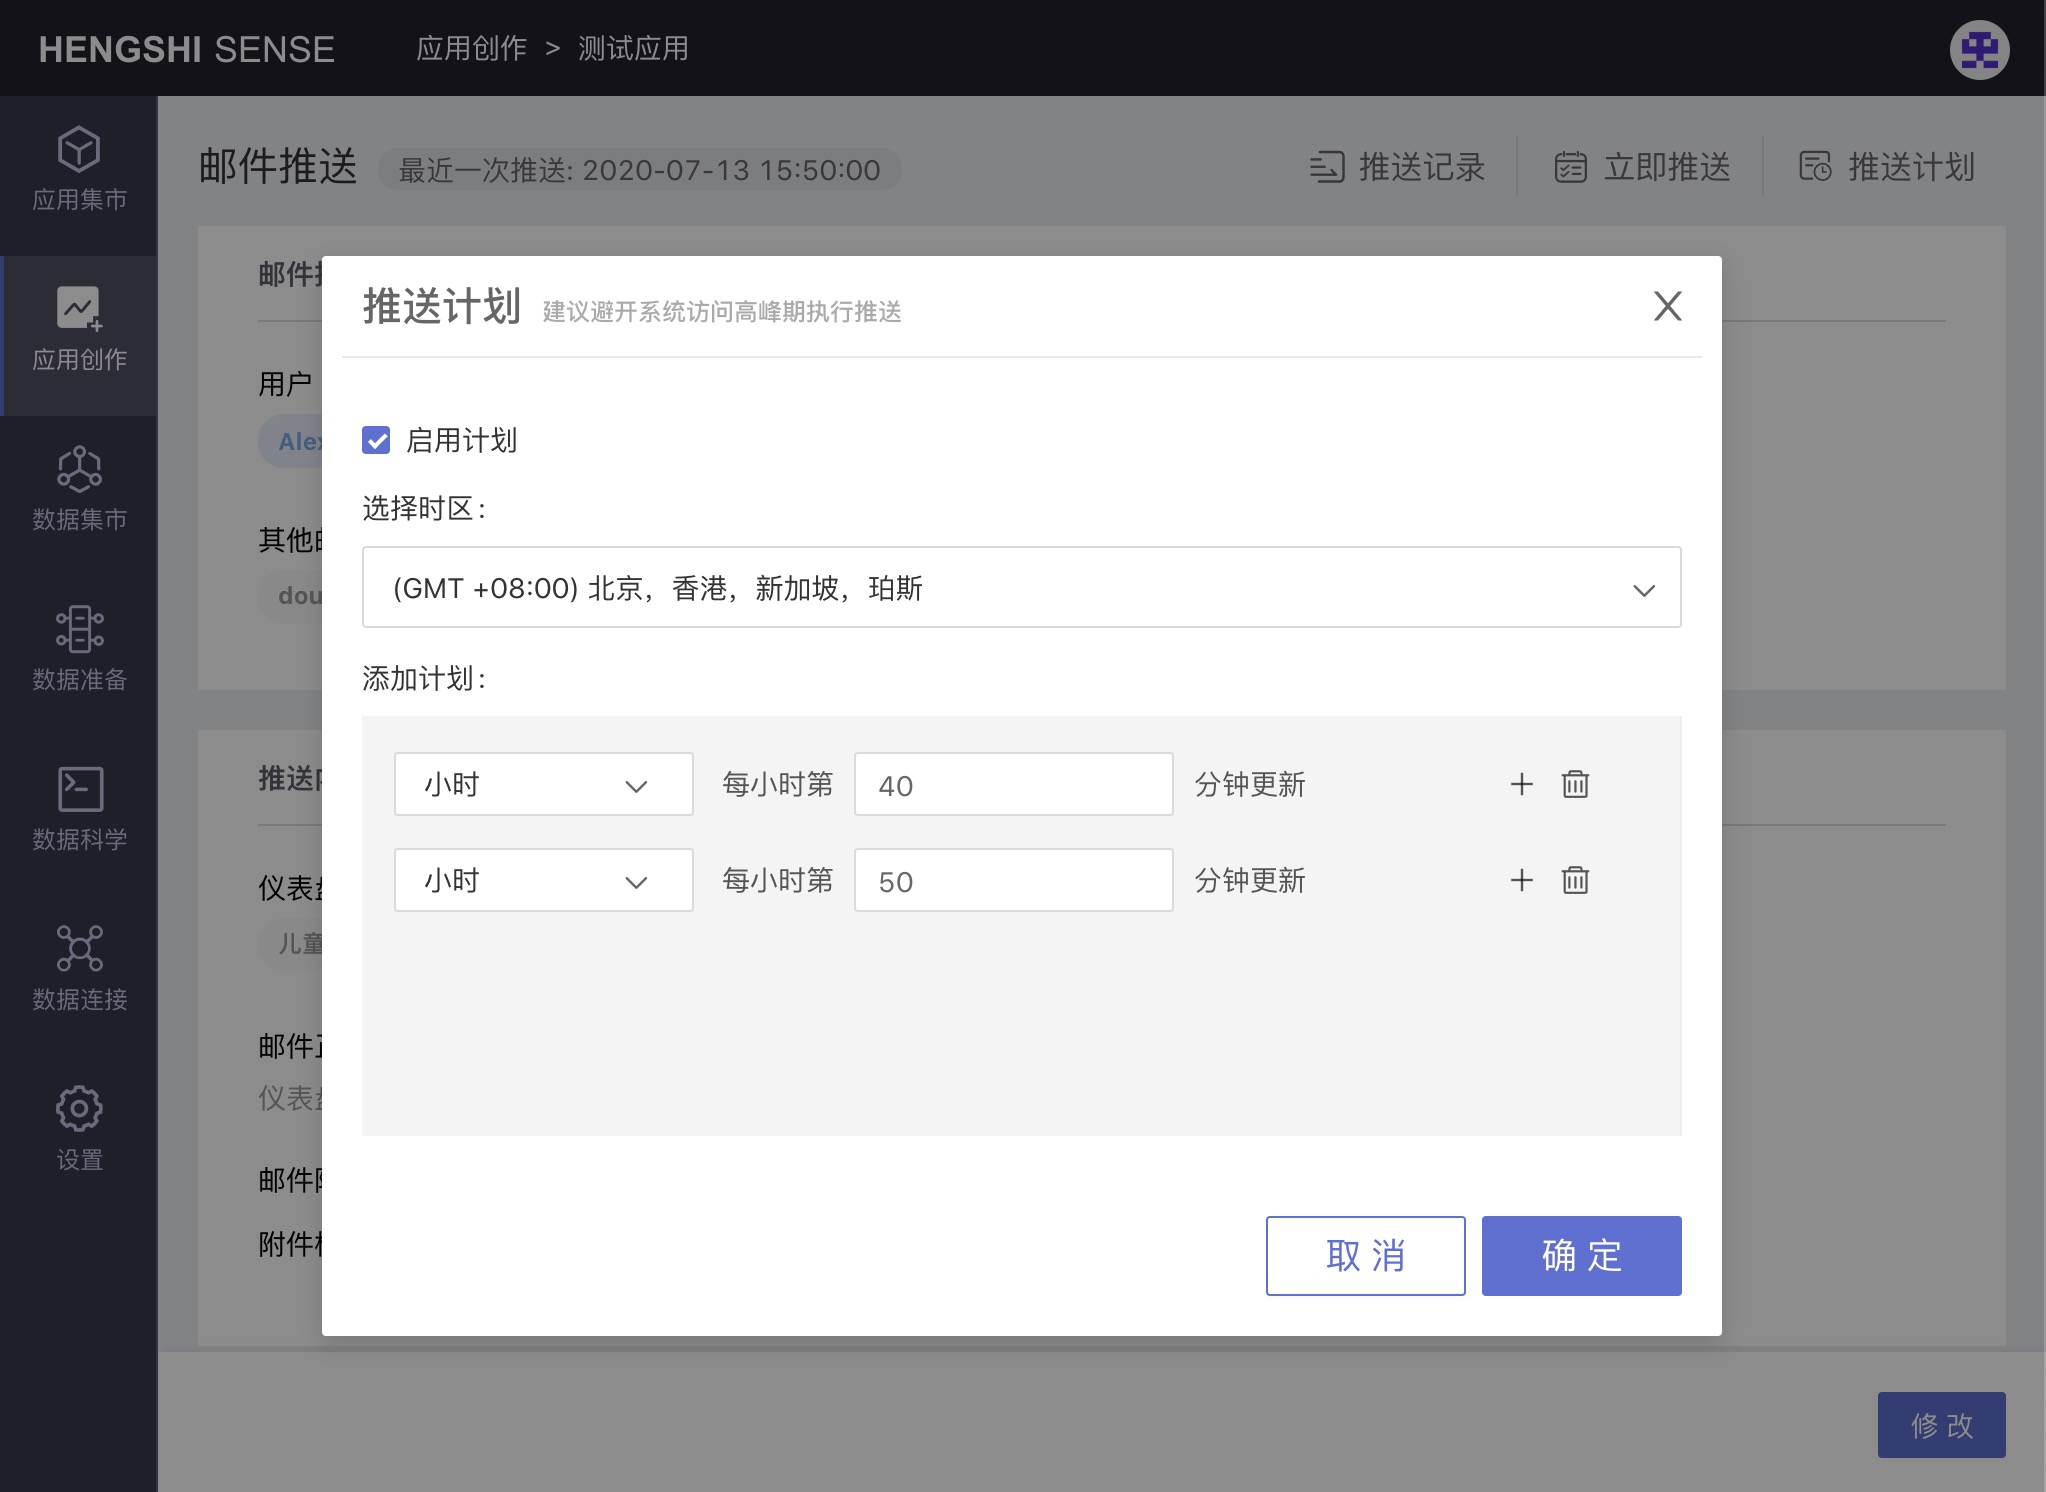
Email Push Schedule
After email push settings are completed, the page will refresh to a details view. You can select "Push Schedule" in the upper right corner of the details page to set a schedule for email push. The email will then be delivered at the scheduled time. You can also click "Push Now" to push the application immediately to the target audience.
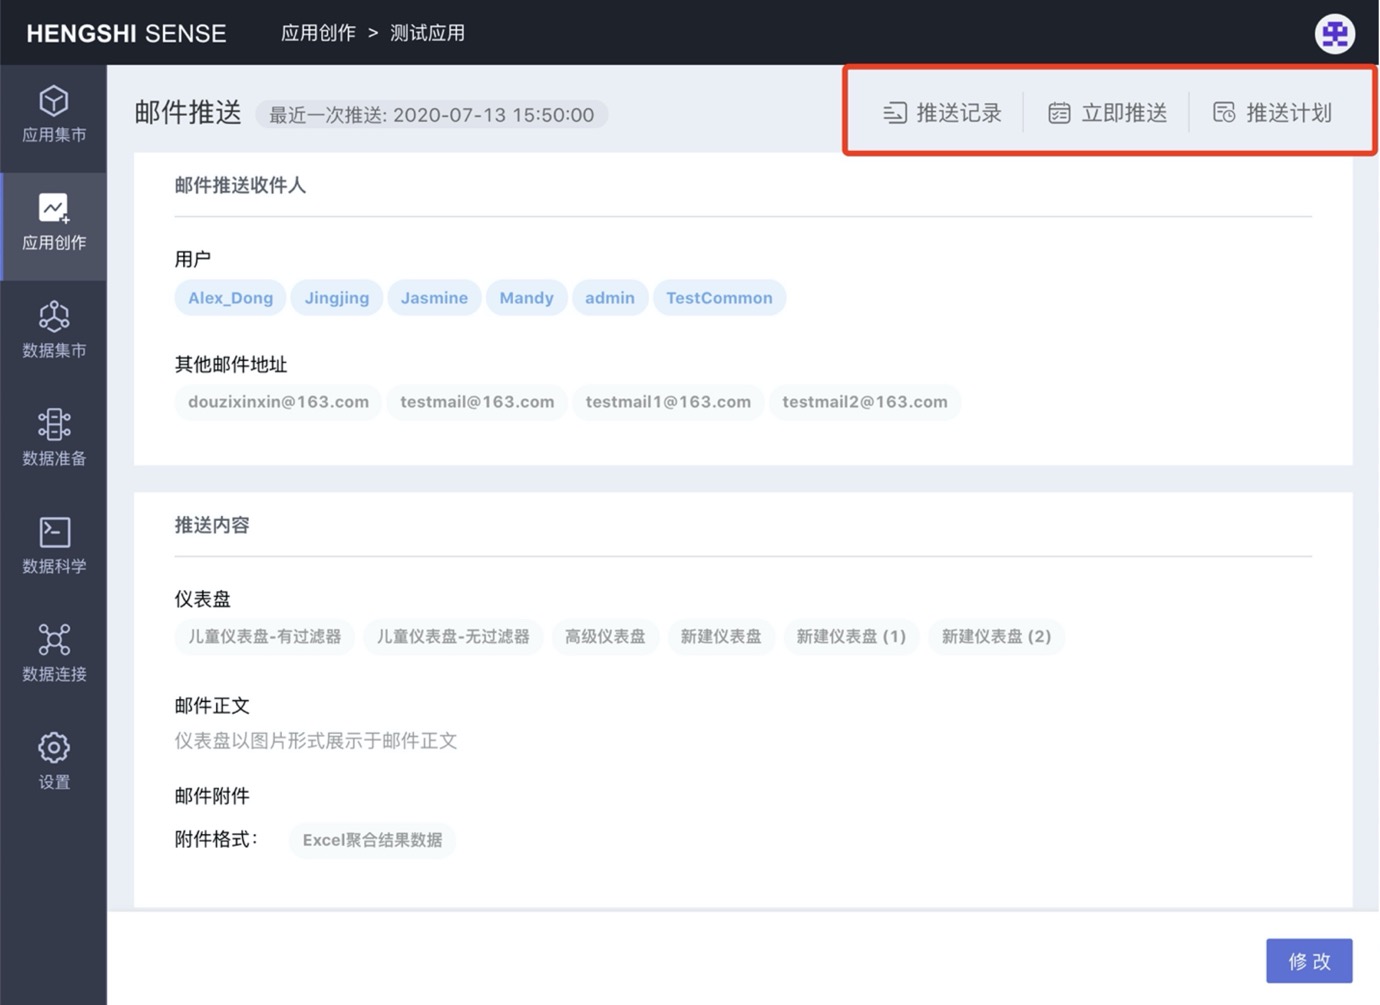
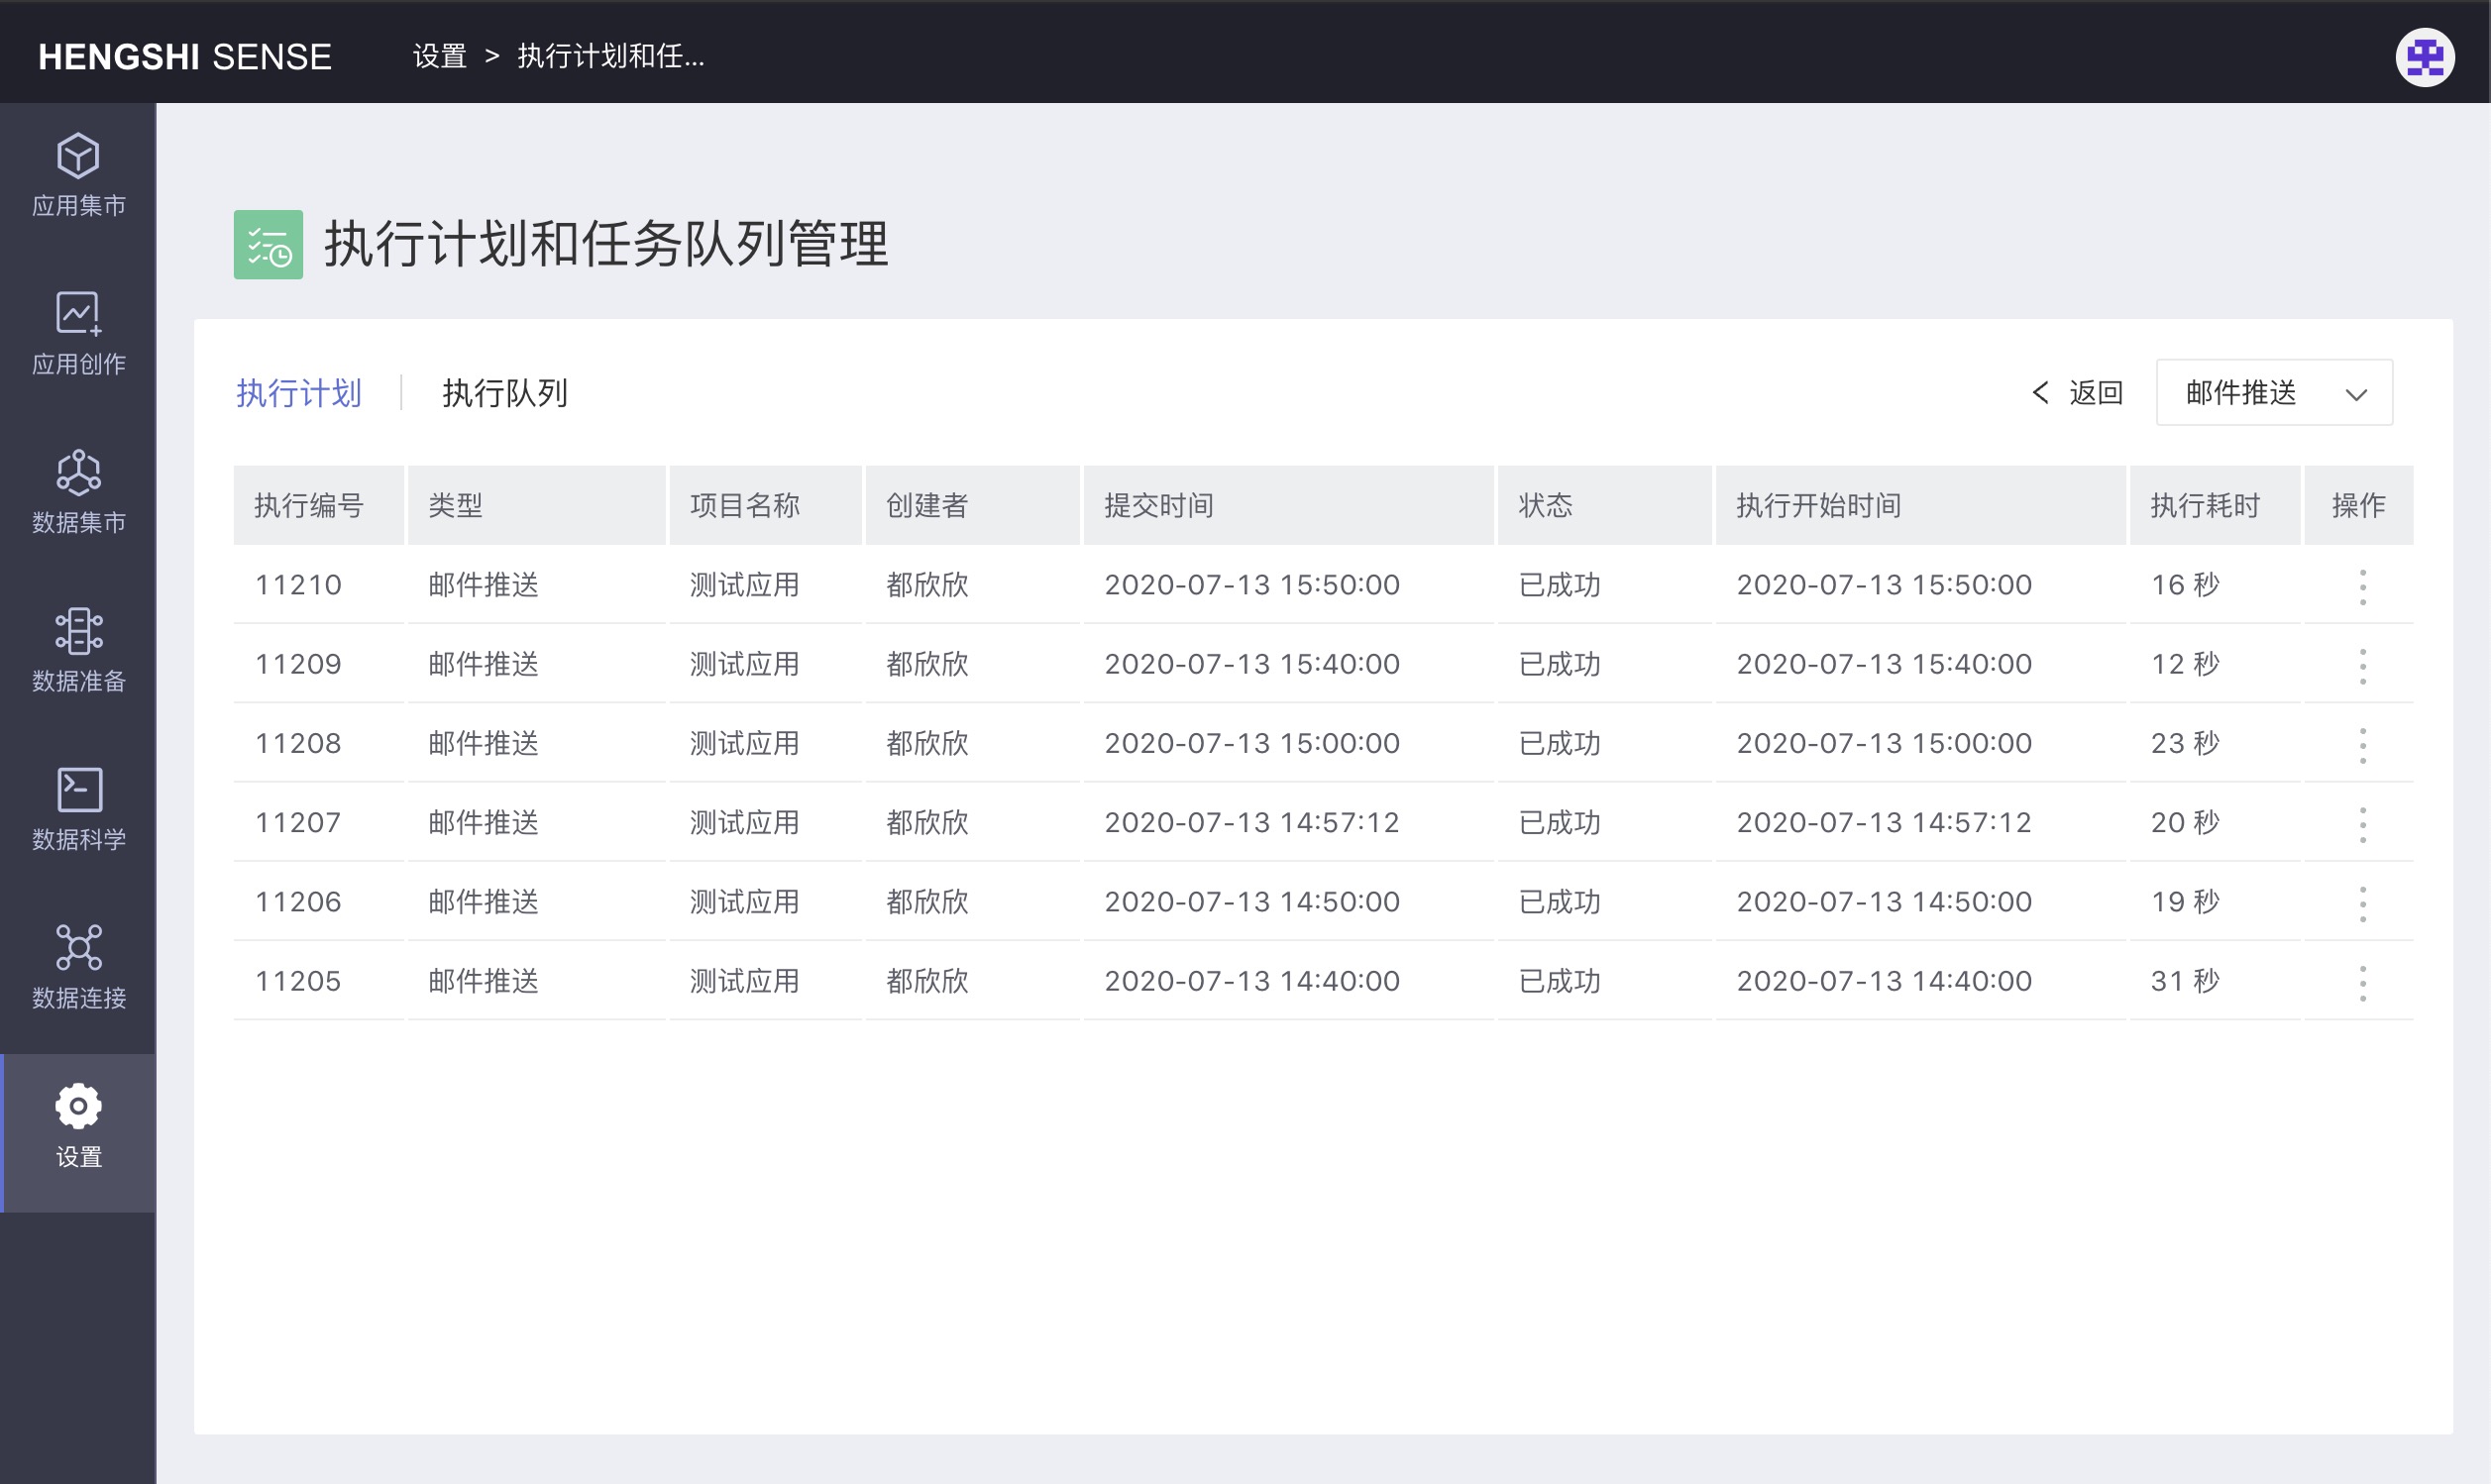
Email Push Record
Select “Push Record” in the upper right corner of the above-mentioned email push details page to view all push history and logs for the application.