Hengshi Documentation
Table of Contents generated with DocToc
In HENGSHI SENSE, whether as a source of data collection or as a carrier for the output results of data preparation, ensuring the security of data connections is a top priority. By controlling access to data connections, Hengshi has the ability to serve as a unified data publishing platform, enabling various business departments to access authoritative and unified data on demand.
Only the owner of a data connection can set permissions.
Permission control does not affect the owner of the connection. No matter what permissions are set, while reviewing table data, the owner can see all the data.
This section will introduce its features around the SENSE data connection interface:
- Data Connection Content List
- Permission Control
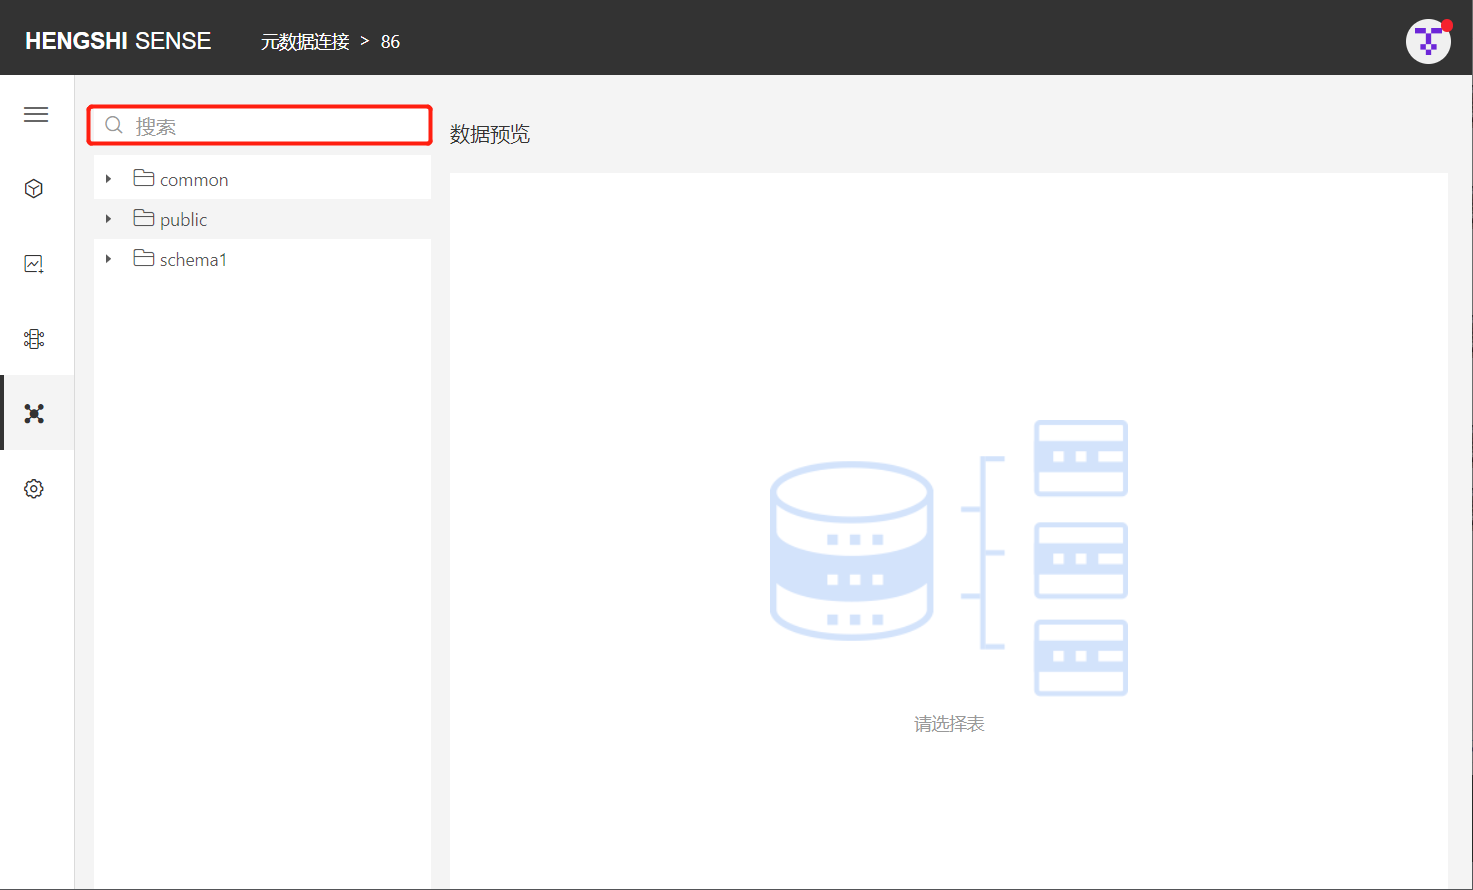
- Data Preview
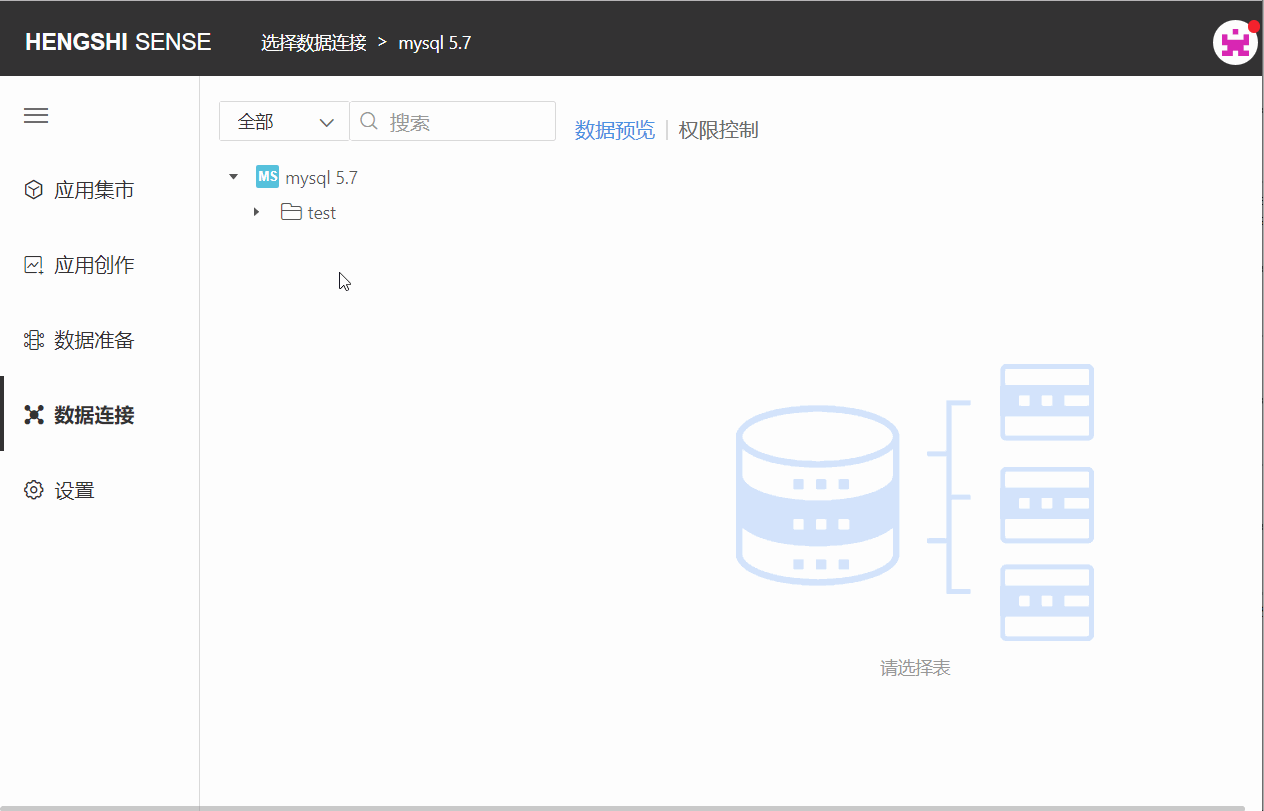
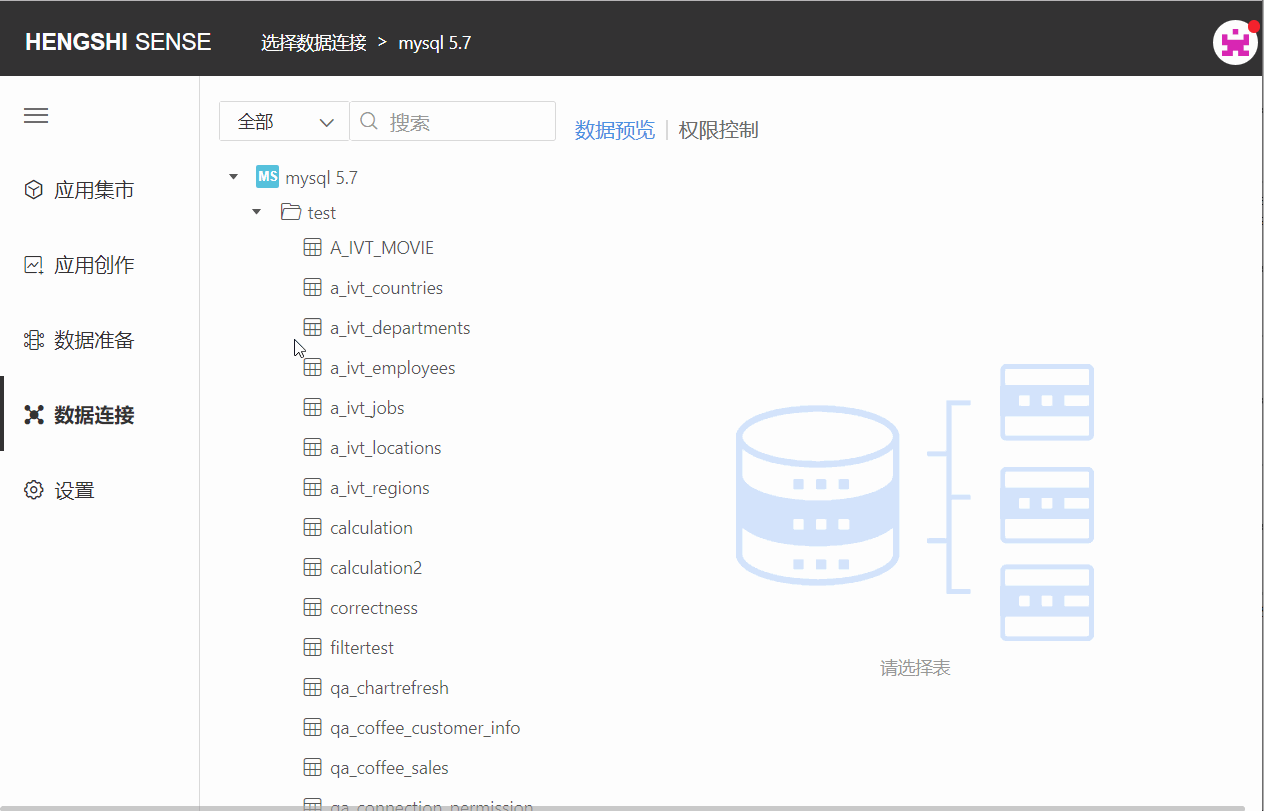
Data Connection Content List
To allow users to quickly and conveniently locate the tables they need, Hengshi SENSE has specifically added the function to search using the following four methods: All, By Authorized, By Unauthorized, and By Visitor.
Only the owner's (creator of the connection) search box has a dropdown list, which can be filtered using the aforementioned criteria.
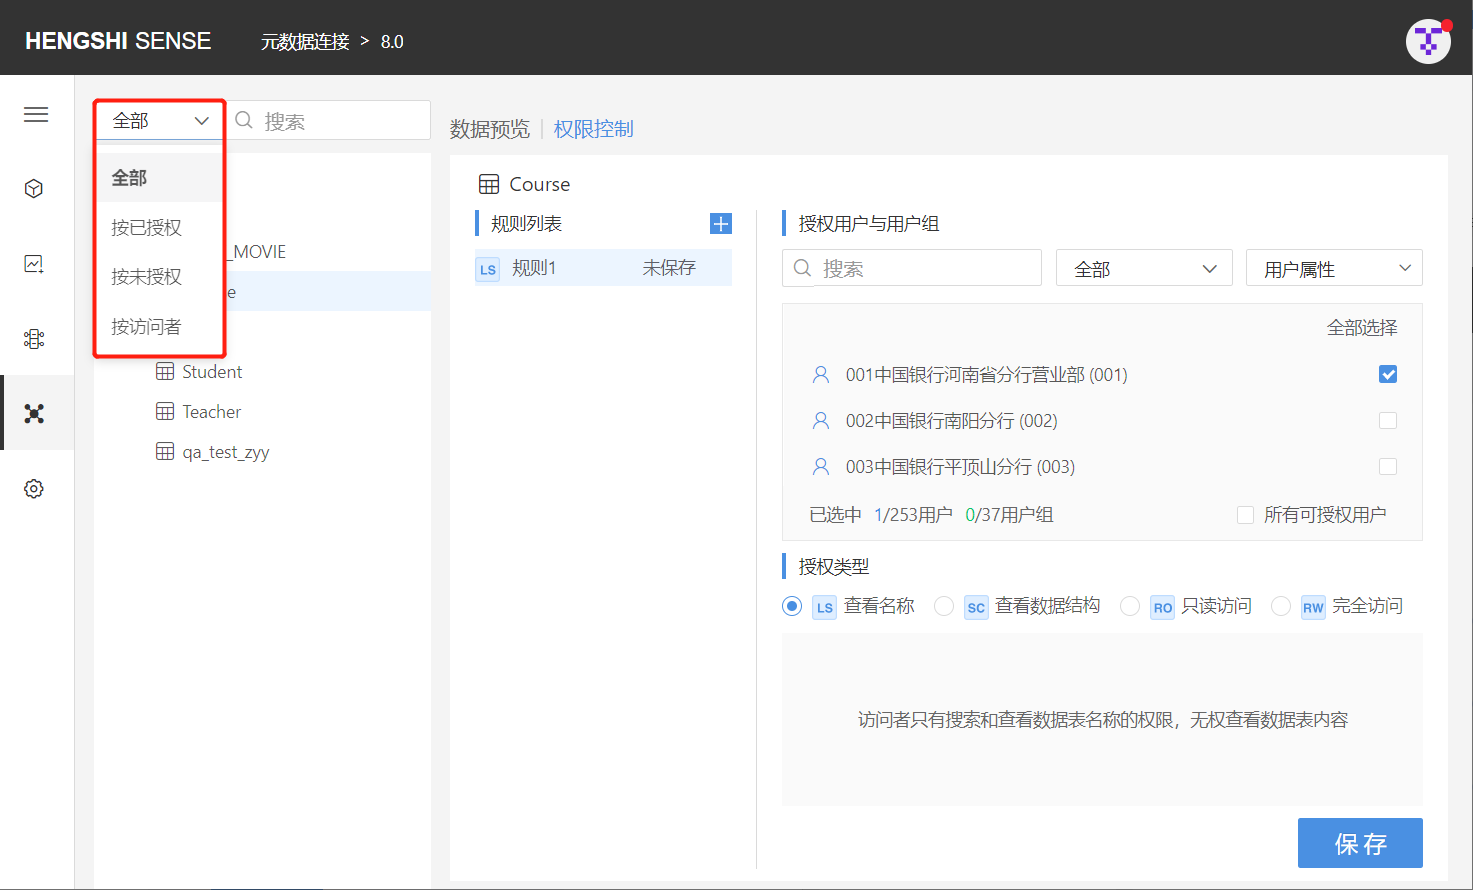
For authorized users, there is no dropdown list in front of the search box, and they can only filter from all authorized tables.
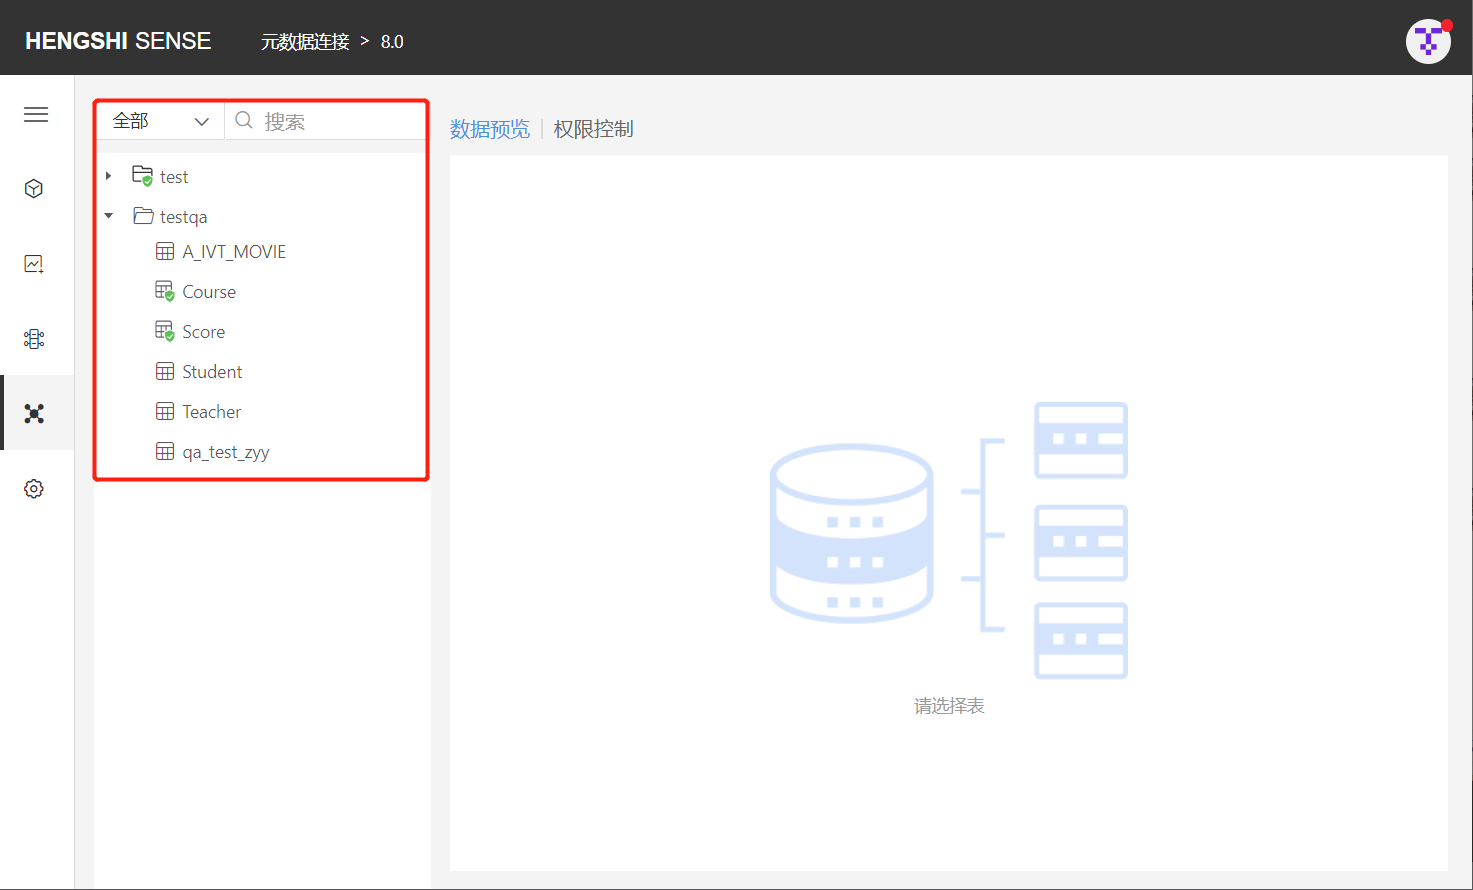
All
The search defaults to filtering from all the tables in the connection, listing all the directories below, and expanding them to display all the tables in the connection. Enter the name of the table you want to find in the search box to retrieve it.
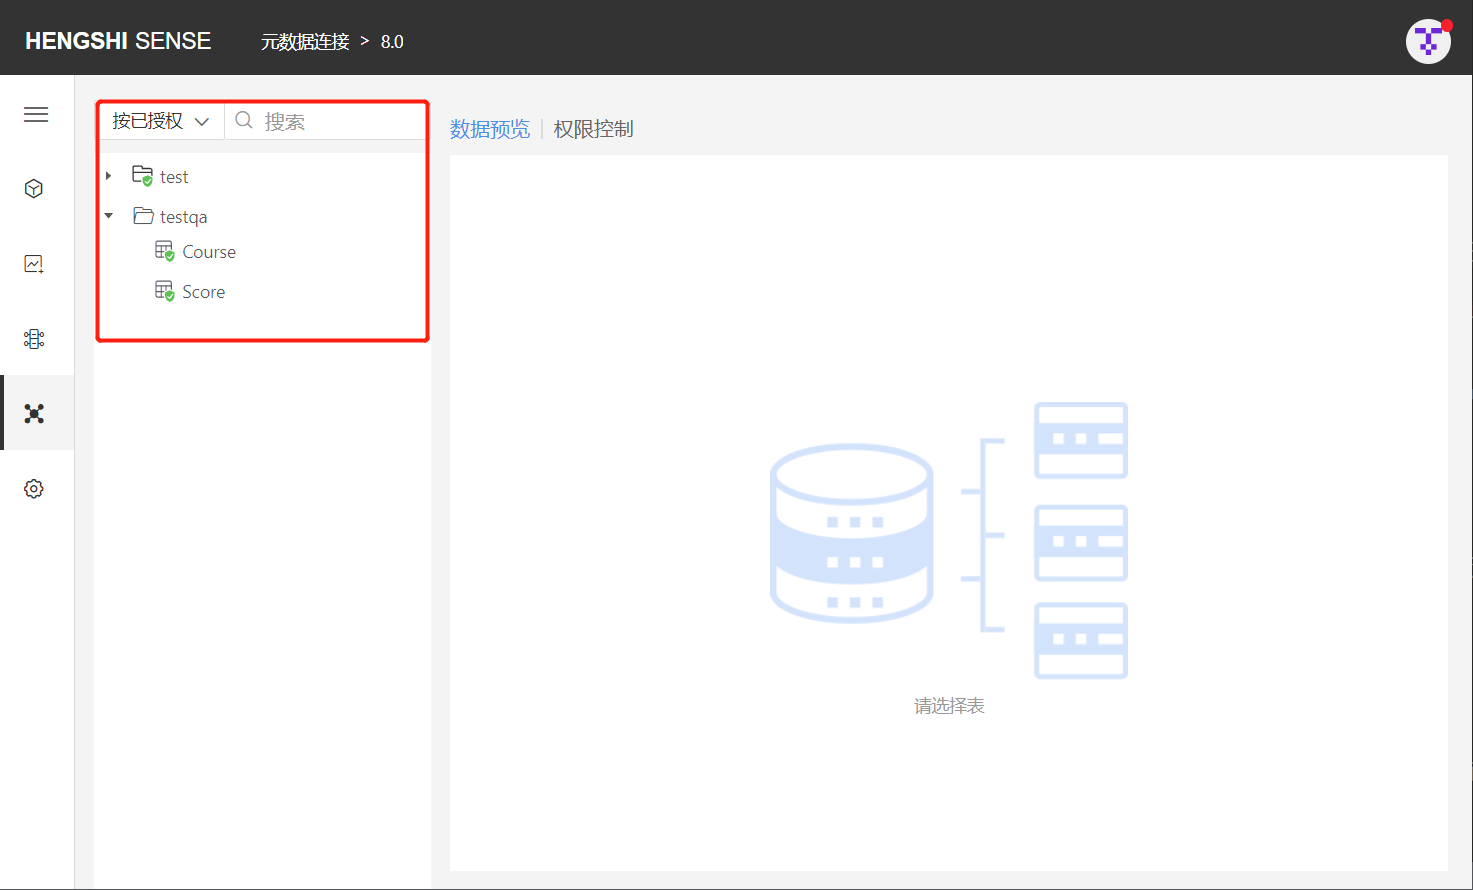
By Authorized
After selecting By Authorized, all authorized directories are listed below (if no rules are set for the directory, but there are authorized tables under it, the directory will also be shown). Expand the directory to display all authorized tables, and a green icon will appear under authorized directories or tables. Enter the name of the authorized table you want to find in the search box to retrieve it.
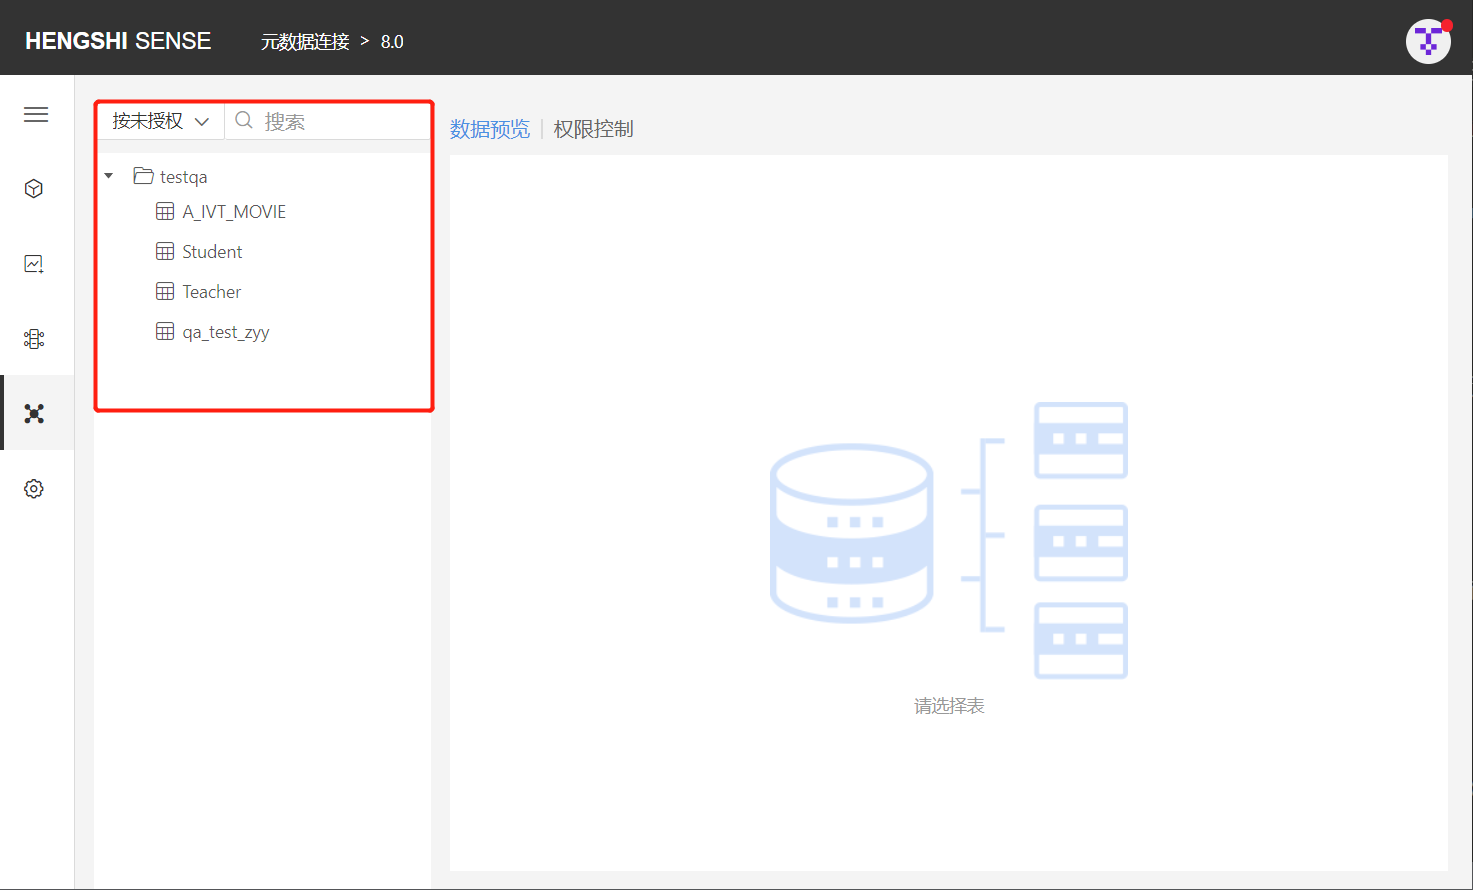
By Unauthorized
After selecting By Unauthorized, all unauthorized directories are listed below (if no rules are set for the directory, but there are unauthorized tables under it, the directory will also be shown). Expand the directory to display all unauthorized tables. Enter the name of the unauthorized table you want to find in the search box to retrieve it.
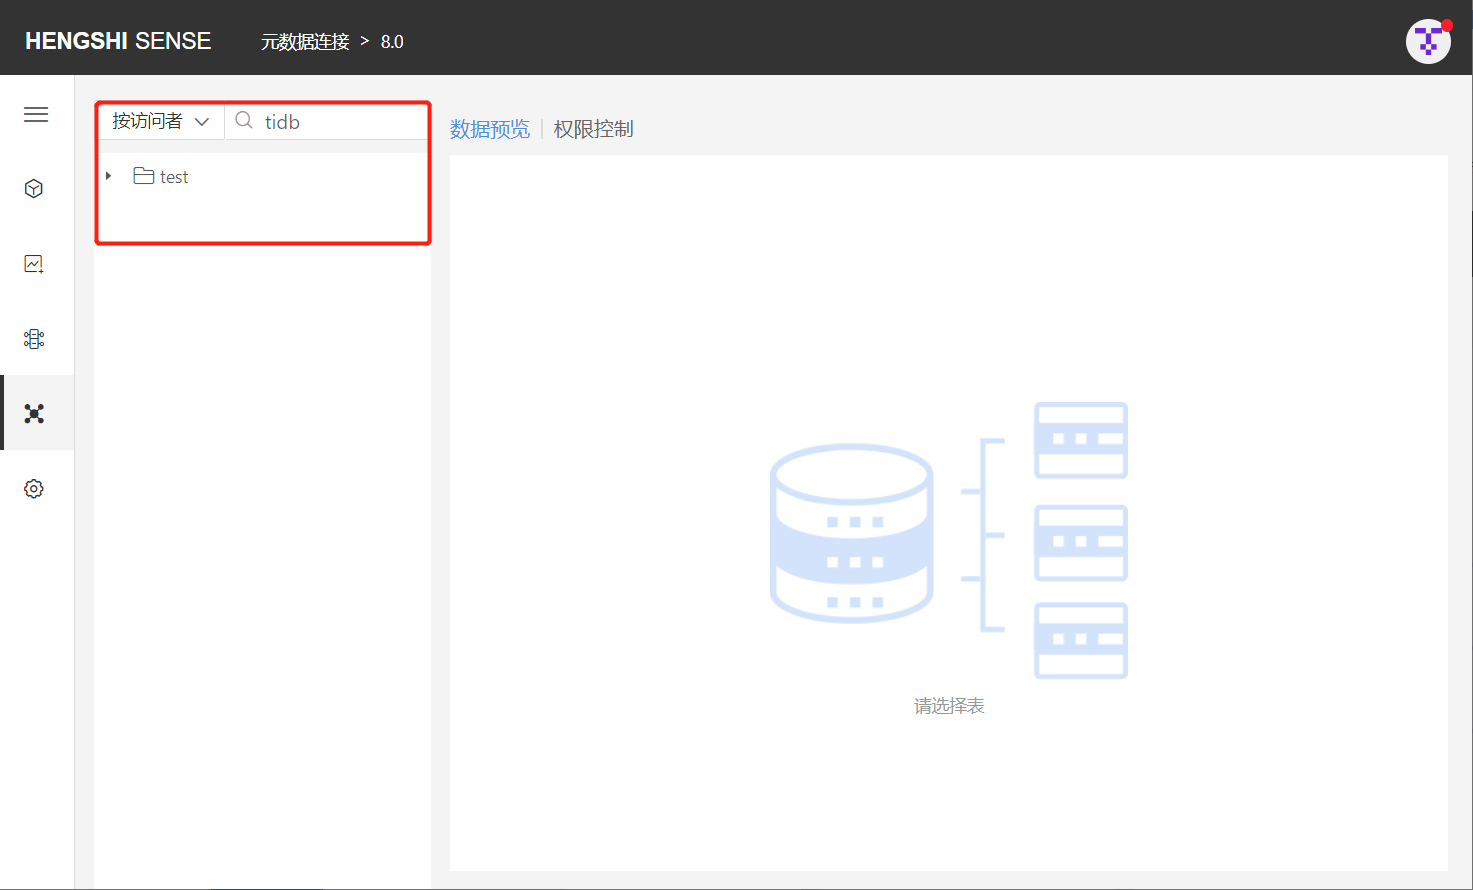
By Visitor
After selecting By Visitor, all directories in the data connection are listed below, and all tables in the connection are displayed when expanded. Enter the name of the user/user group you want to find within the search box to view the directories and tables they can see.
Permission Control
By controlling access to data connections, data distribution can be achieved; the owner can decide which users can access which data in their connection tables.
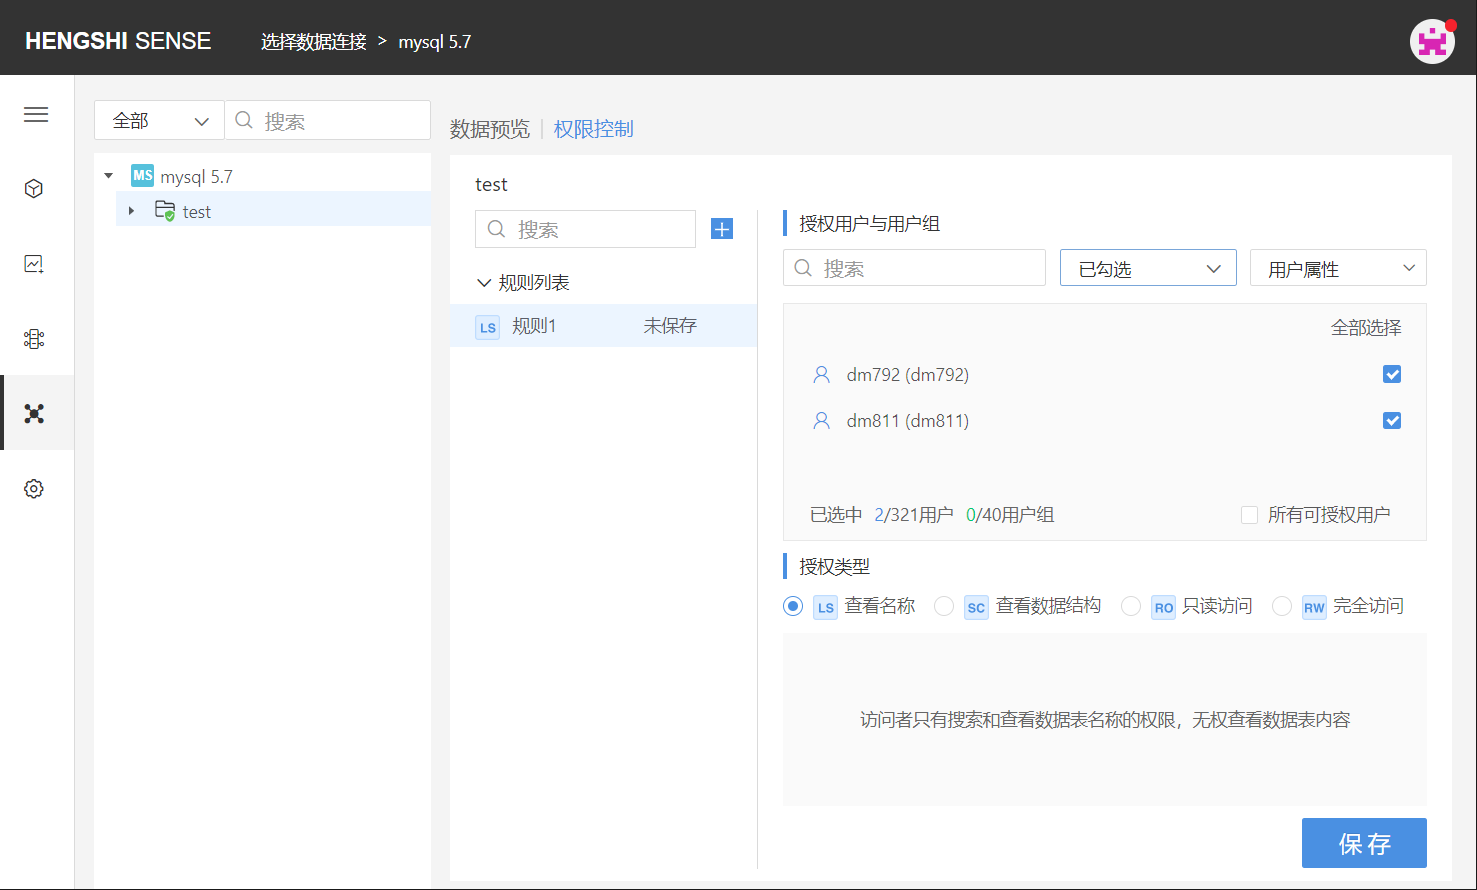
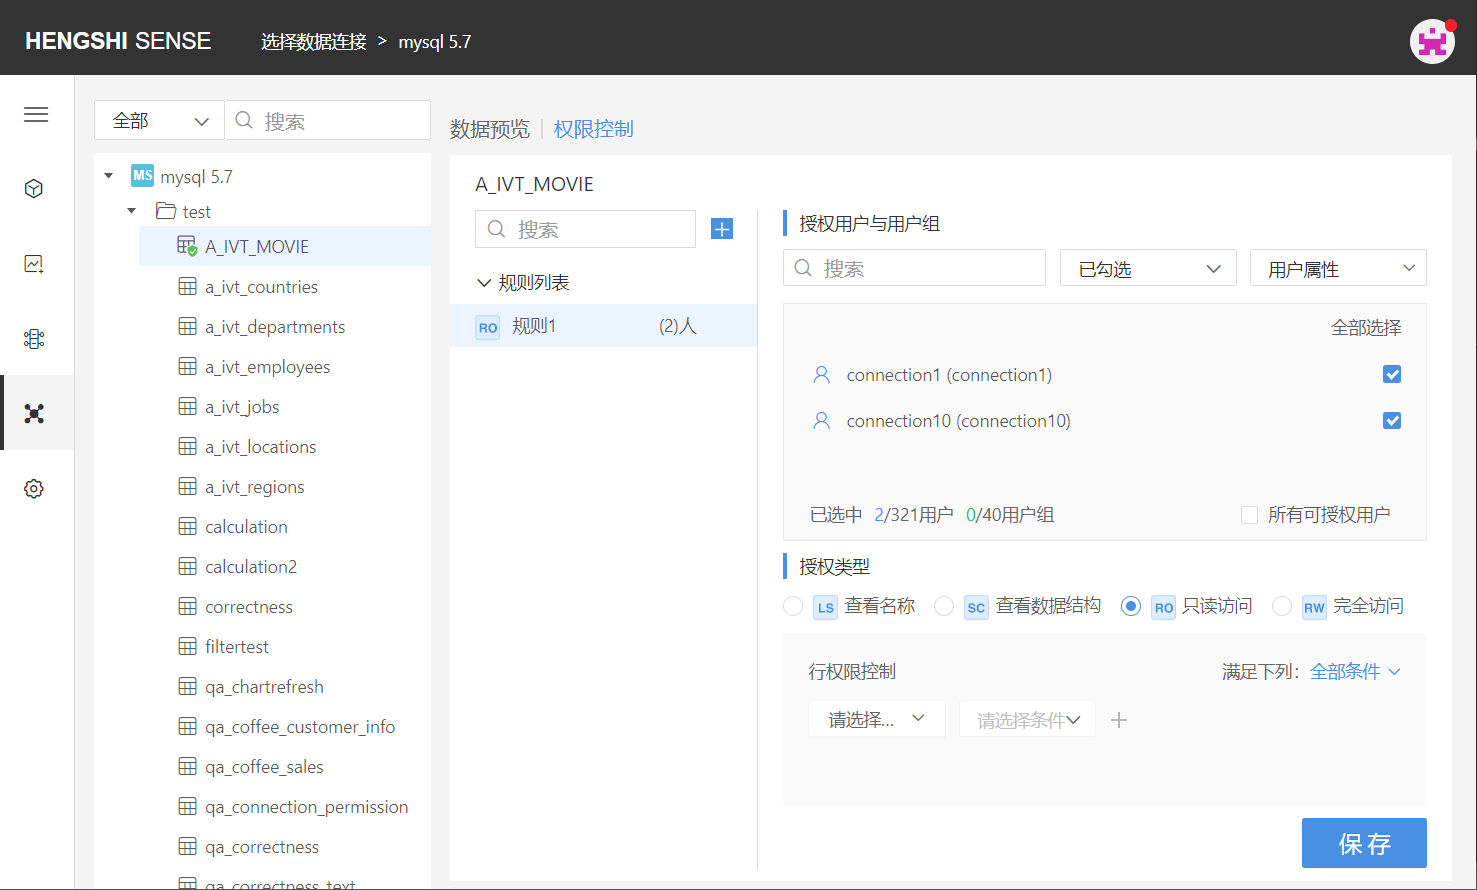
After selecting a table/directory, clicking to enter the permission control page lists out all the rules currently present in the directory/table.

Only owners can set permission control, other users opening the connection will not have the permission control tab.
Add Rules
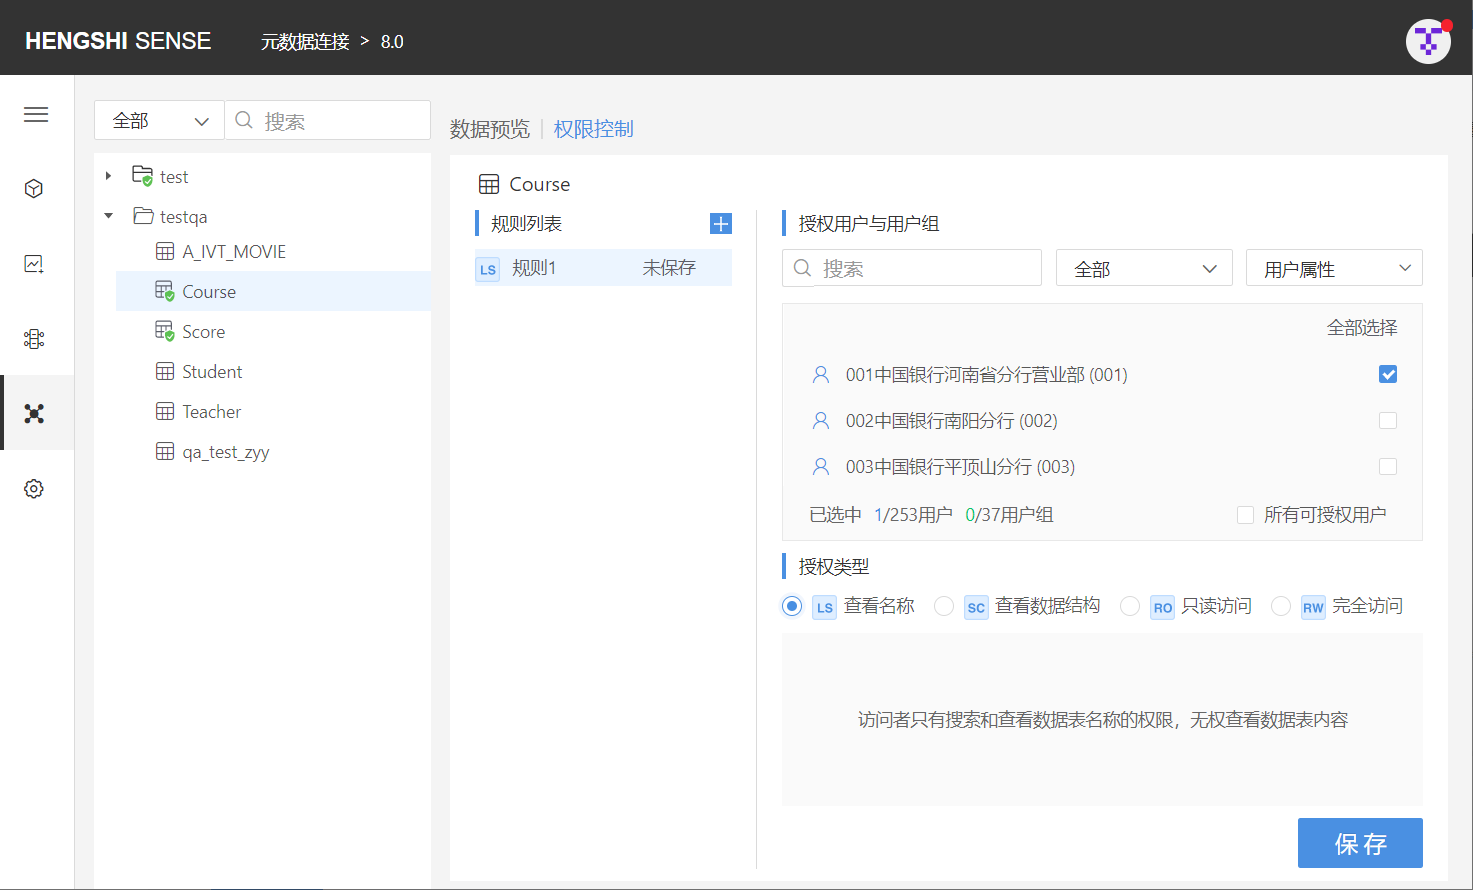
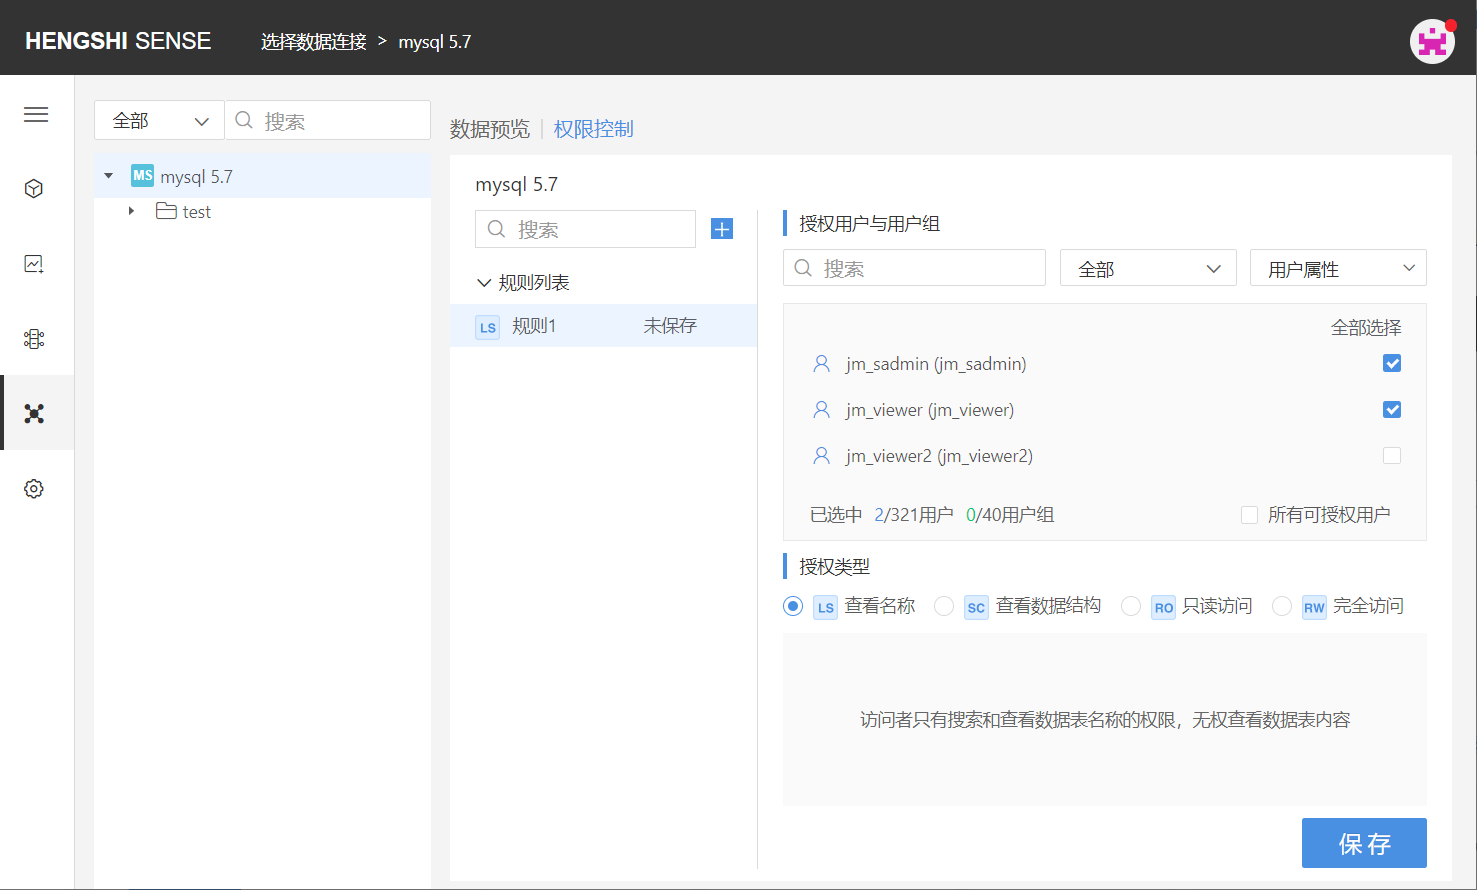
The owner can add rules to the connection for specific users, setting access privileges for those users on the connection. A complete rule includes authorized user/user group and type of authorization.
- Multiple rules can be set on each directory/table;
- Each rule can only contain one type of permission.
Add Connection Rules
Step One: Add Rules
After the owner opens the connection, they select the connection: open the 'Permission Control' list on the right, click on 'Add Rules', and a new blank rule is added successfully. Click the edit button on the rule name to change the name so it aligns better with business logic;
Step Two: Choose Authorized Users and User Groups
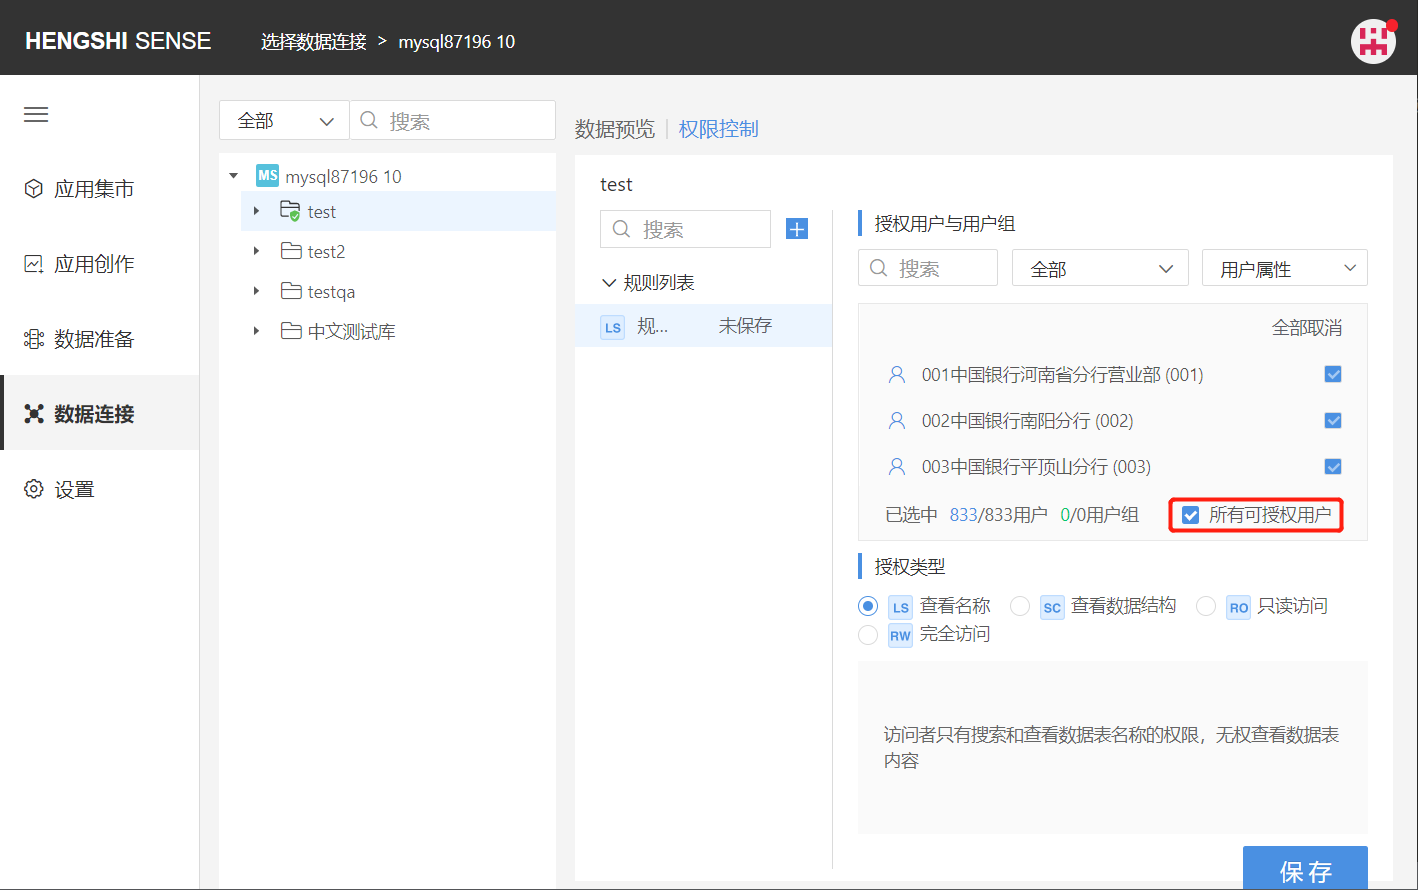
Choose the user/user group that this rule applies to by scrolling the vertical scrollbar. Click the check box at the end of the user/user group column to select them, or search for the user you want to tick. You can filter already checked and unchecked users via the dropdown box in the top right corner:
There are two special methods to choose users:
Select All
Clicking 'Select All' at the top right corner of the authorized user and user group list will tick all users currently in the system.
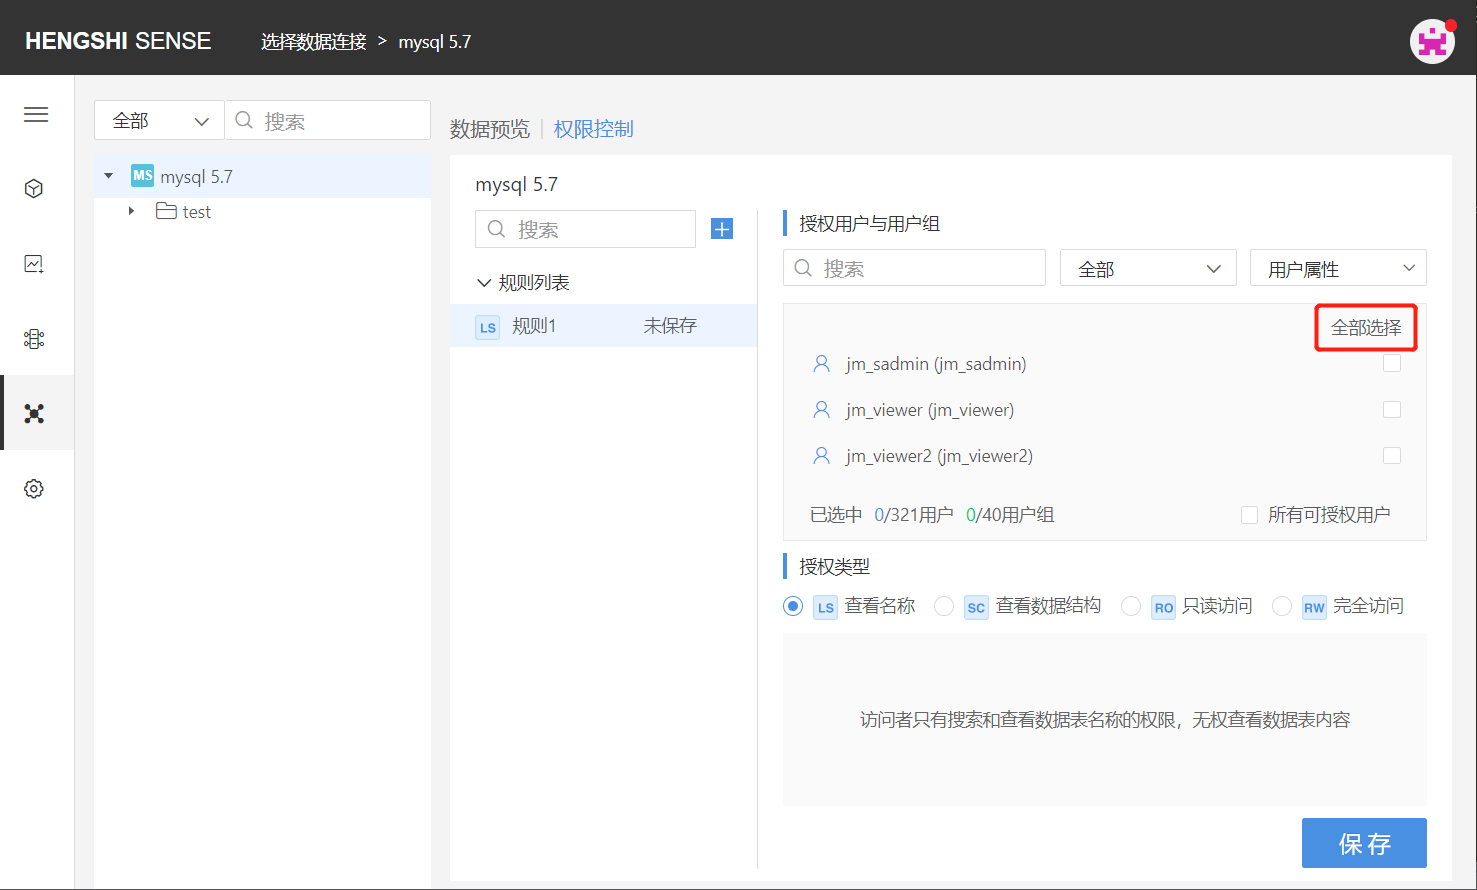
You can click 'Cancel All' to untick all.

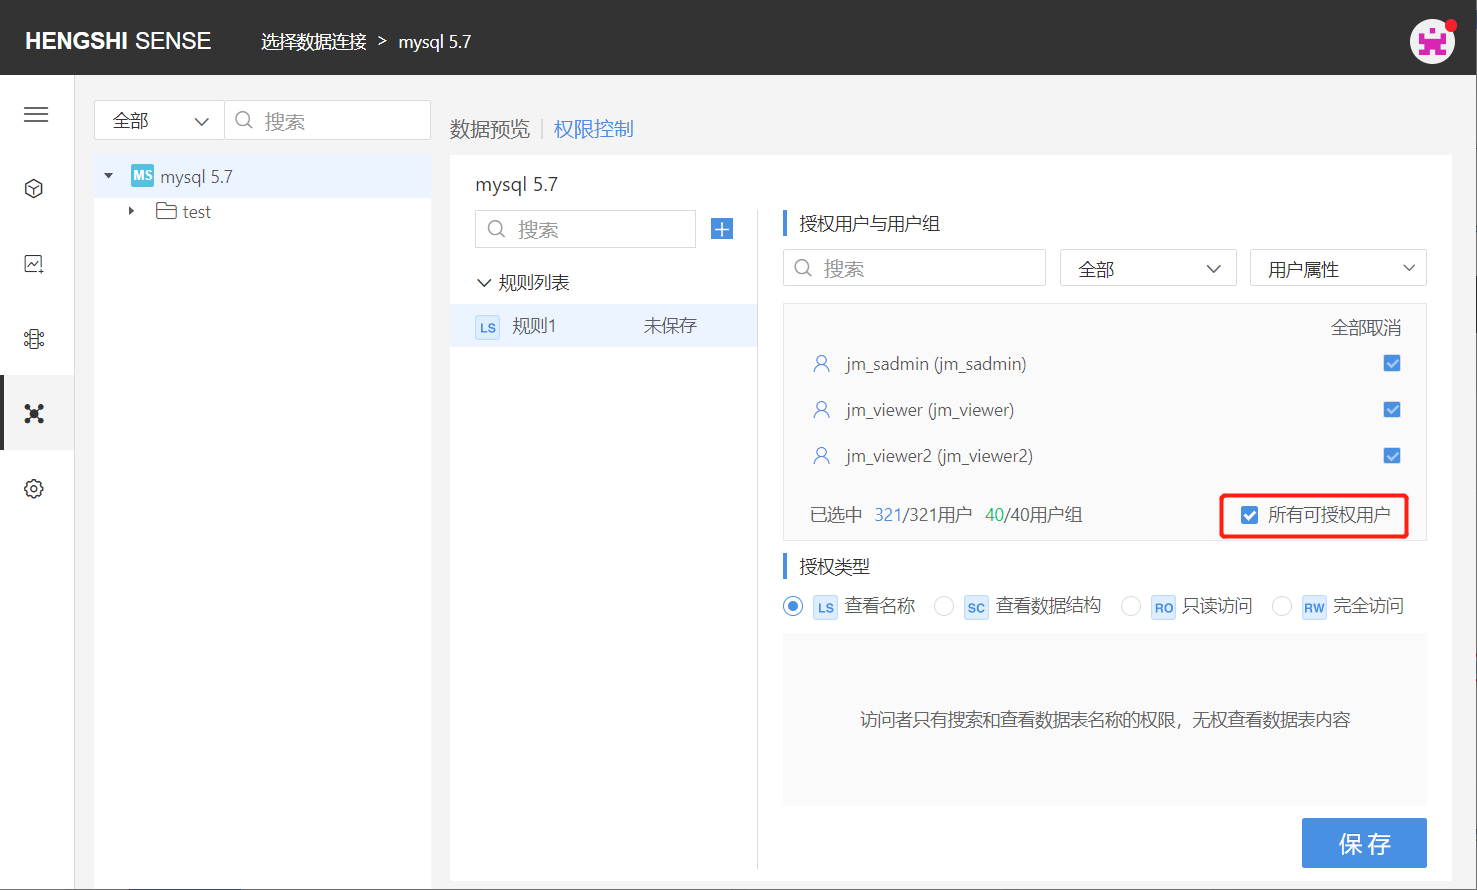
All Licensable Users
Clicking on 'All Licensable Users' ticks all users that can be authorized, greys out the button, preventing you from clicking unselect/select users, and any new users created in the system will automatically be added to this rule, possessing the permissions set by this rule.
Step Three: Choose Authorization Type
The available types of authorization are divided into the following four:
- View Names (LS)
- View Data Structure (SC)
- Read-Only Access (RO)
- Full Access (RW)
Authorization type is single-choice only. Just click the checkbox in front of the authorization type.
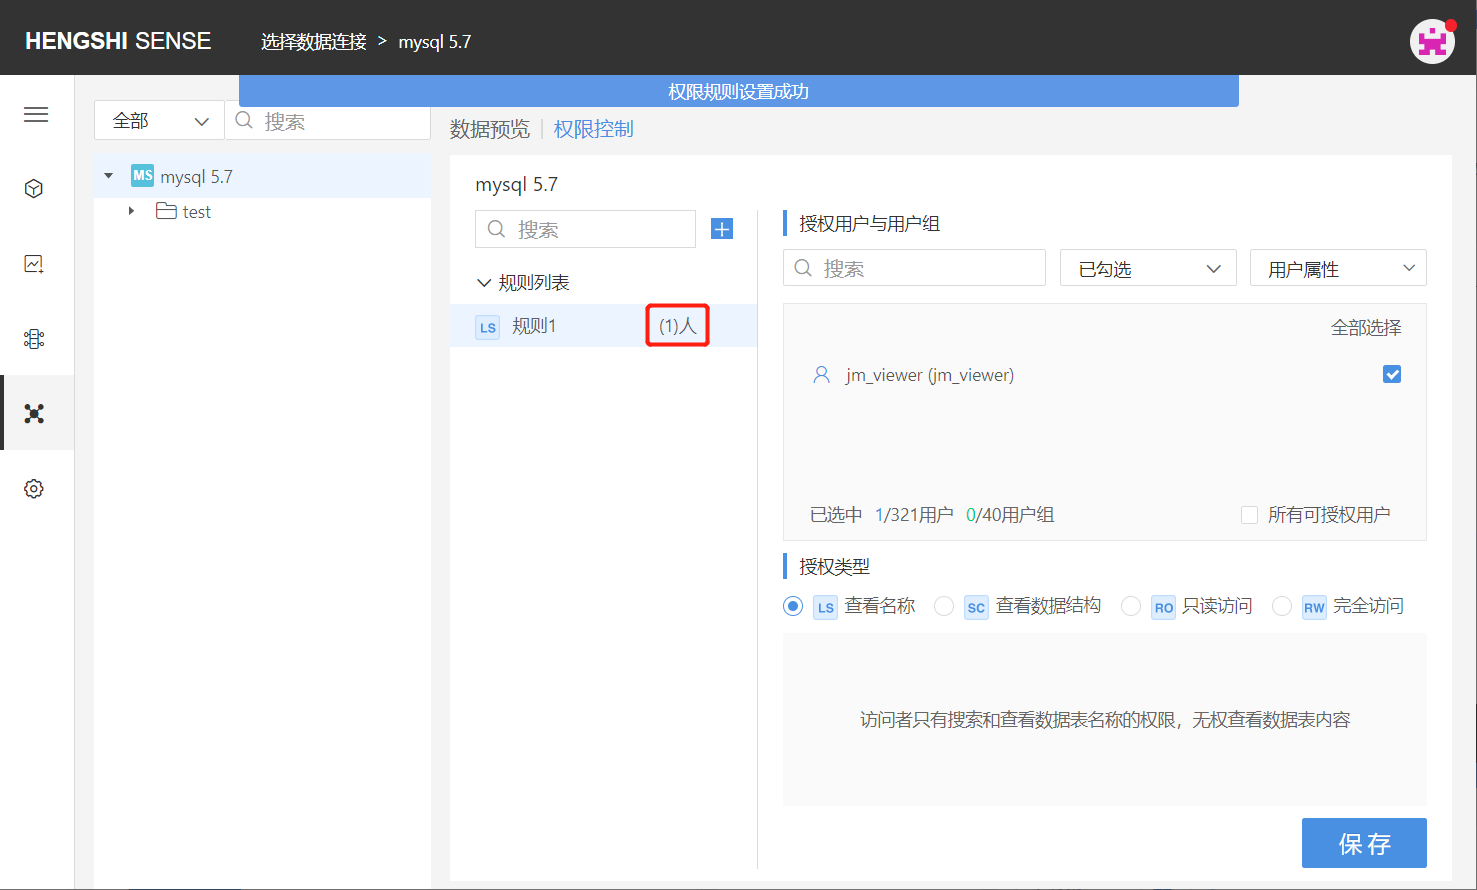
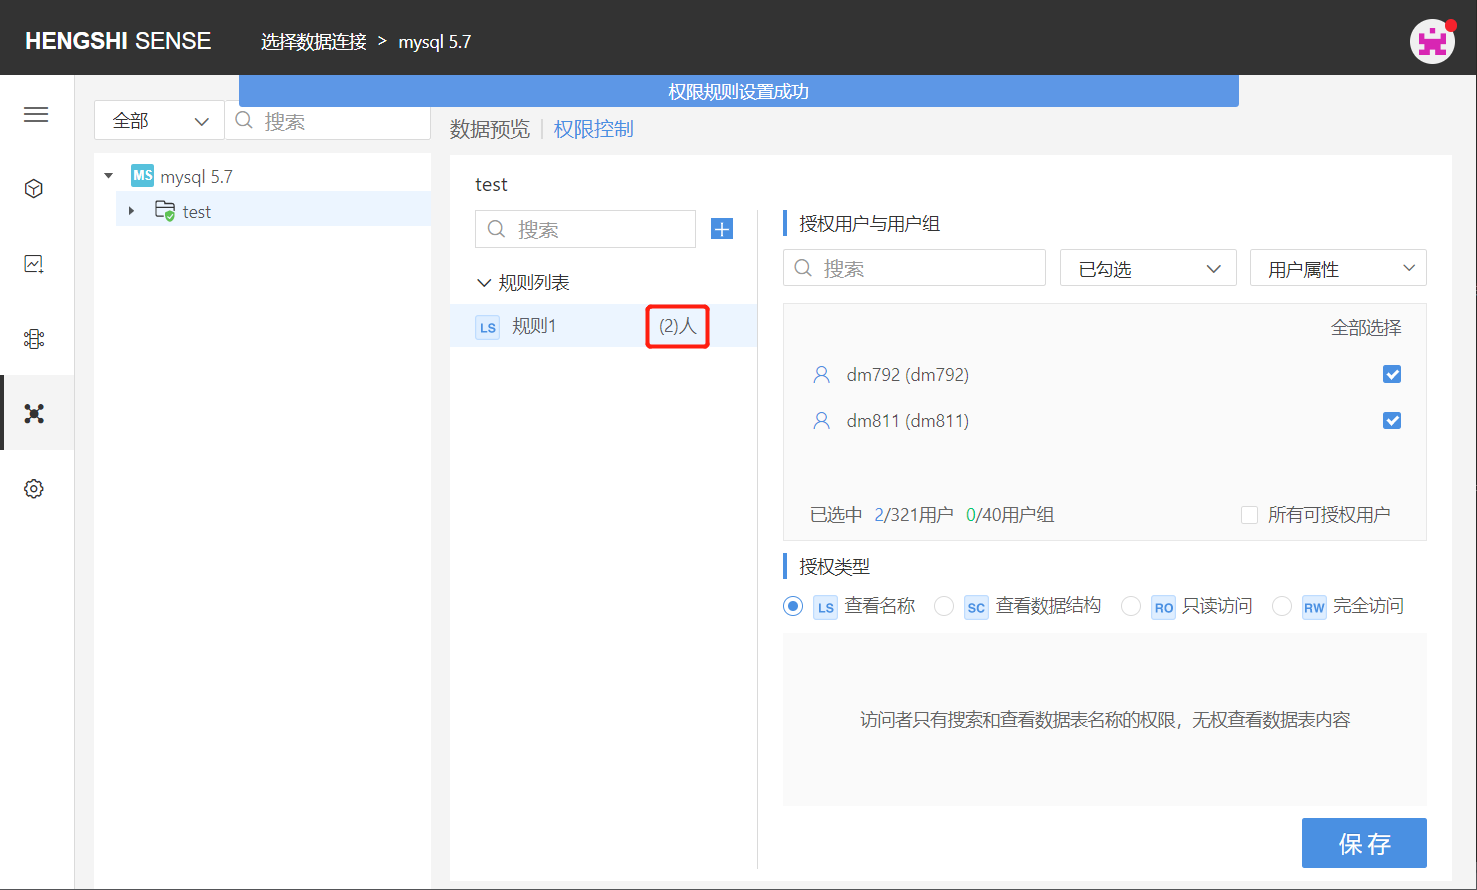
Step Four: Save Rules
Click 'Save', and the rule settings are successful, with the number of authorized users/users behind the rule name being updated.
Post-Authorization User Access
Depending on the type of authorization selected, the contents visible to users within that rule when accessing the application are:
- LS: Can only see the names of tables under mysql 5.7 connection;
- SC: Can see the names of tables under mysql 5.7 connection as well as the field structure of each table;
- RO: Can see the names of tables under mysql 5.7 connection, the field structure of each table, and the complete table data;
- RW: Can see the names of tables under mysql 5.7 connection, the field structure of each table, and the complete table data.
Add Directory Rules
Step One: Add Rules
After the owner opens the connection, they click on the directory they want to add permissions for: open the 'Permission Control' list on the right, click on 'Add Rules', and a new blank rule is added successfully. Click the edit button on the rule name to change the name so it aligns better with business logic;
Step Two: Choose Authorized Users and User Groups
Choose the user/user group that this rule applies to by scrolling the vertical scrollbar. Click the check box at the end of the user/user group column to select them, or search for the user you want to tick. You can filter already checked and unchecked users via the dropdown box in the top right corner:
There are two special methods to choose users:
Select All
Clicking 'Select All' at the top right corner of the authorized user and user group list will tick all users currently in the system.

You can click 'Cancel All' to untick all.

All Licensable Users
Clicking on 'All Licensable Users' ticks all users that can be authorized, greys out the button, preventing you from clicking unselect/select users, and any new users created in the system will automatically be added to this rule, possessing the permissions set by this rule.
Step Three: Choose Authorization Type
The available types of authorization are divided into the following four:
- View Names (LS)
- View Data Structure (SC)
- Read-Only Access (RO)
- Full Access (RW)
Authorization type is single-choice only. Just click the checkbox in front of the authorization type.
Step Four: Save Rules
Click 'Save', and the rule settings are successful, with the number of authorized users/users behind the rule name being updated.
Post-Authorization User Access
Depending on the type of authorization selected, the contents visible to users within that rule when accessing the application are:
- LS: Can only see the names of tables in the test directory;
- SC: Can see the names of tables in the test directory, and the field structure of each table;
- RO: Can see the names of tables in the test directory, the field structure of each table, and the complete table data;
- RW: Can see the names of tables in the test directory, the field structure of each table, and the complete table data.
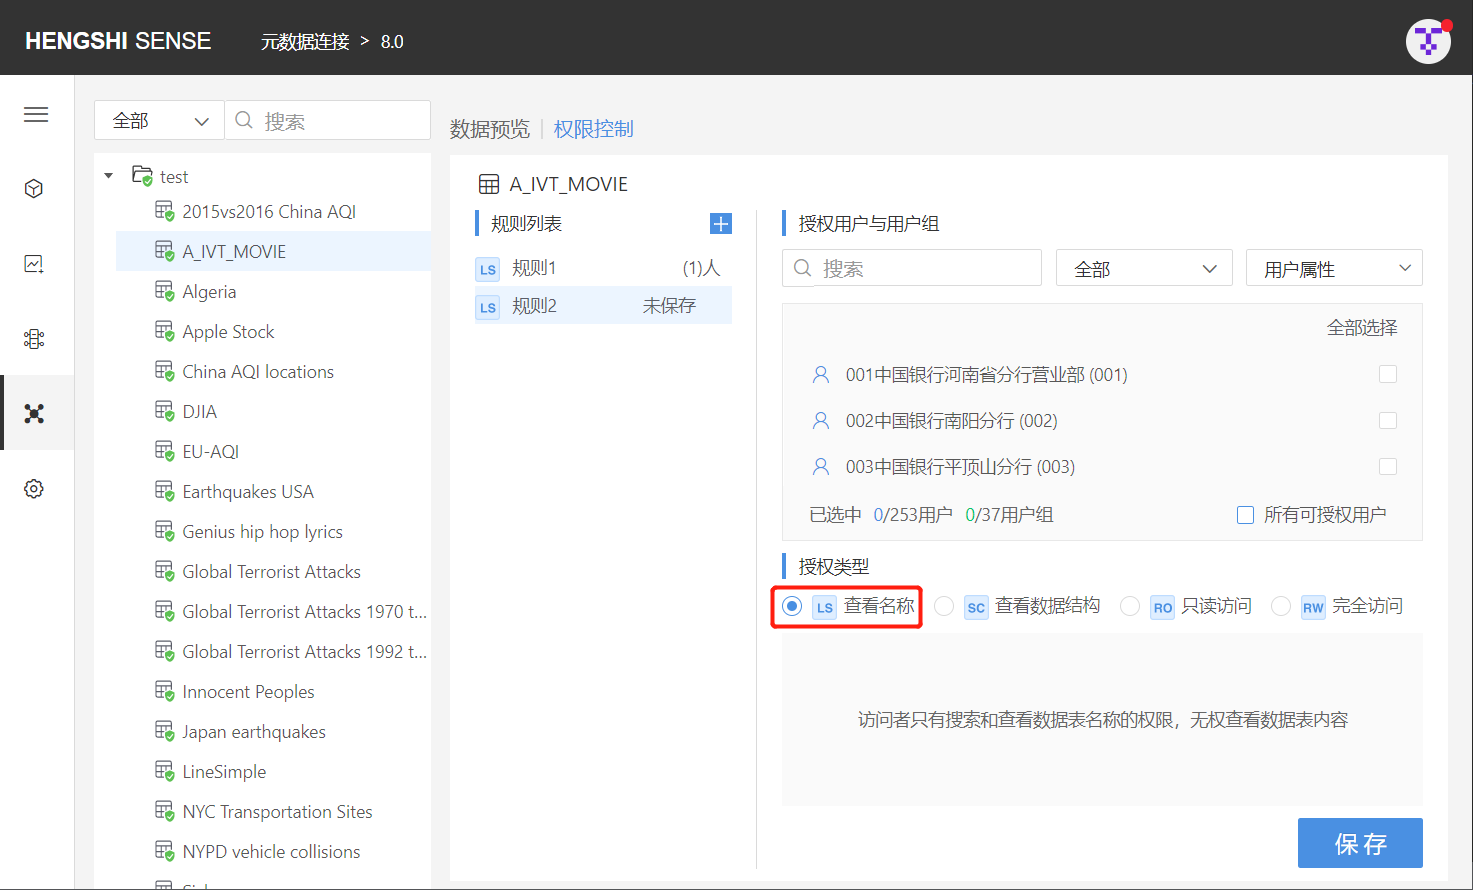
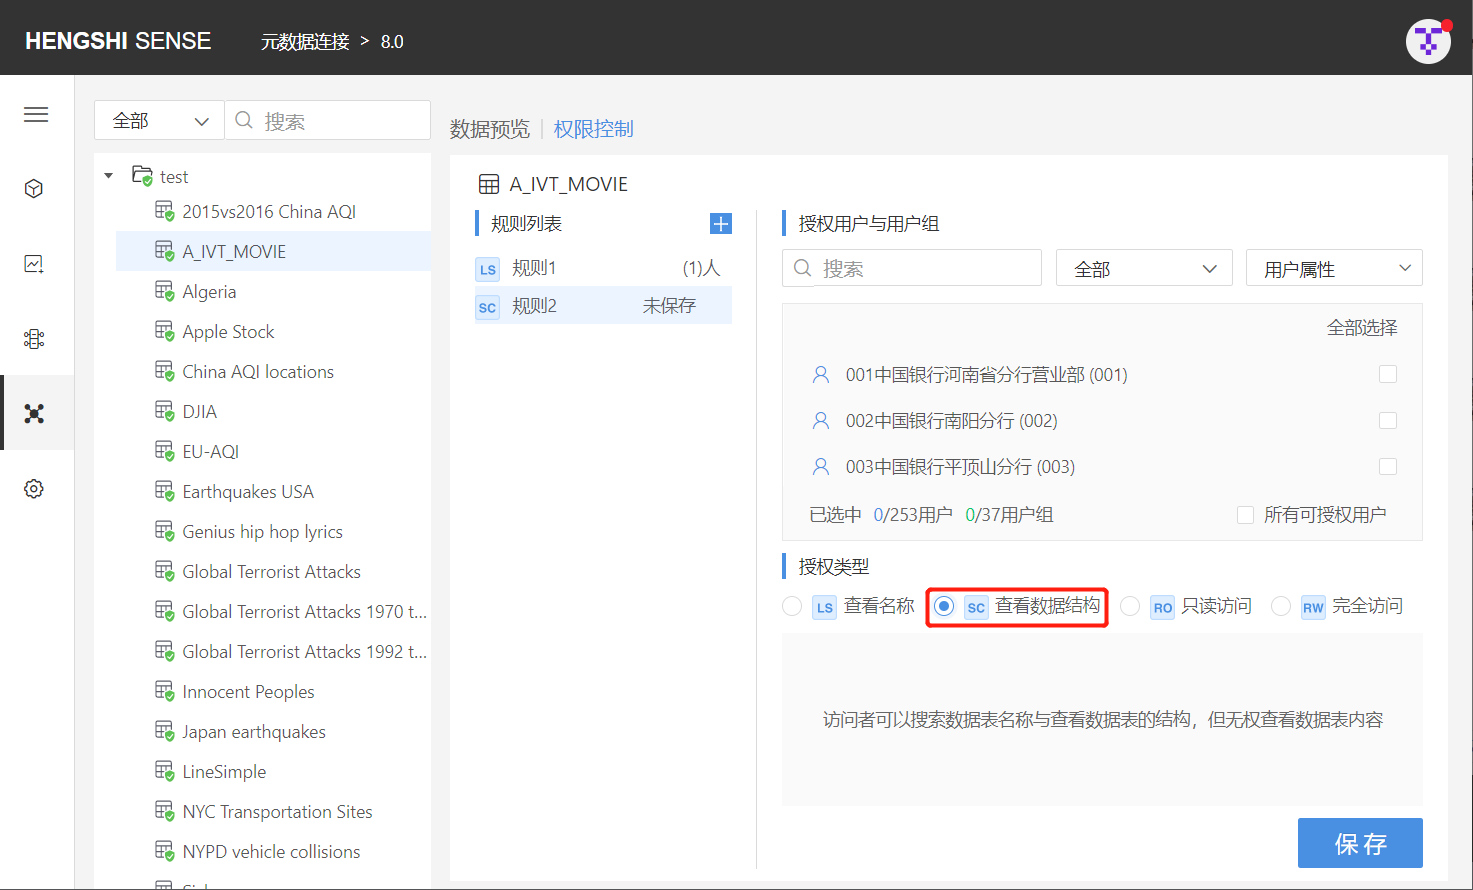
Add Table Rules
Step One: Add Rules
After the owner opens the connection, they click on the table they want to add permissions for: open the 'Permission Control' list on the right, click on 'Add Rules', and a new blank rule is added successfully. Click the edit button on the rule name to change the name so it aligns better with business logic;
Step Two: Choose Authorized Users and User Groups
Choose the user/user group that this rule applies to by scrolling the vertical scrollbar. Click the check box at the end of the user/user group column to select them, or search for the user you want to tick. You can filter already checked and unchecked users via the dropdown box in the top right corner:
There are two special methods to choose users:
Select All
All Licensable Users
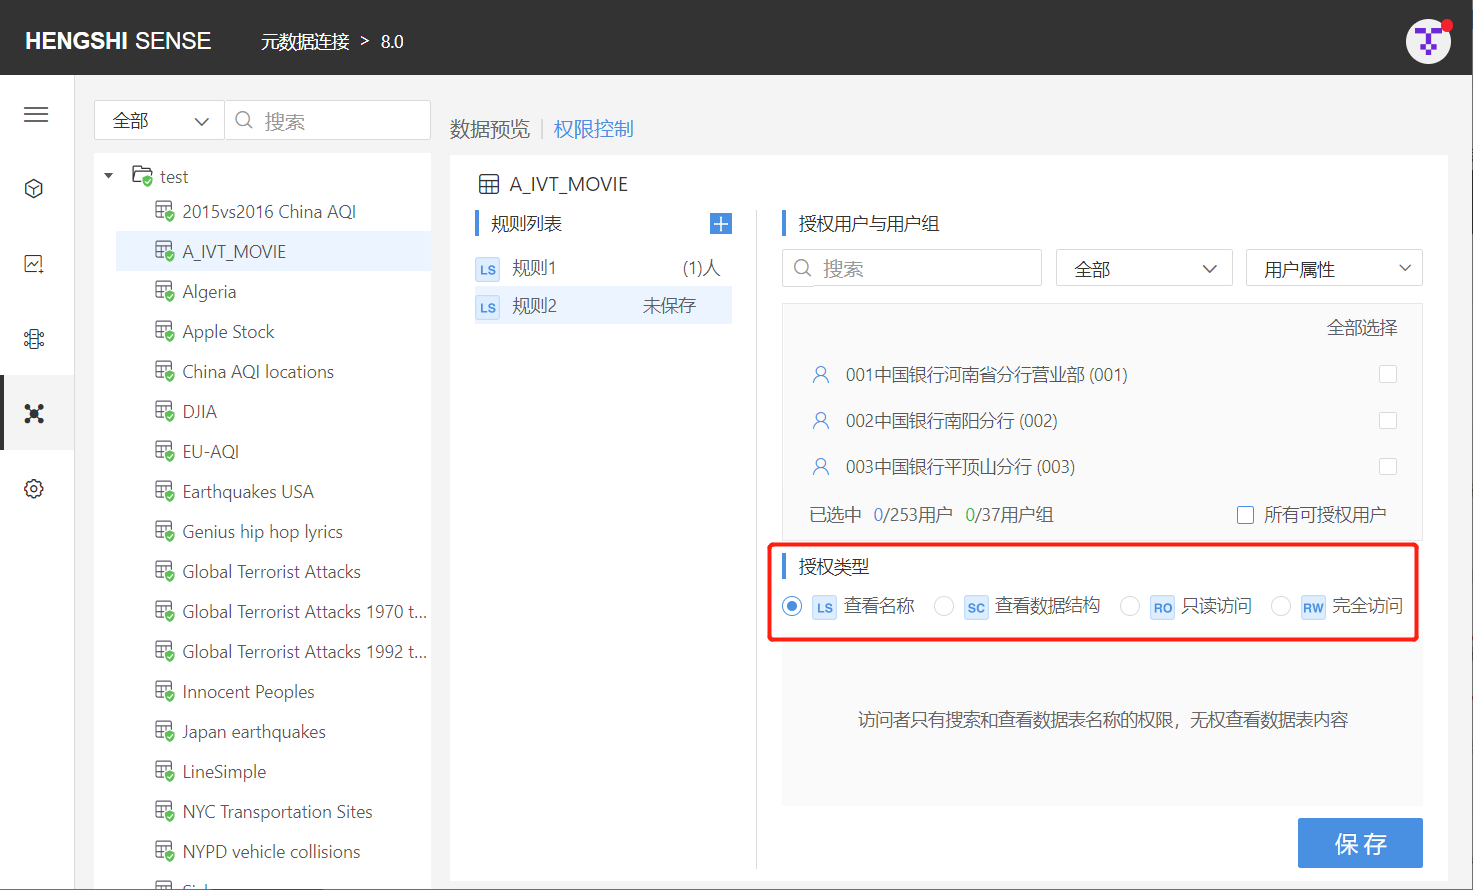
Step Three: Choose Authorization Type
When adding rules to a table, there are still four types of authorization available:
View Names (LS)
View Data Structure (SC)
Read-Only Access (RO)
Full Access (RW)
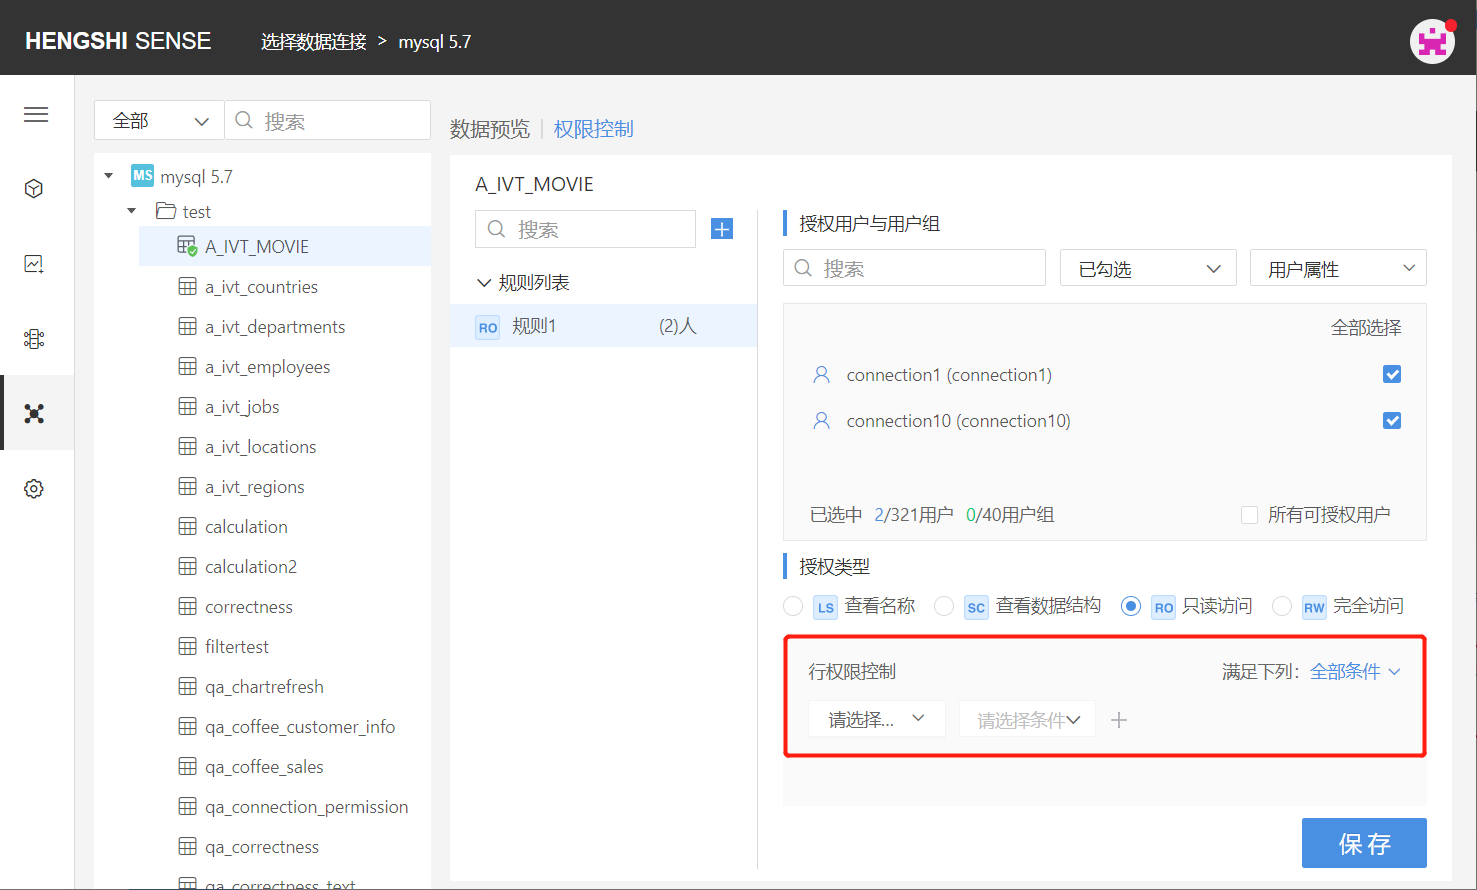
Unlike the directory authorization, when a table chooses RO Read-Only Access, it is necessary to set the specific visible data range:
After selecting RO Read-Only Access, the setting box for row access control expands below:
The comparison value in row access can be a parameter value and in certain cases can also choose a user attribute.
Row access can select user attribute comparison conditions:
Text: Except for 'is empty'/'is not empty', all comparison methods' comparison values can select user attributes;
Number: The comparison values for 'equals'/'does not equal' can select user attributes;
Date: The comparison values for 'equals'/'does not equal' can select user attributes;
To add row access control, the row access here can meet 'all conditions' but can also be a 'some conditions' relationship. Select the field to add row access in the drop-down list, specify the comparison method, and the comparison value.
- Parameter Value
If selecting the comparison method as a parameter value:
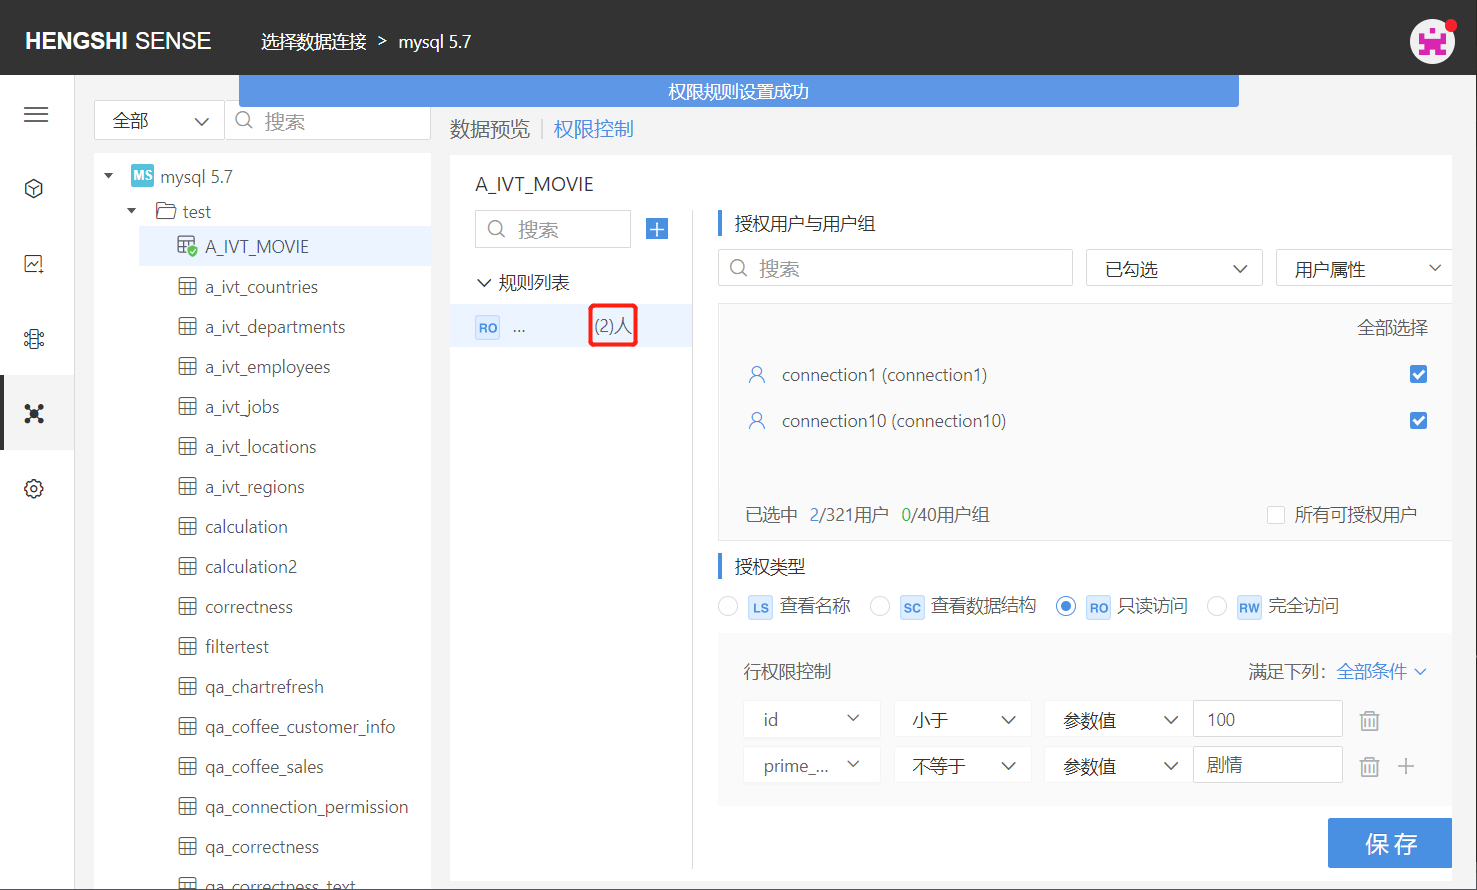
For example: For the rule "Movie" selected users and user groups, add row access:
Meet all conditions;

Field id: Only visible data is the data in rows where the "id" field is less than "parameter value" "100";

Field prime_genre: Only visible data is the data in rows where the "prime_genre" field does not equal "Drama";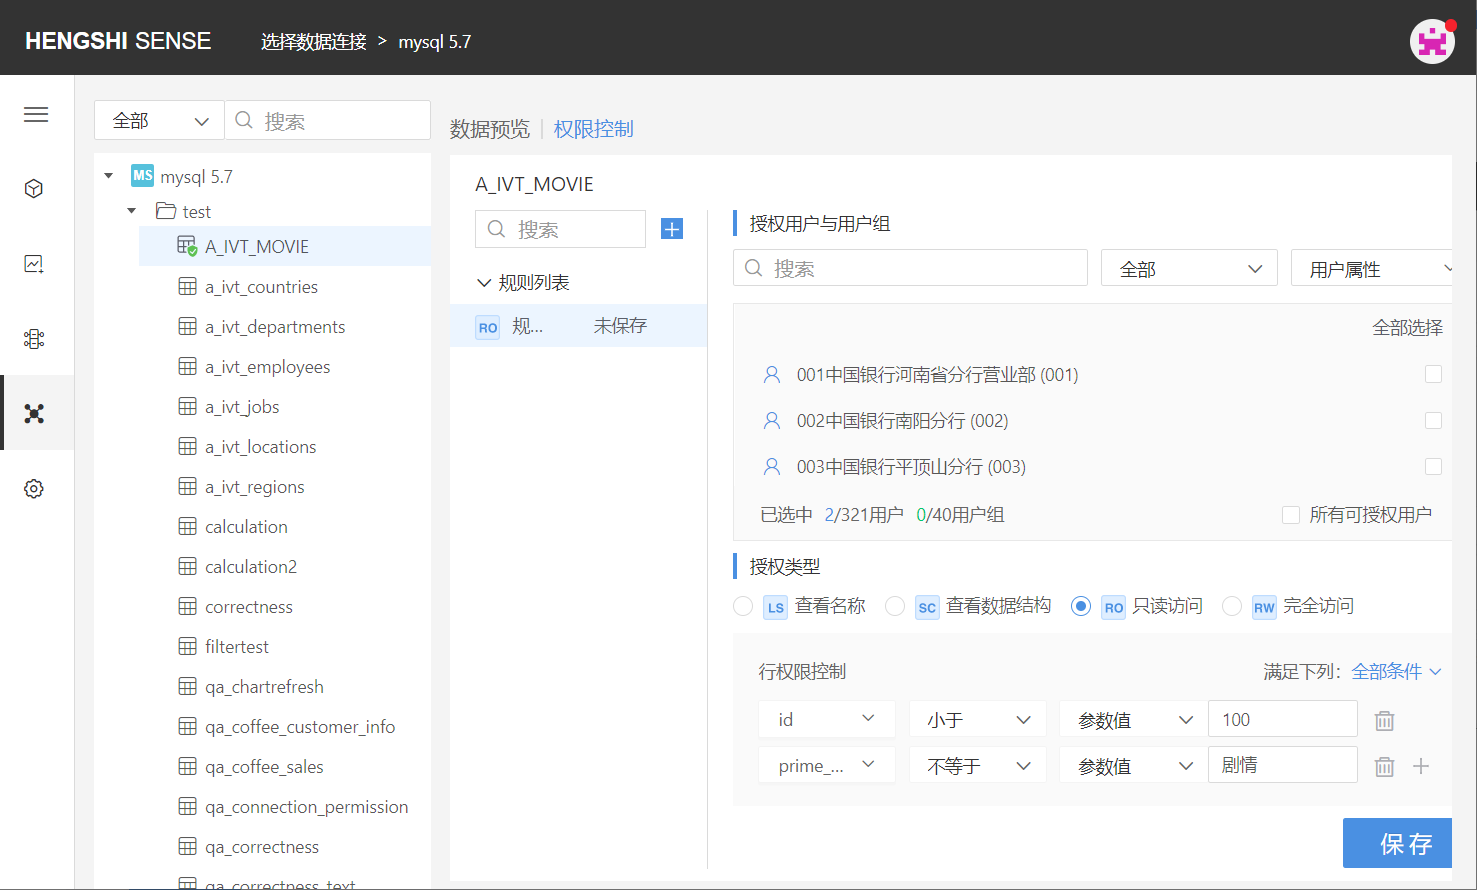
Users within the authority can only see data in rows where id is less than 100 and prime_genre does not include Drama.
- User Attribute
If selecting the comparison method as a user attribute (for the setting method of user attributes see User Management):
For example: For the rule "Province" selected users, add row access:
The field "province" equals "User Attribute," in the dropdown list connected to user attributes, all user attributes in the system will be listed:
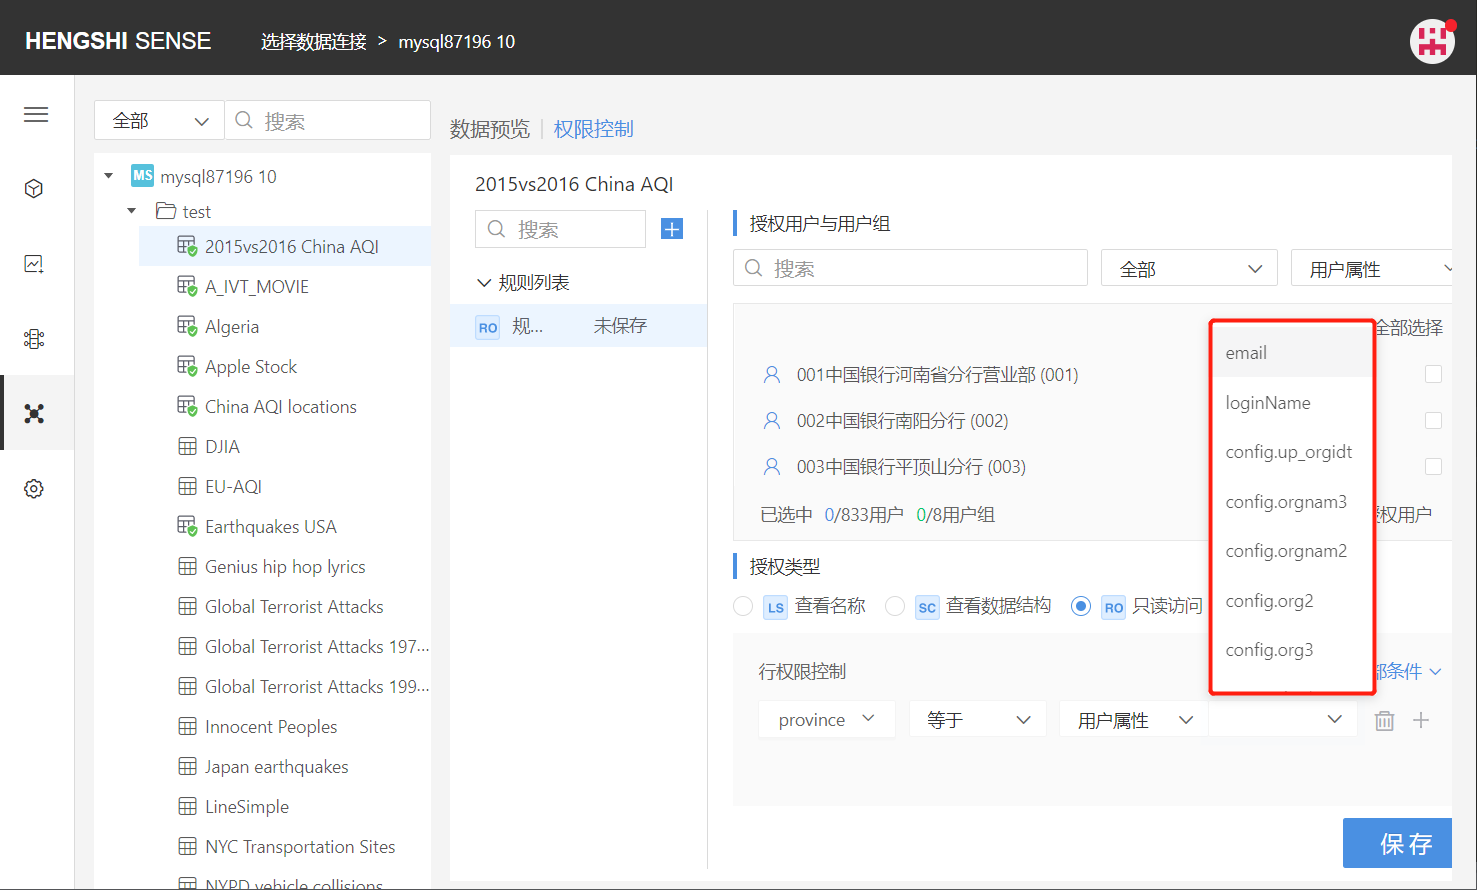
Select the user attribute config.org2:
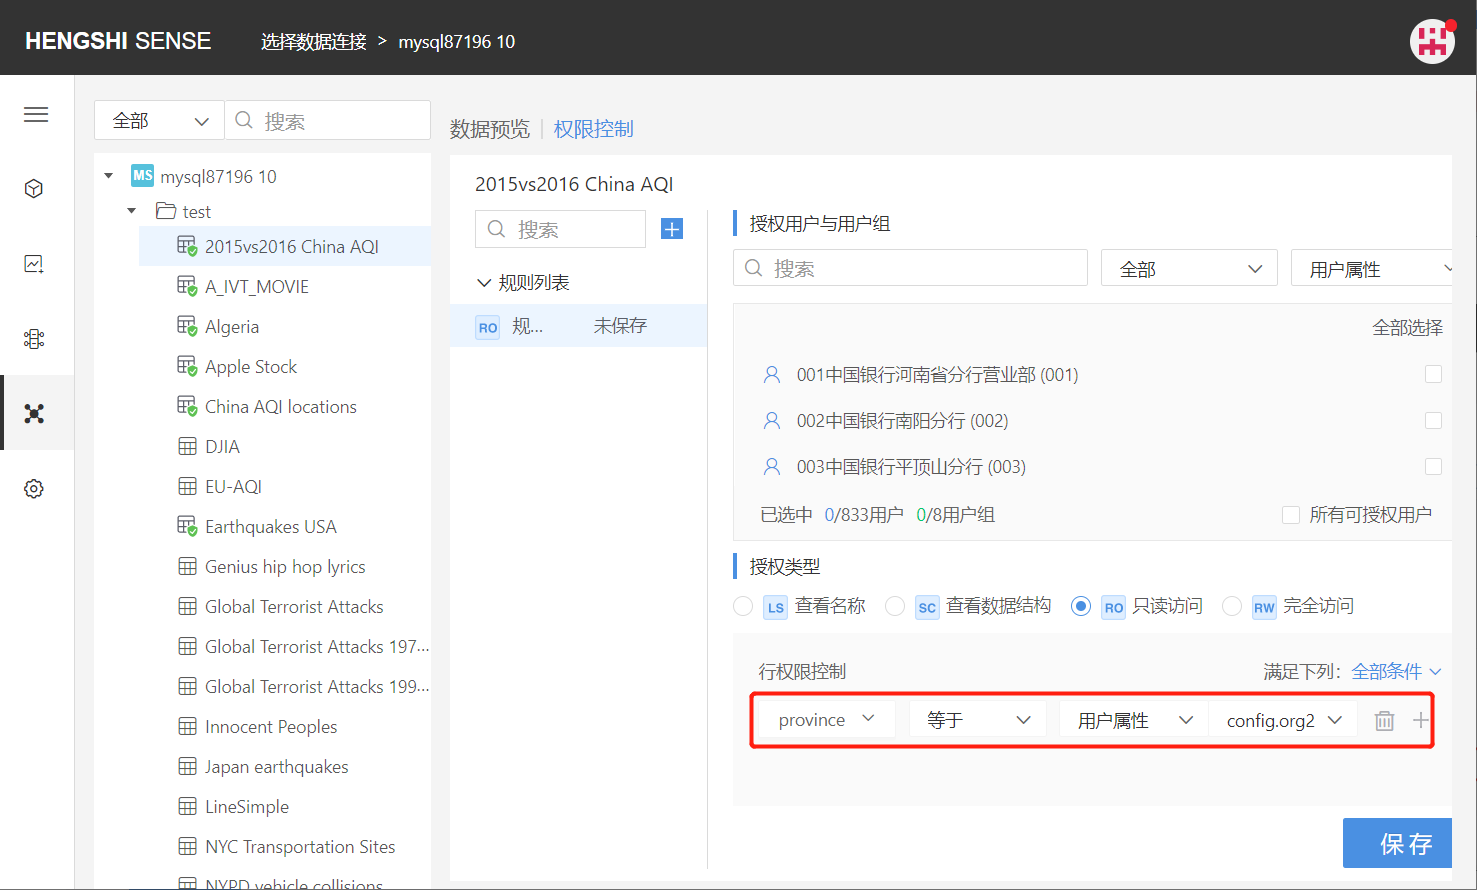
Users within that rule when accessing the connection, in that table, can only see row data where the "province" field equals their user attribute config.org2 value.
Step Four: Save Rules
Click 'Save', and the rule settings are successful, with the number of authorized users/users behind the rule name being updated.
Post-Authorization User Access
Depending on the type of authorization selected, the contents visible to users within that rule when accessing the application are:
- LS: Can only see the name of the selected table in the test directory;
- SC: Can see the name and structure of the selected table in the test directory;
- RO: Can see the sorted data range established by row access of the selected table in the test directory;
- RW: Can see the name and structure of all tables in the test directory and the complete table data.
Authorized User Visible Data
By setting Authorization Type, the owner can specify which data in their connection directories/tables the authorized user can access.
When the authorized user logs in and visits the data connection, or creates new data sets depending on the data connection, the visible data are all restricted by the access control range.
There are four types of authorization:
- View Names (LS)
- View Data Structure (SC)
- Read-Only Access (RO)
- Full Access (RW)
Please note:
- Having a certain permission on a directory is the same as having that permission on all its subdirectories and the tables within them;
- If due to directory hierarchy or belonging relationship between users and groups, there are multiple types of permissions when accessing the same directory or table, the highest permission is obtained.
View Names (LS)
- When set on the connection: Access to names/structures/data of all tables under that connection (no row access settings)
- When set on the directory: Access to names of all tables in that directory
- When set on the table: Access to the name of that table
View Data Structure (SC)
- When set on the connection: Access to names/structures/data of all tables under that connection (no row access settings)
- When set on the directory: Access to the structure of all tables in that directory
- When set on the table: Access to the structure of that table
Read-Only Access (RO)
- When set on the connection: Access to names/structures/data of all tables under that connection (no row access settings)
- When set on the directory: Access to names/