Hengshi Documentation
User Management
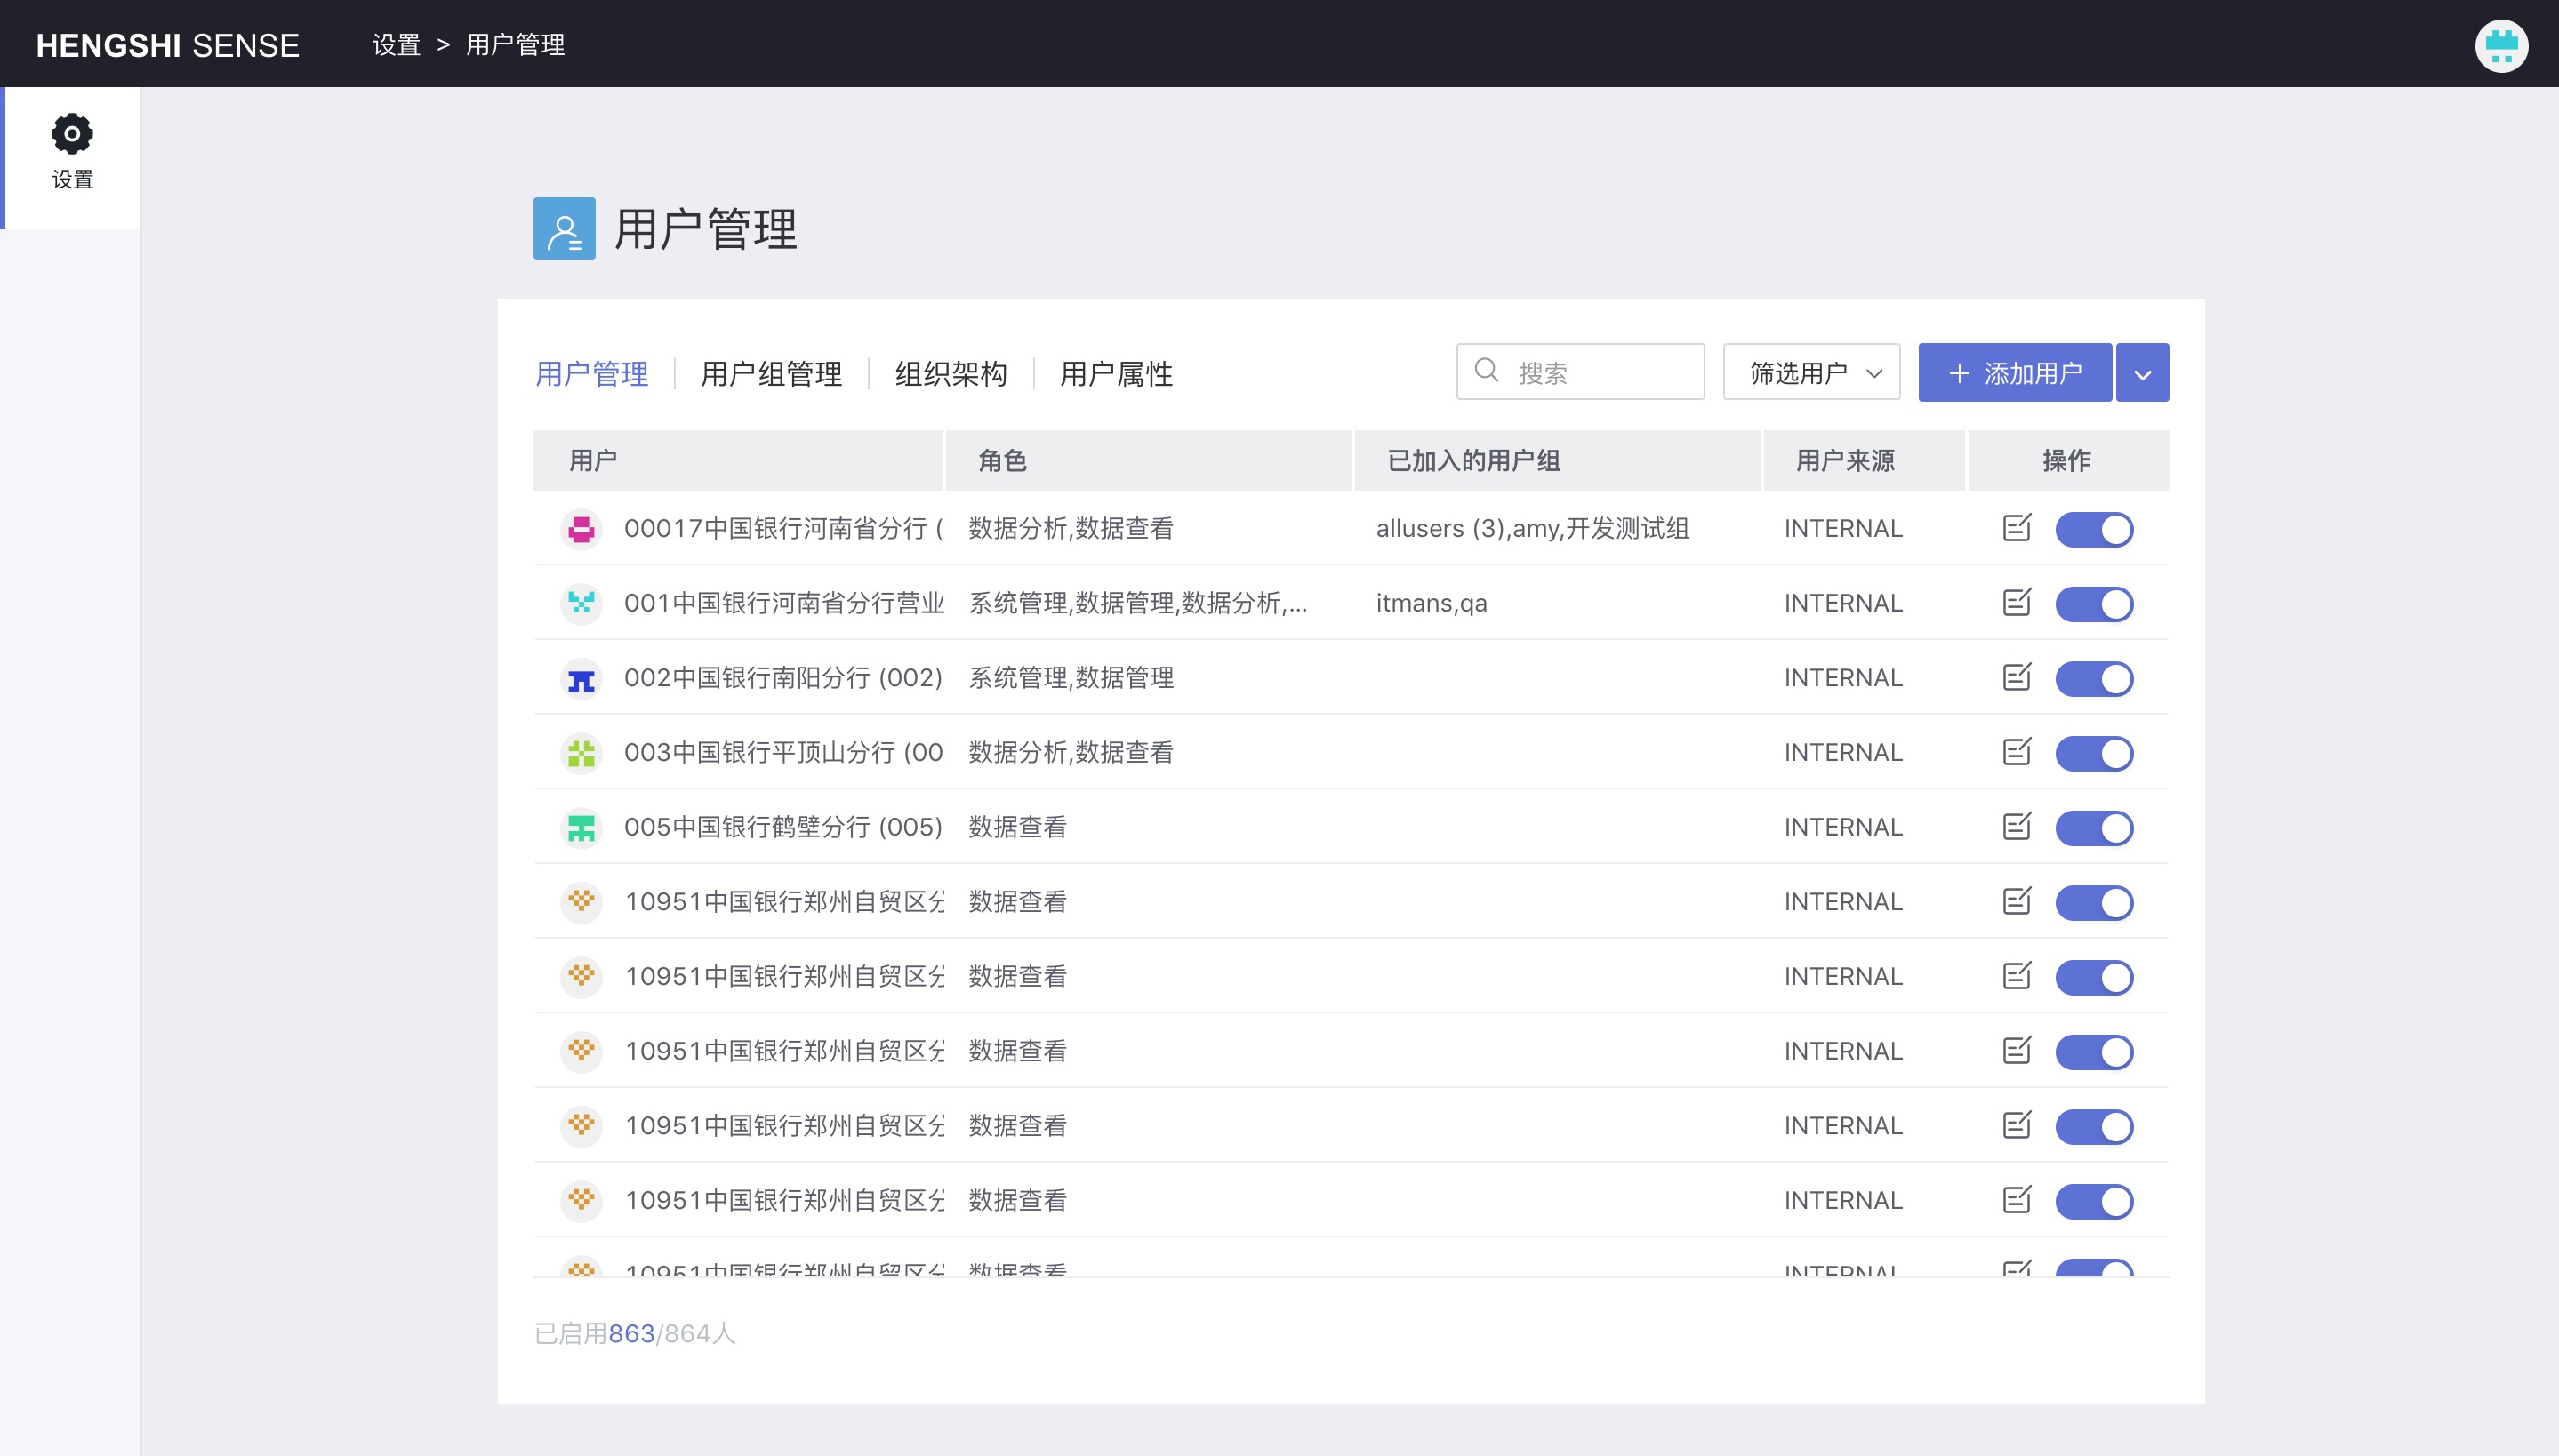
User Management
User List
In the user list, you can see all users of the system.
User Roles
There are four types of user roles in the SENSE system, and each user can add one or more of these four roles. Having the corresponding user role will have the corresponding permissions. The table of user roles and permissions is as follows:
| User Group | Permissions |
|---|---|
| System Management | View and modify all configuration options in the system settings. |
| Data Management | Create and manage data connections, data markets, data preparation, and data science. |
| Data Analysis | The main user in the system, create and manage applications, including the datasets, charts, dashboards, etc. |
| Data Browsing | View applications released to oneself by data analysts within the app market, and can browse charts, export applications, share applications, etc., within the application. |
System Management
System administrators have the right to view and modify all configuration items in the first-level menu Settings.
Data Management
Data managers can create and manage data connections, data markets, data preparation, and data science.
Data Analysis
Data analysts are the primary users for data exploration, and the vast majority of functions for datasets, chart exploration, and dashboards fall under the responsibility of data analysts.
In addition to creating datasets by file upload, to create other datasets, data connections must be created by a data manager and authorized to data analysts, after which data analysts can create datasets based on this connection and conduct exploration.
Data Browsing
Data browsers can view the meters, charts, etc., in the applications released to themselves by data analysts in the app market.
Add User
After system initialization, once the administrator is created, the admin can manually add new users in the HENGSHI SENSE system or use other authentication methods to access the organization's users.
Log in with the system administrator account, go to Settings -> User Management, and click Add User.
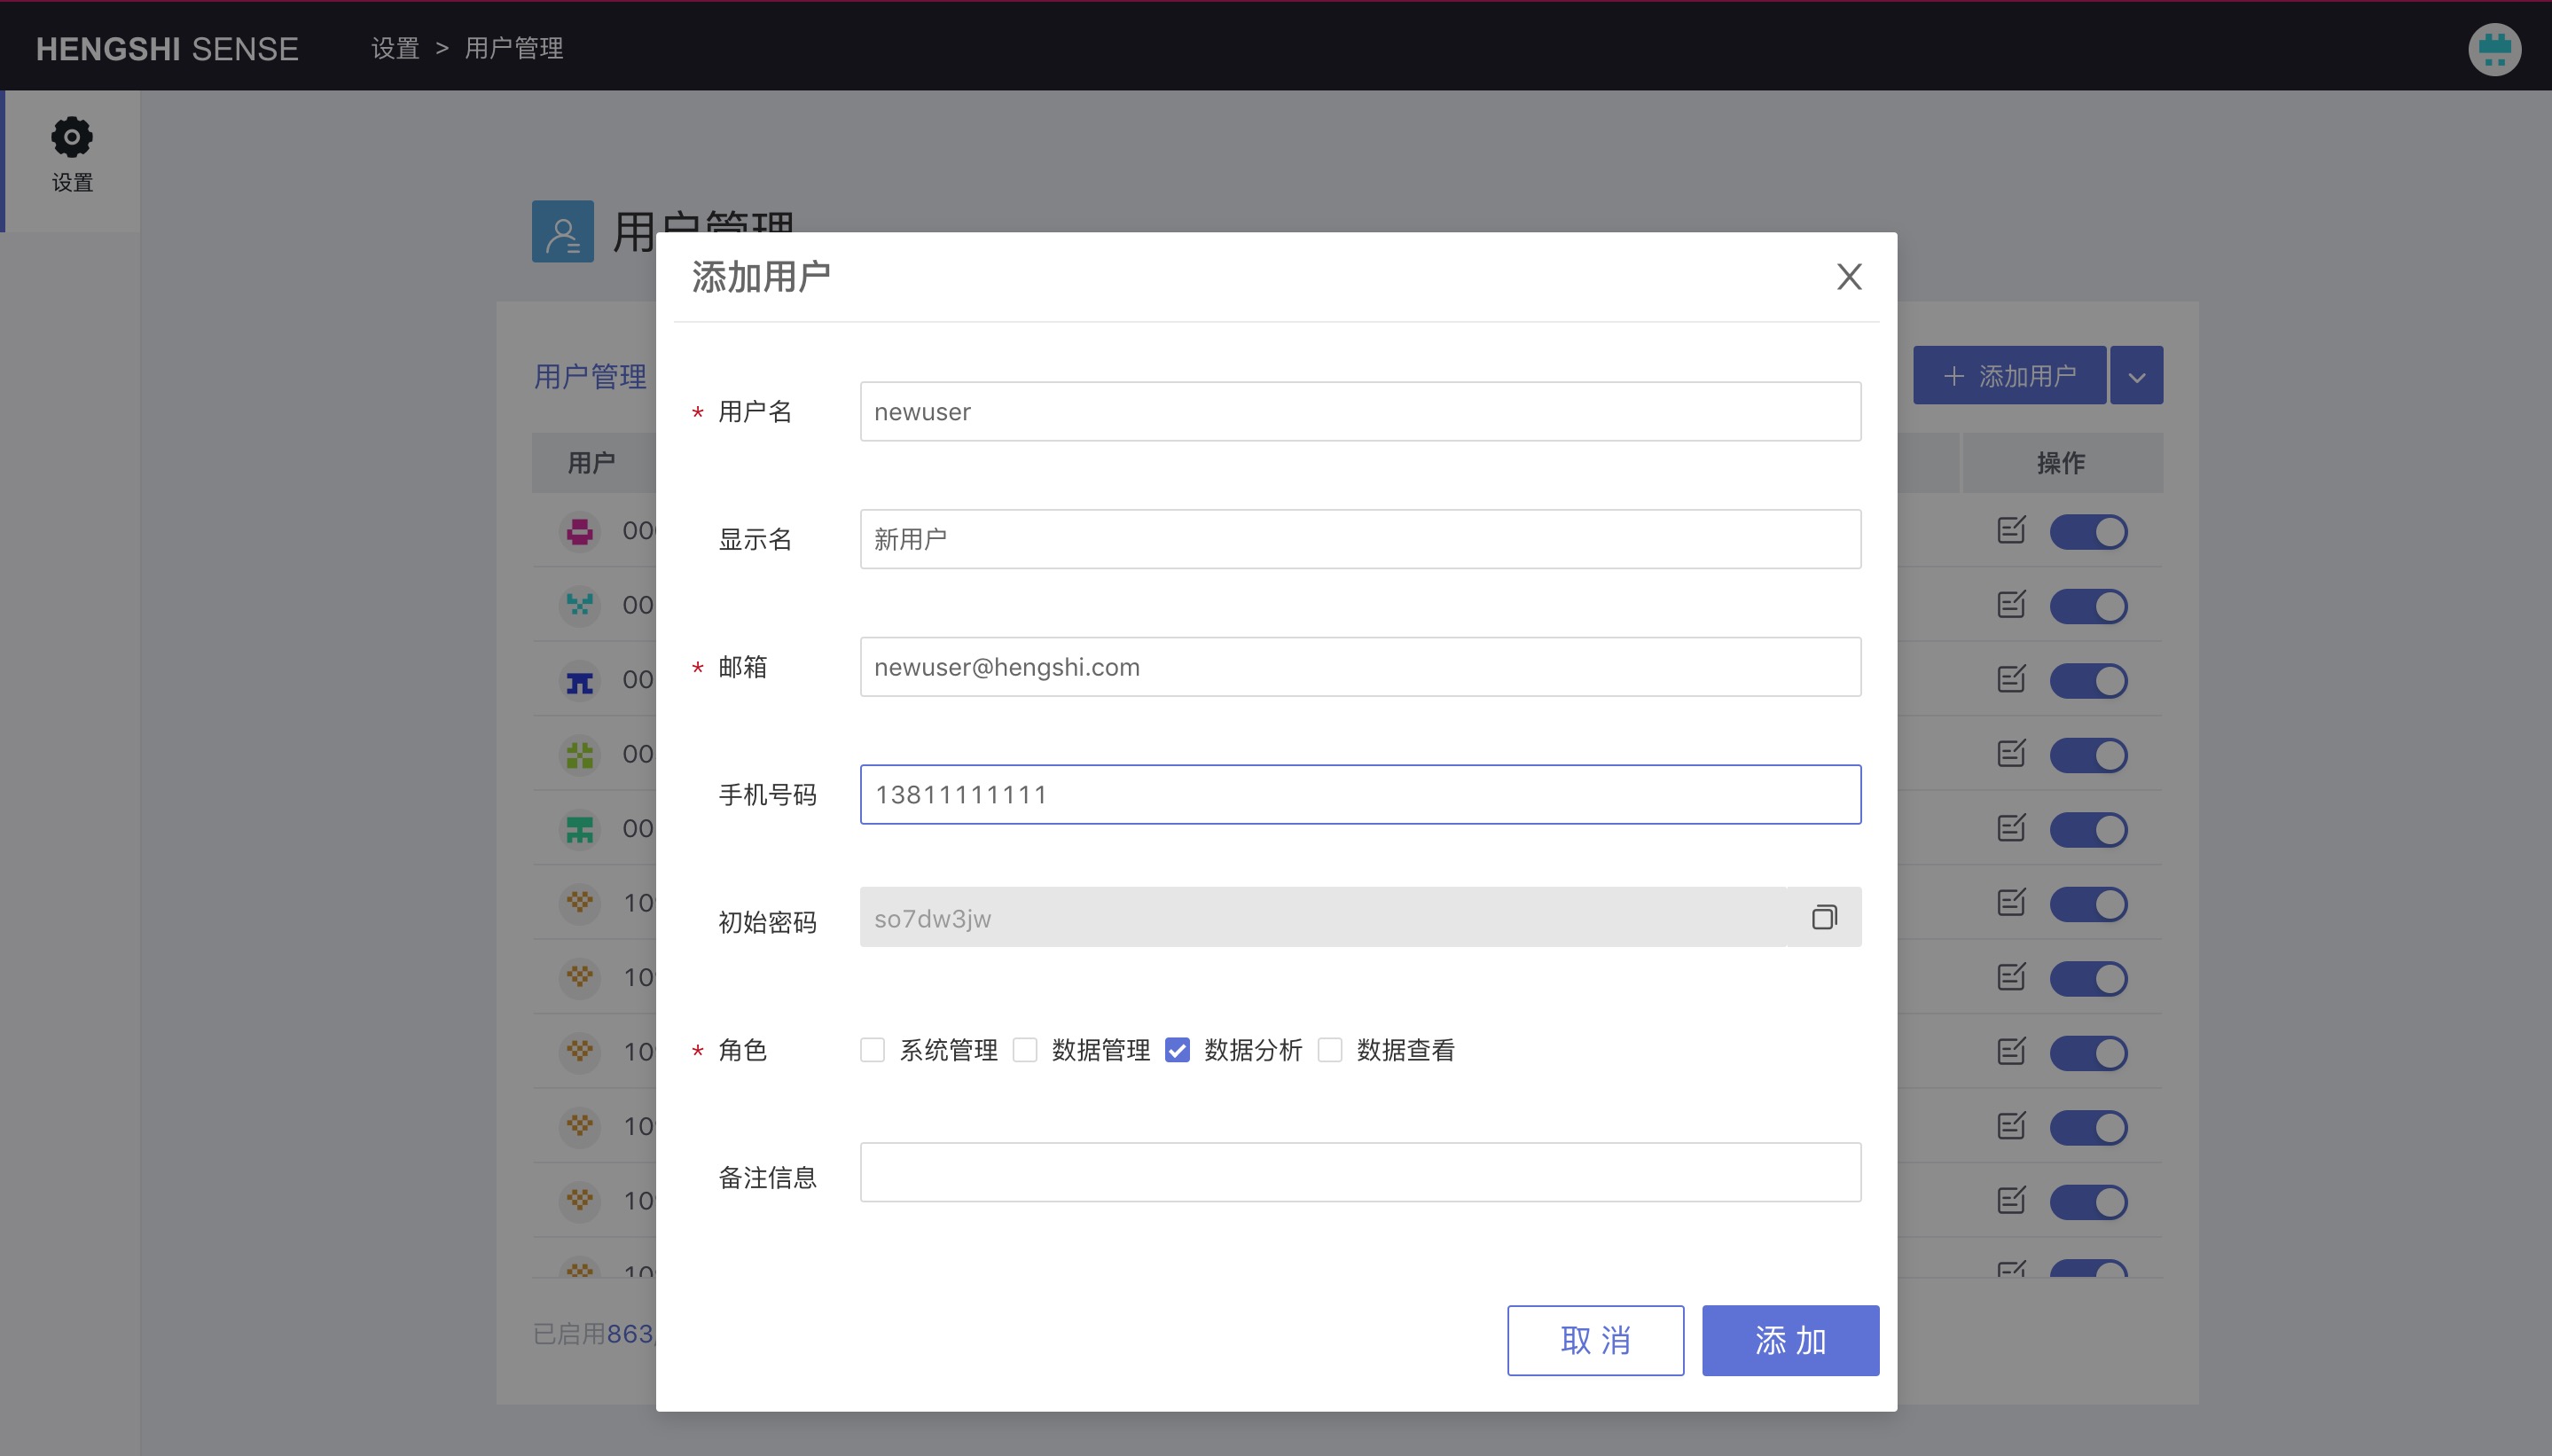
Fill in the required information: username and email, and a new user will be generated, the default user group for new users being "Data Analysis."
Two fields are described as follows:
| Field | Description |
|---|---|
| Username | The unique identifier for users to log into the system, cannot be duplicated, cannot be changed, and cannot contain special characters or start with numbers. |
| The unique identifier for the user, a correctly formatted, valid email address, cannot be duplicated, cannot be changed. |
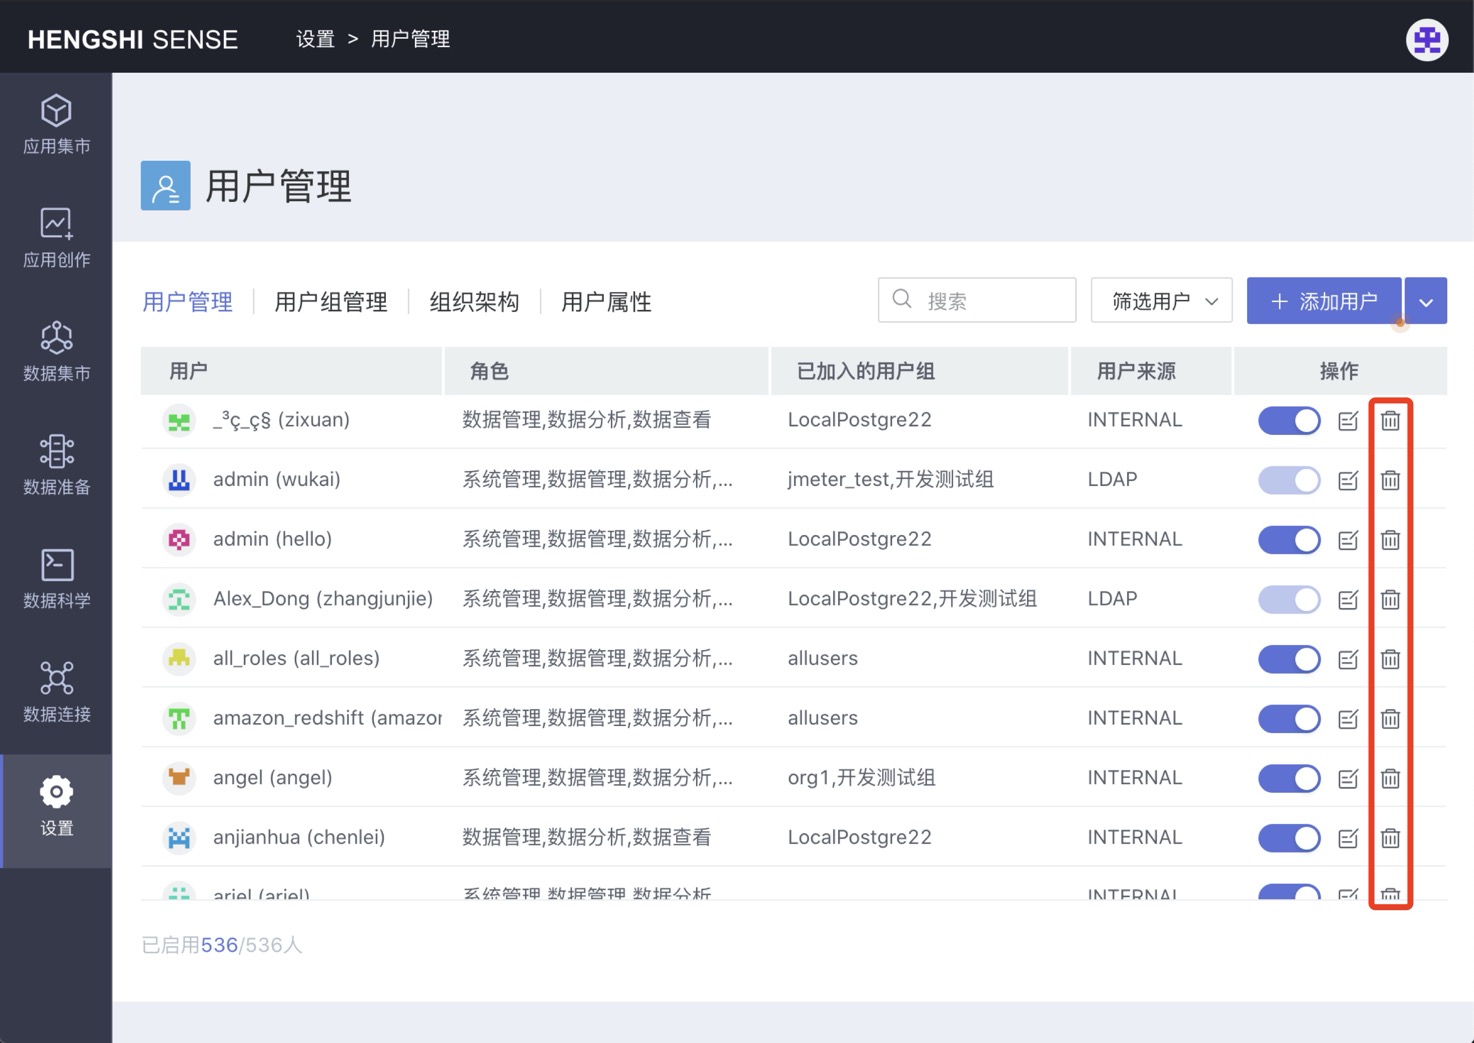
Delete User
Based on admin errors or employee departures, system administrators may need to delete certain users. With the system administrator account, click Settings -> User Management to enter the user management list. After making sure that the user has no available resources, click "Delete User" to delete the user.
Batch Operations
Batch operations provide bulk operations for users, including bulk import, bulk export, enable all, and disable all.
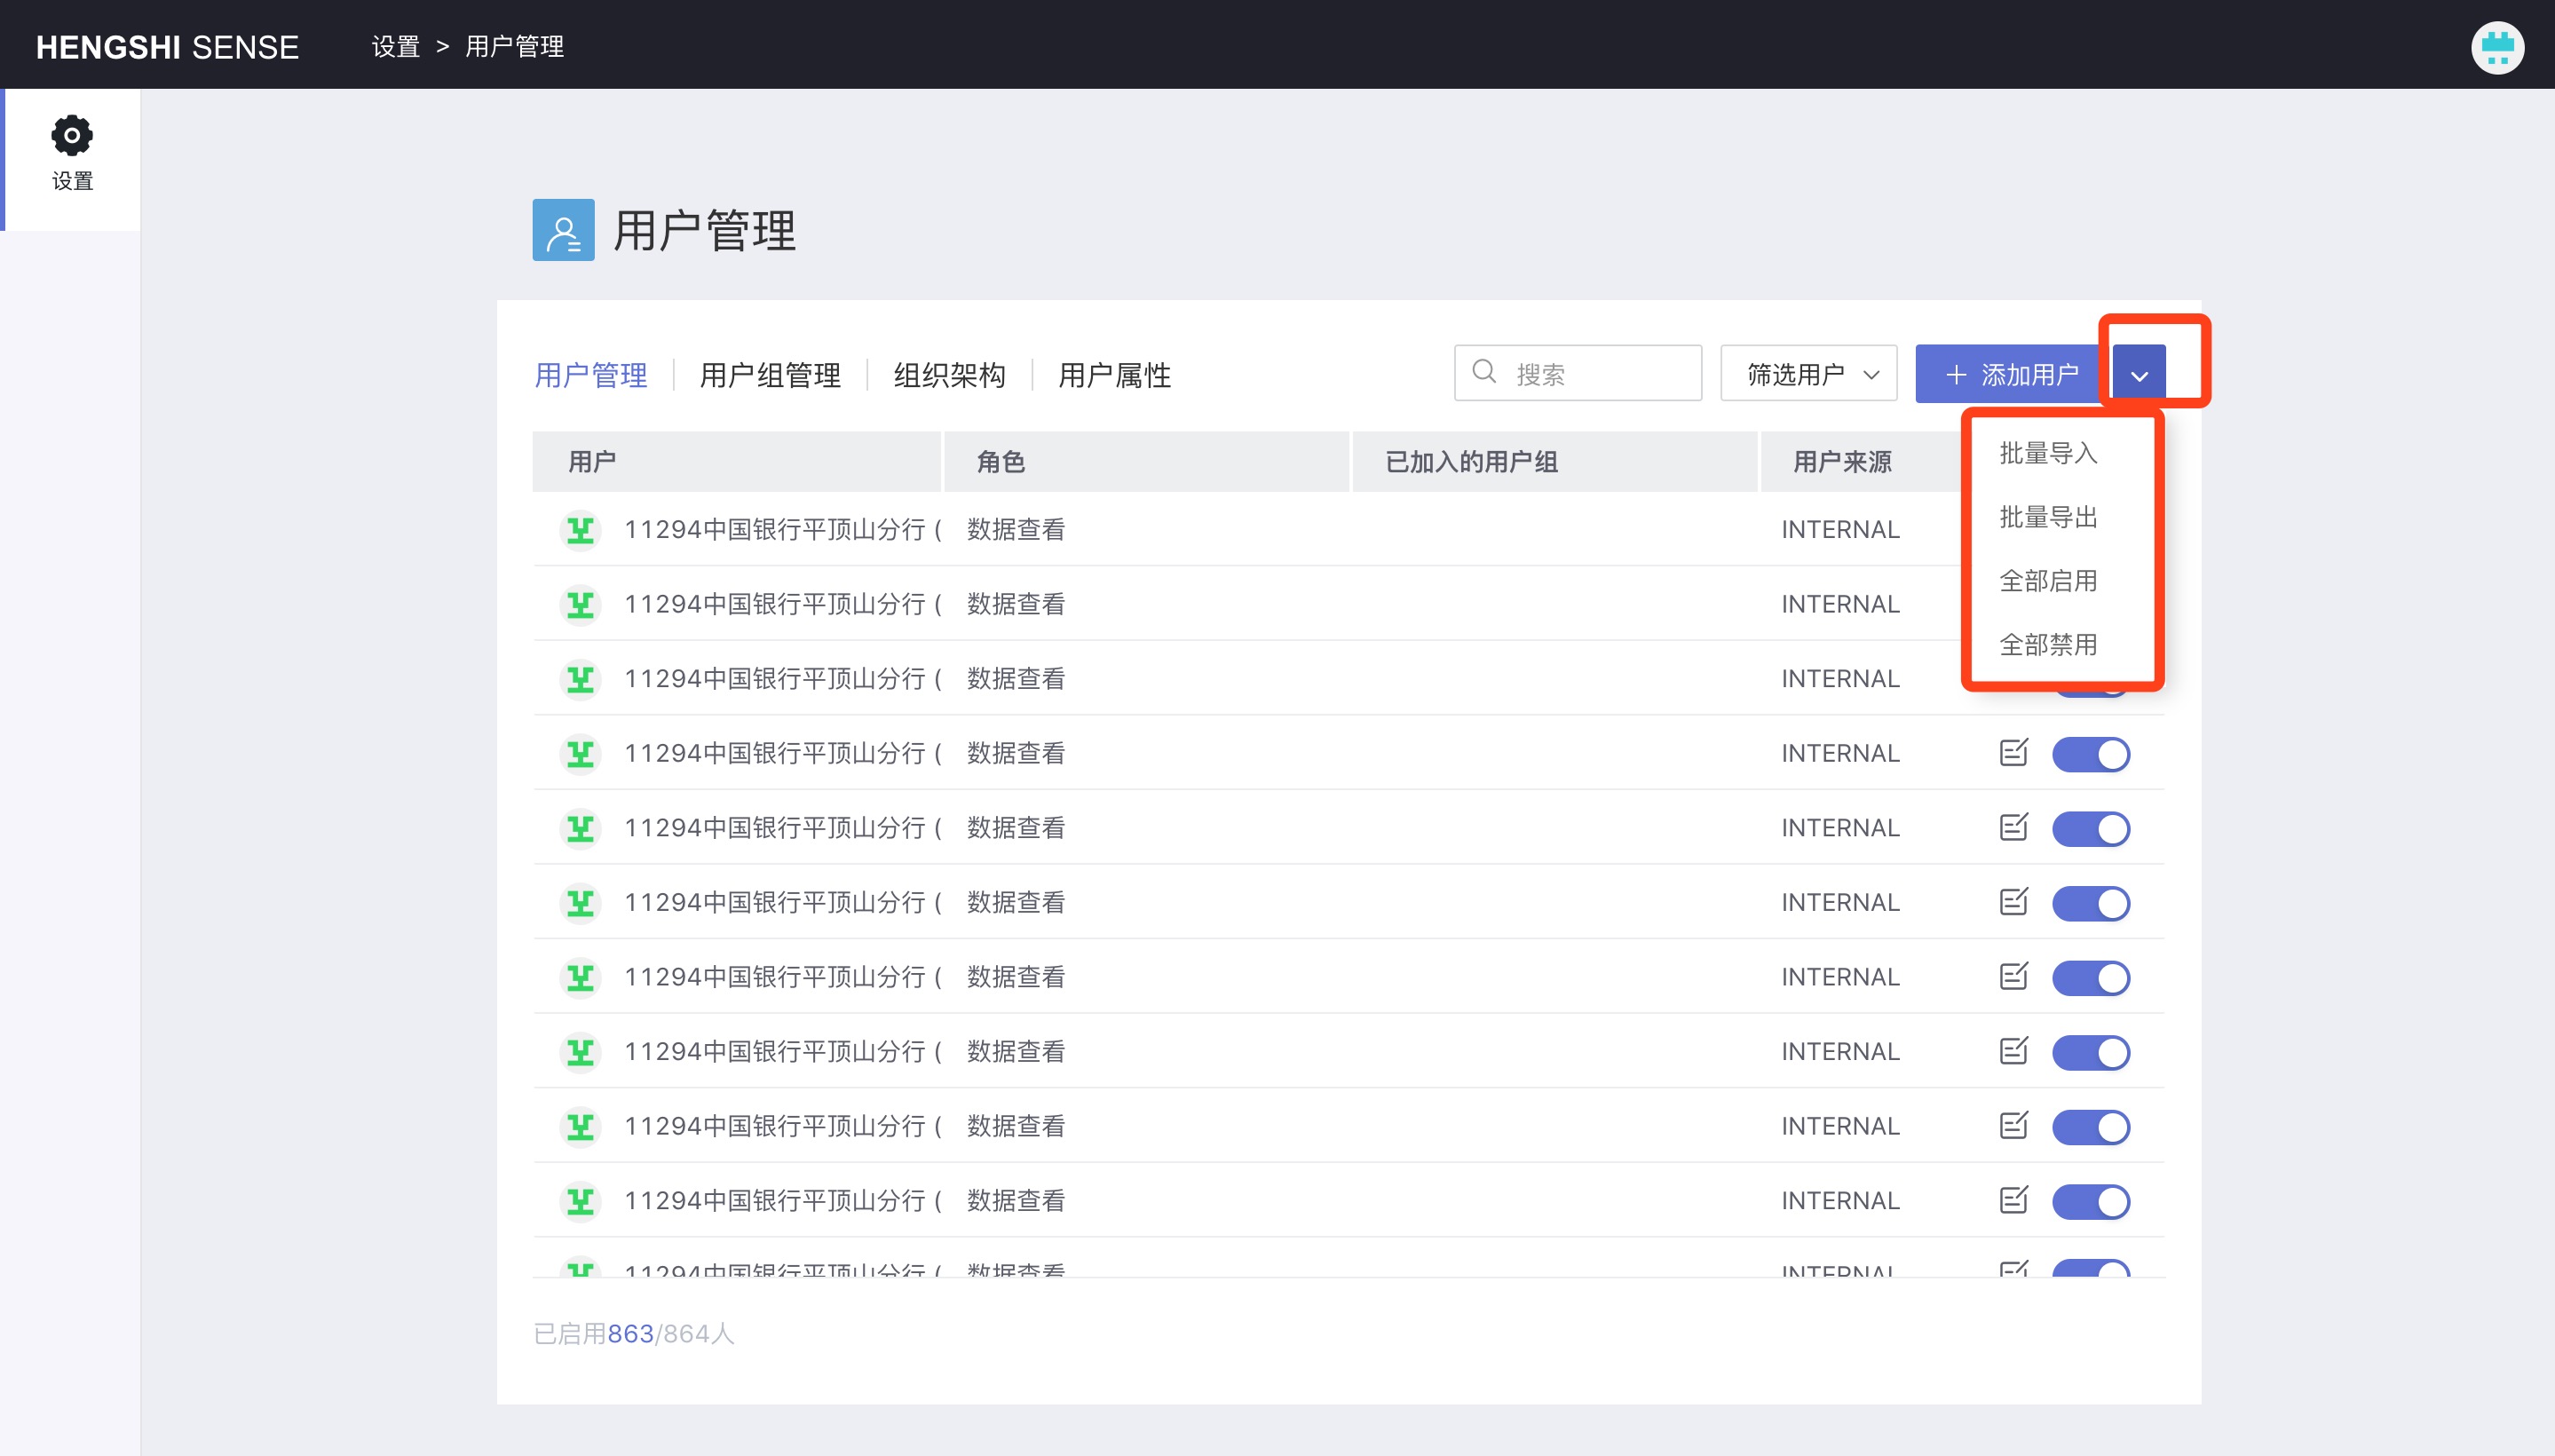
Bulk Import
Click the Bulk Import button in batch operations; you can increase, disable, or modify users by uploading local csv files.
When importing users in bulk, you can set user attributes for the users and add custom attributes.
In the local file for importing users:
- If you are adding a new user, loginName and email are required. The default password is "hs2019", and the default role is data browser.
- If it's an existing user, the necessary information must include: either loginName or id, either of which can uniquely determine a user, thus updating that user's information. If both loginName and id are provided but inconsistent with what's in the system, you will encounter an error.
- When a user needs to add multiple roles values, they are separated by a colon.
- When a user needs to join multiple organizations, the organization IDs are separated by a colon.
Bulk Export
When no filter condition is added, clicking the Bulk Export button in batch operations will export all users in the system:
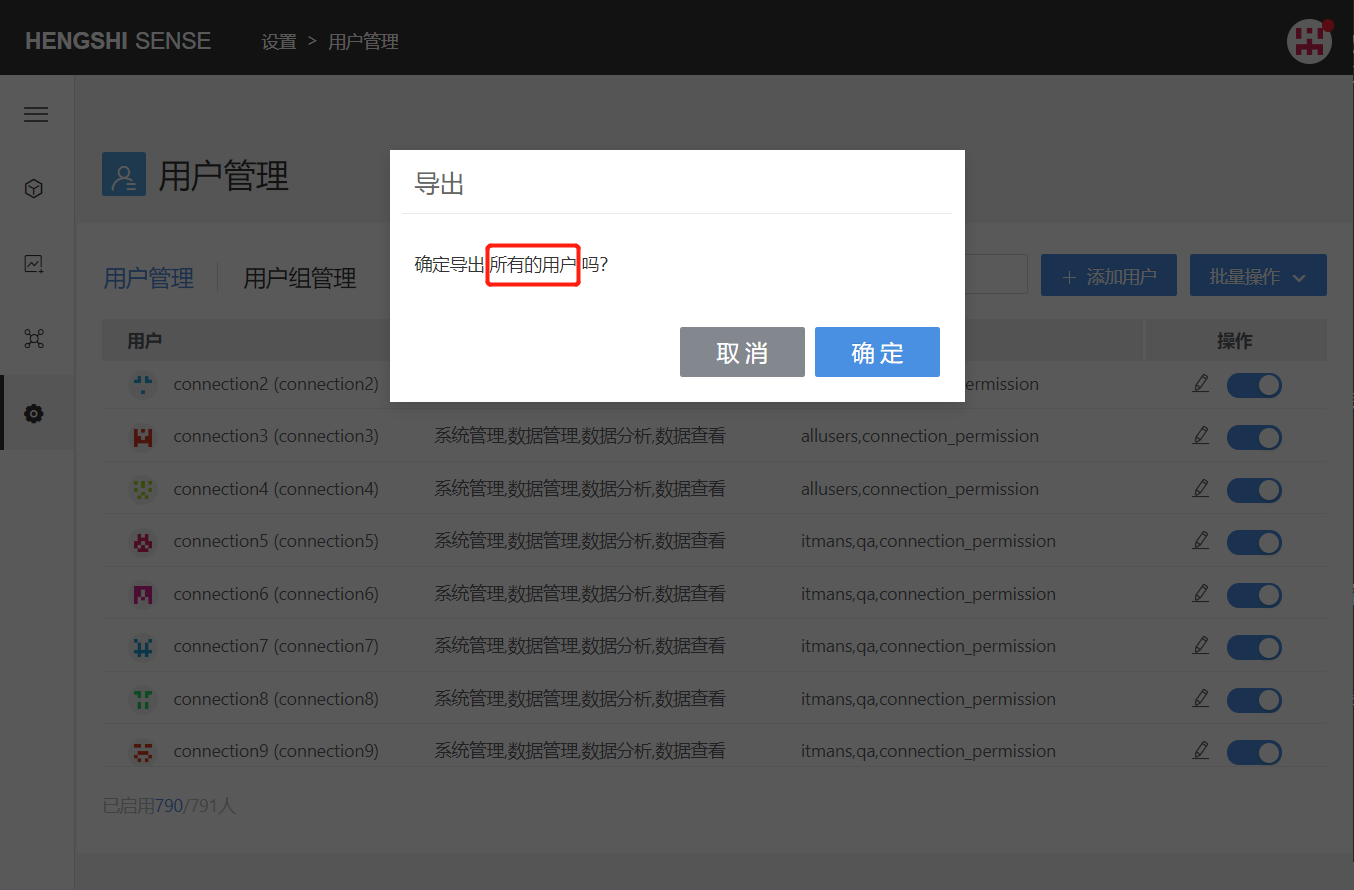
After adding a filter condition, clicking the Bulk Export button in batch operations will export all users within the filter condition:

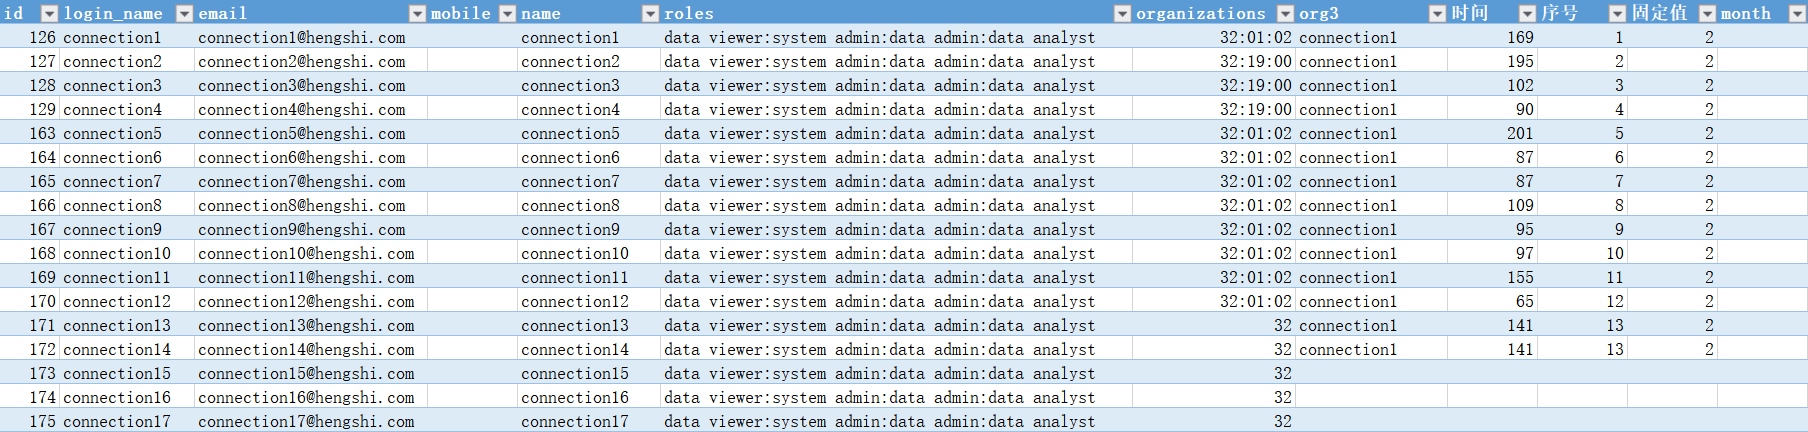
Open the exported file to export all information except the user's password completely:
Bulk export and import are suitable for user migration between systems.
Enable All
When no filter condition is added, clicking the Enable All button in batch operations will enable all users in the system:

After adding a filter condition, clicking the Enable button in batch operations will enable all currently filtered users:

Disable All
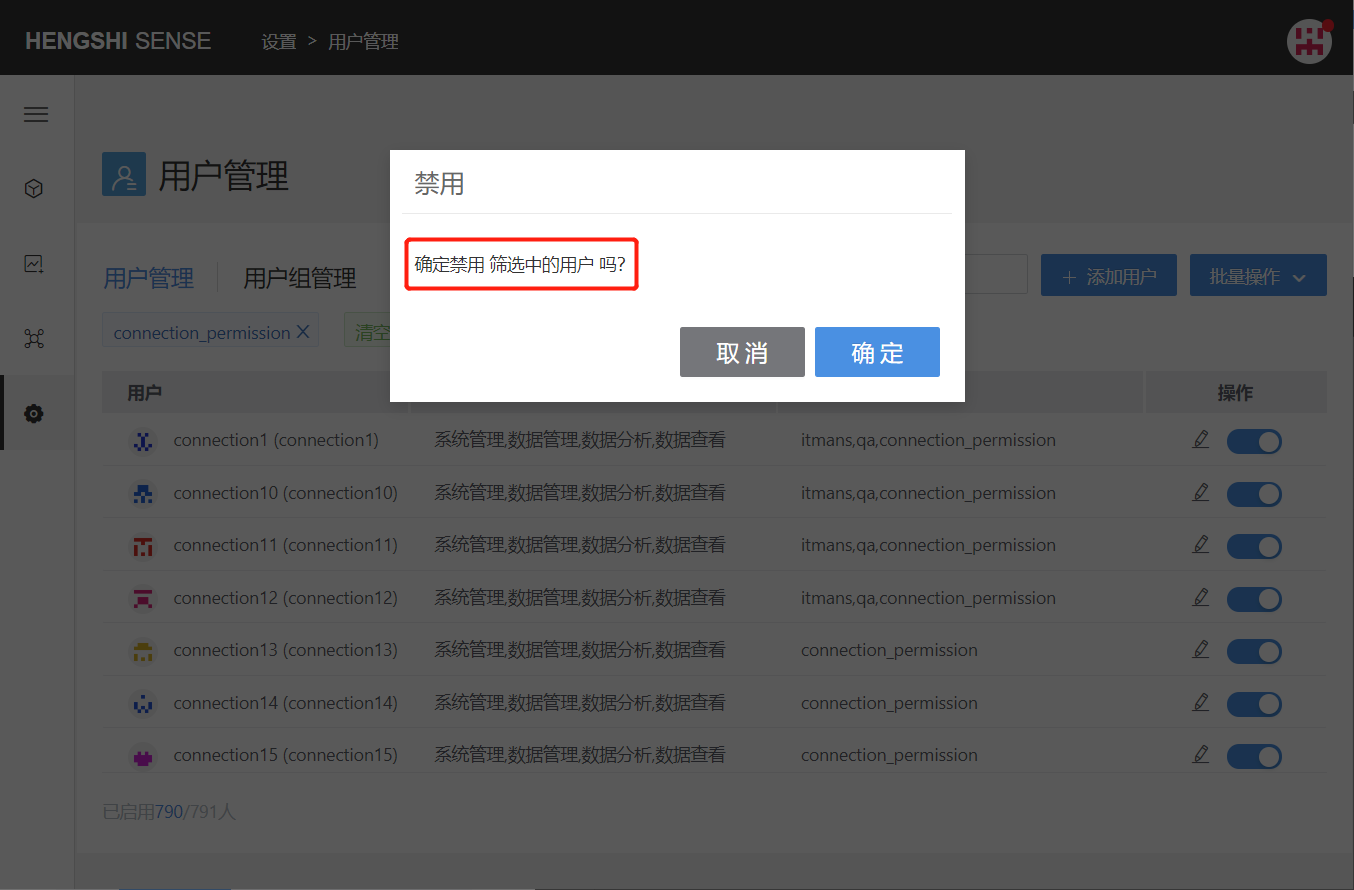
When no filter condition is added, clicking the Disable All button in batch operations will disable all users in the system:

After adding a filter condition, clicking the Disable All button in batch operations will disable all currently filtered users:
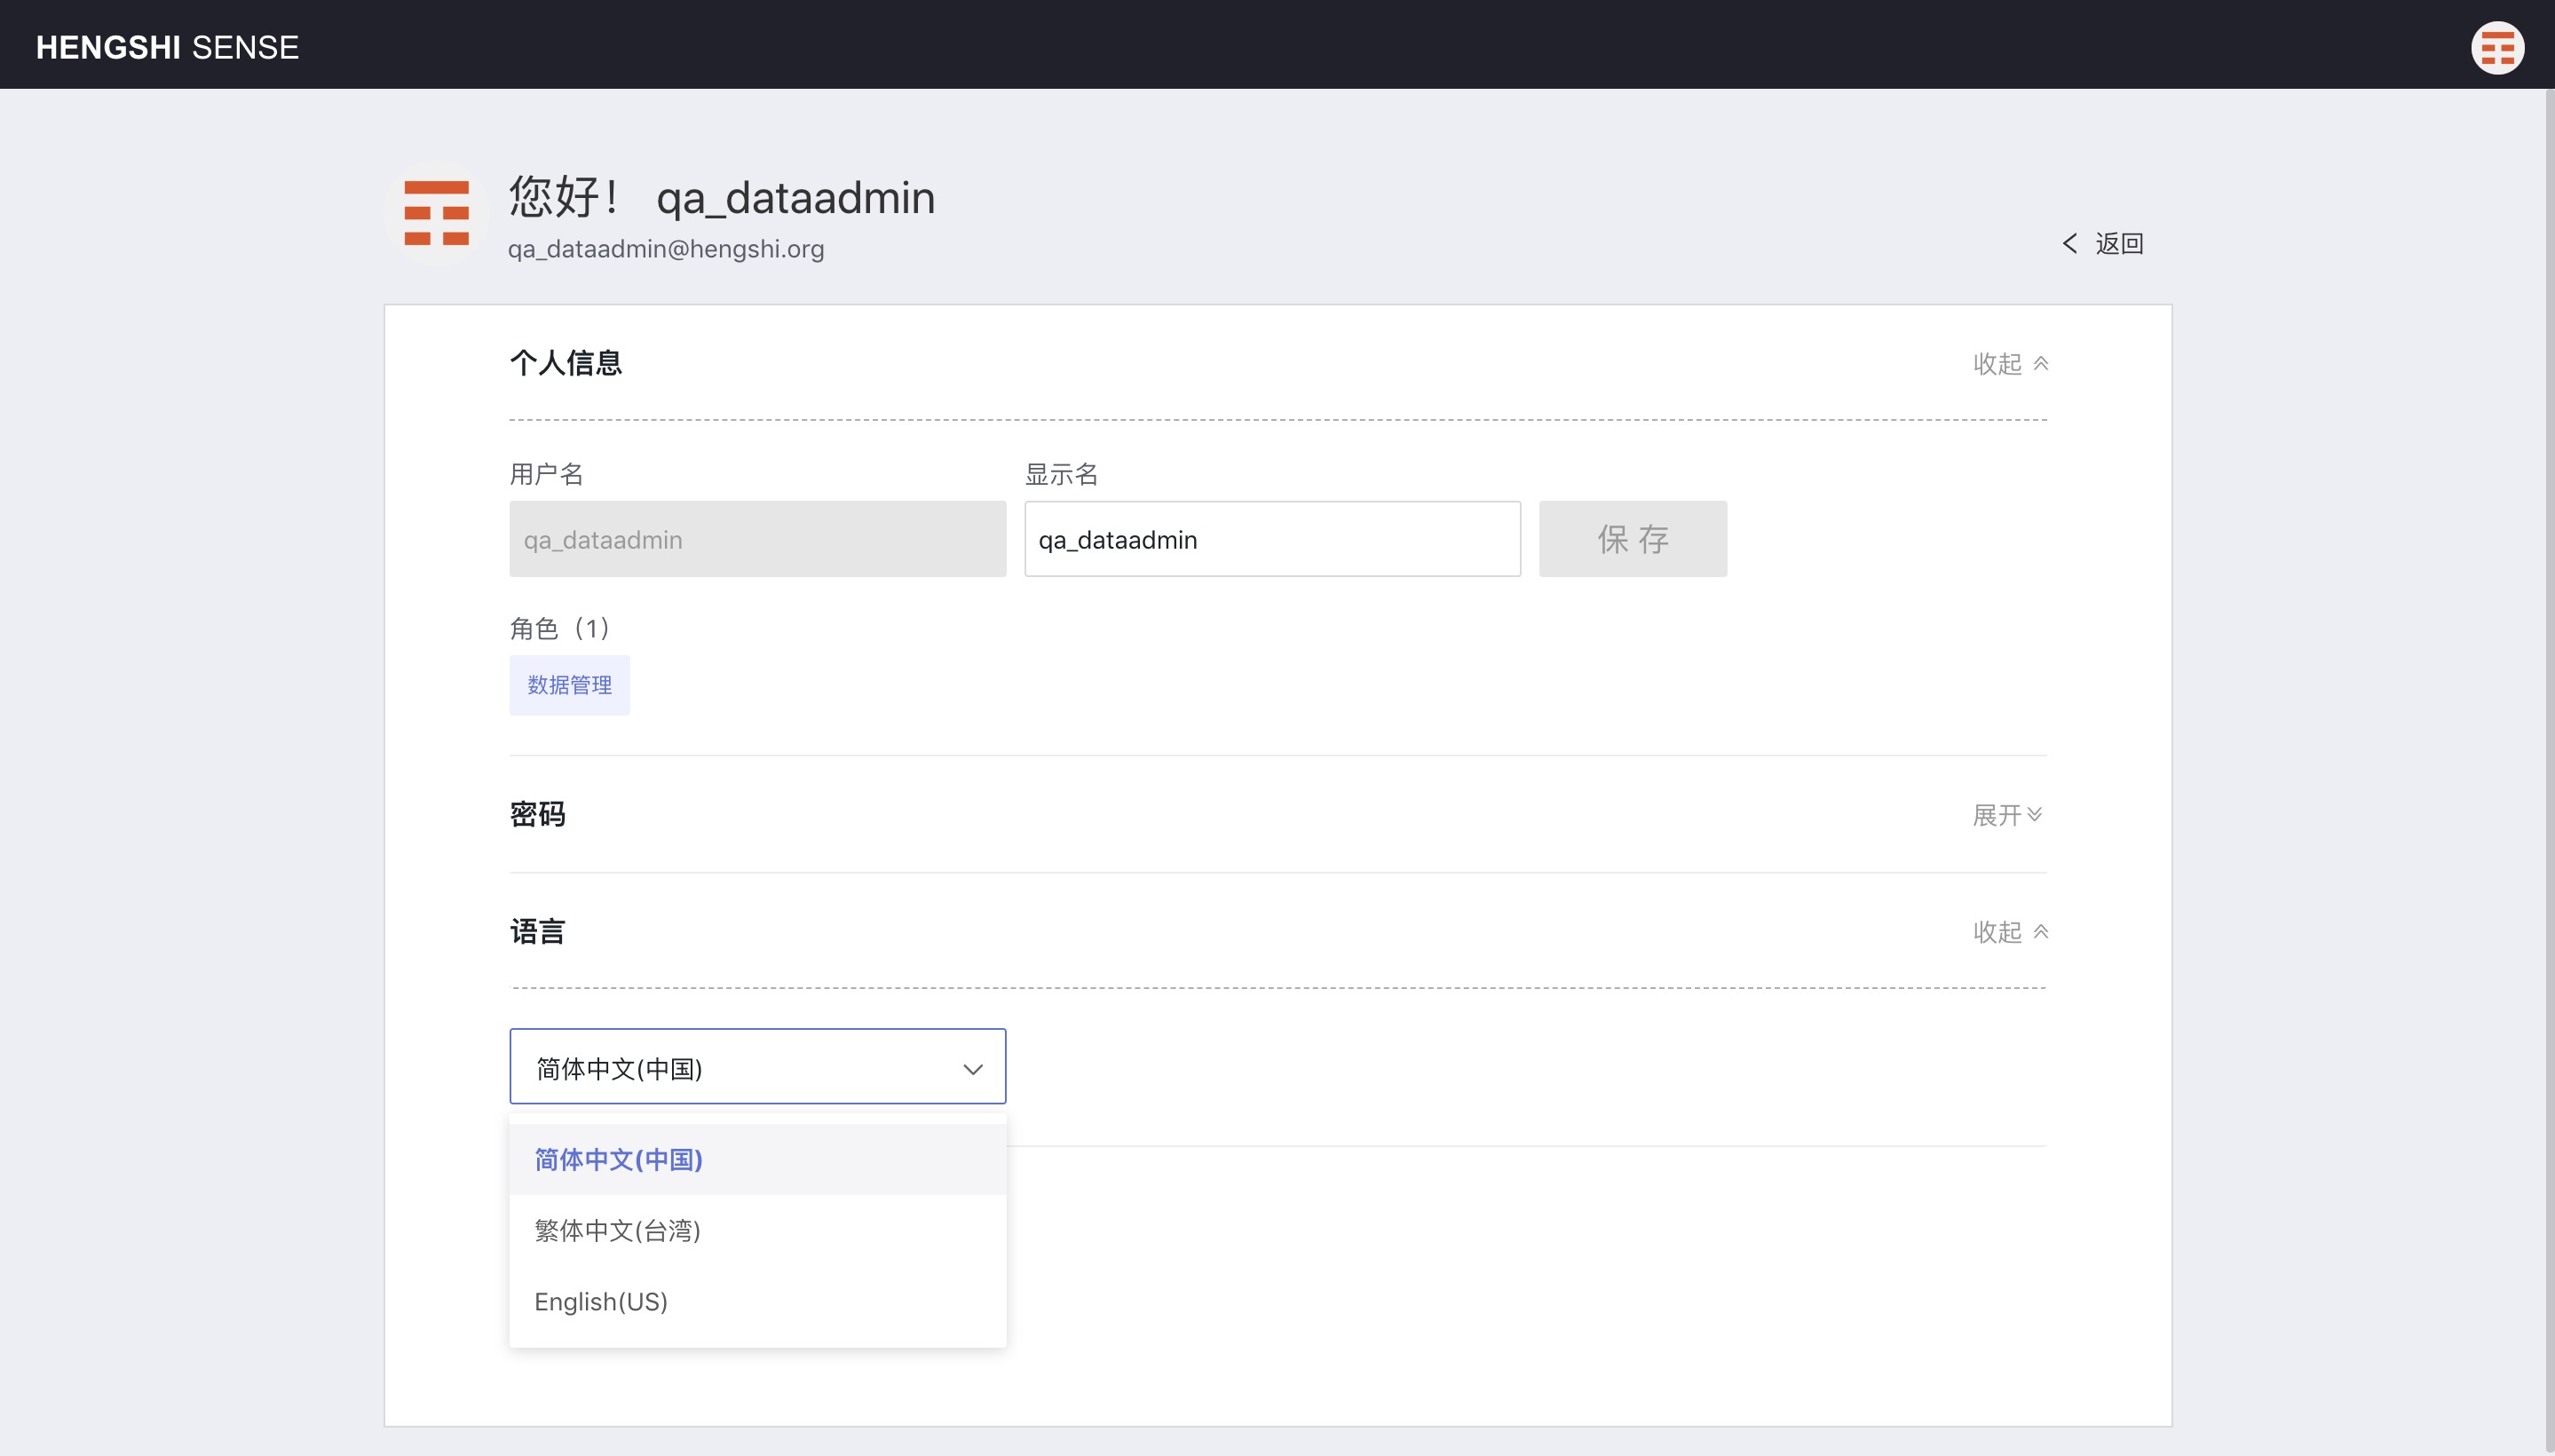
Account Settings
All users can view or change their personal information by clicking on the avatar -> Account Settings in the top right corner. Items that can be edited include:
- User avatar
- Display name
- User password
- System language
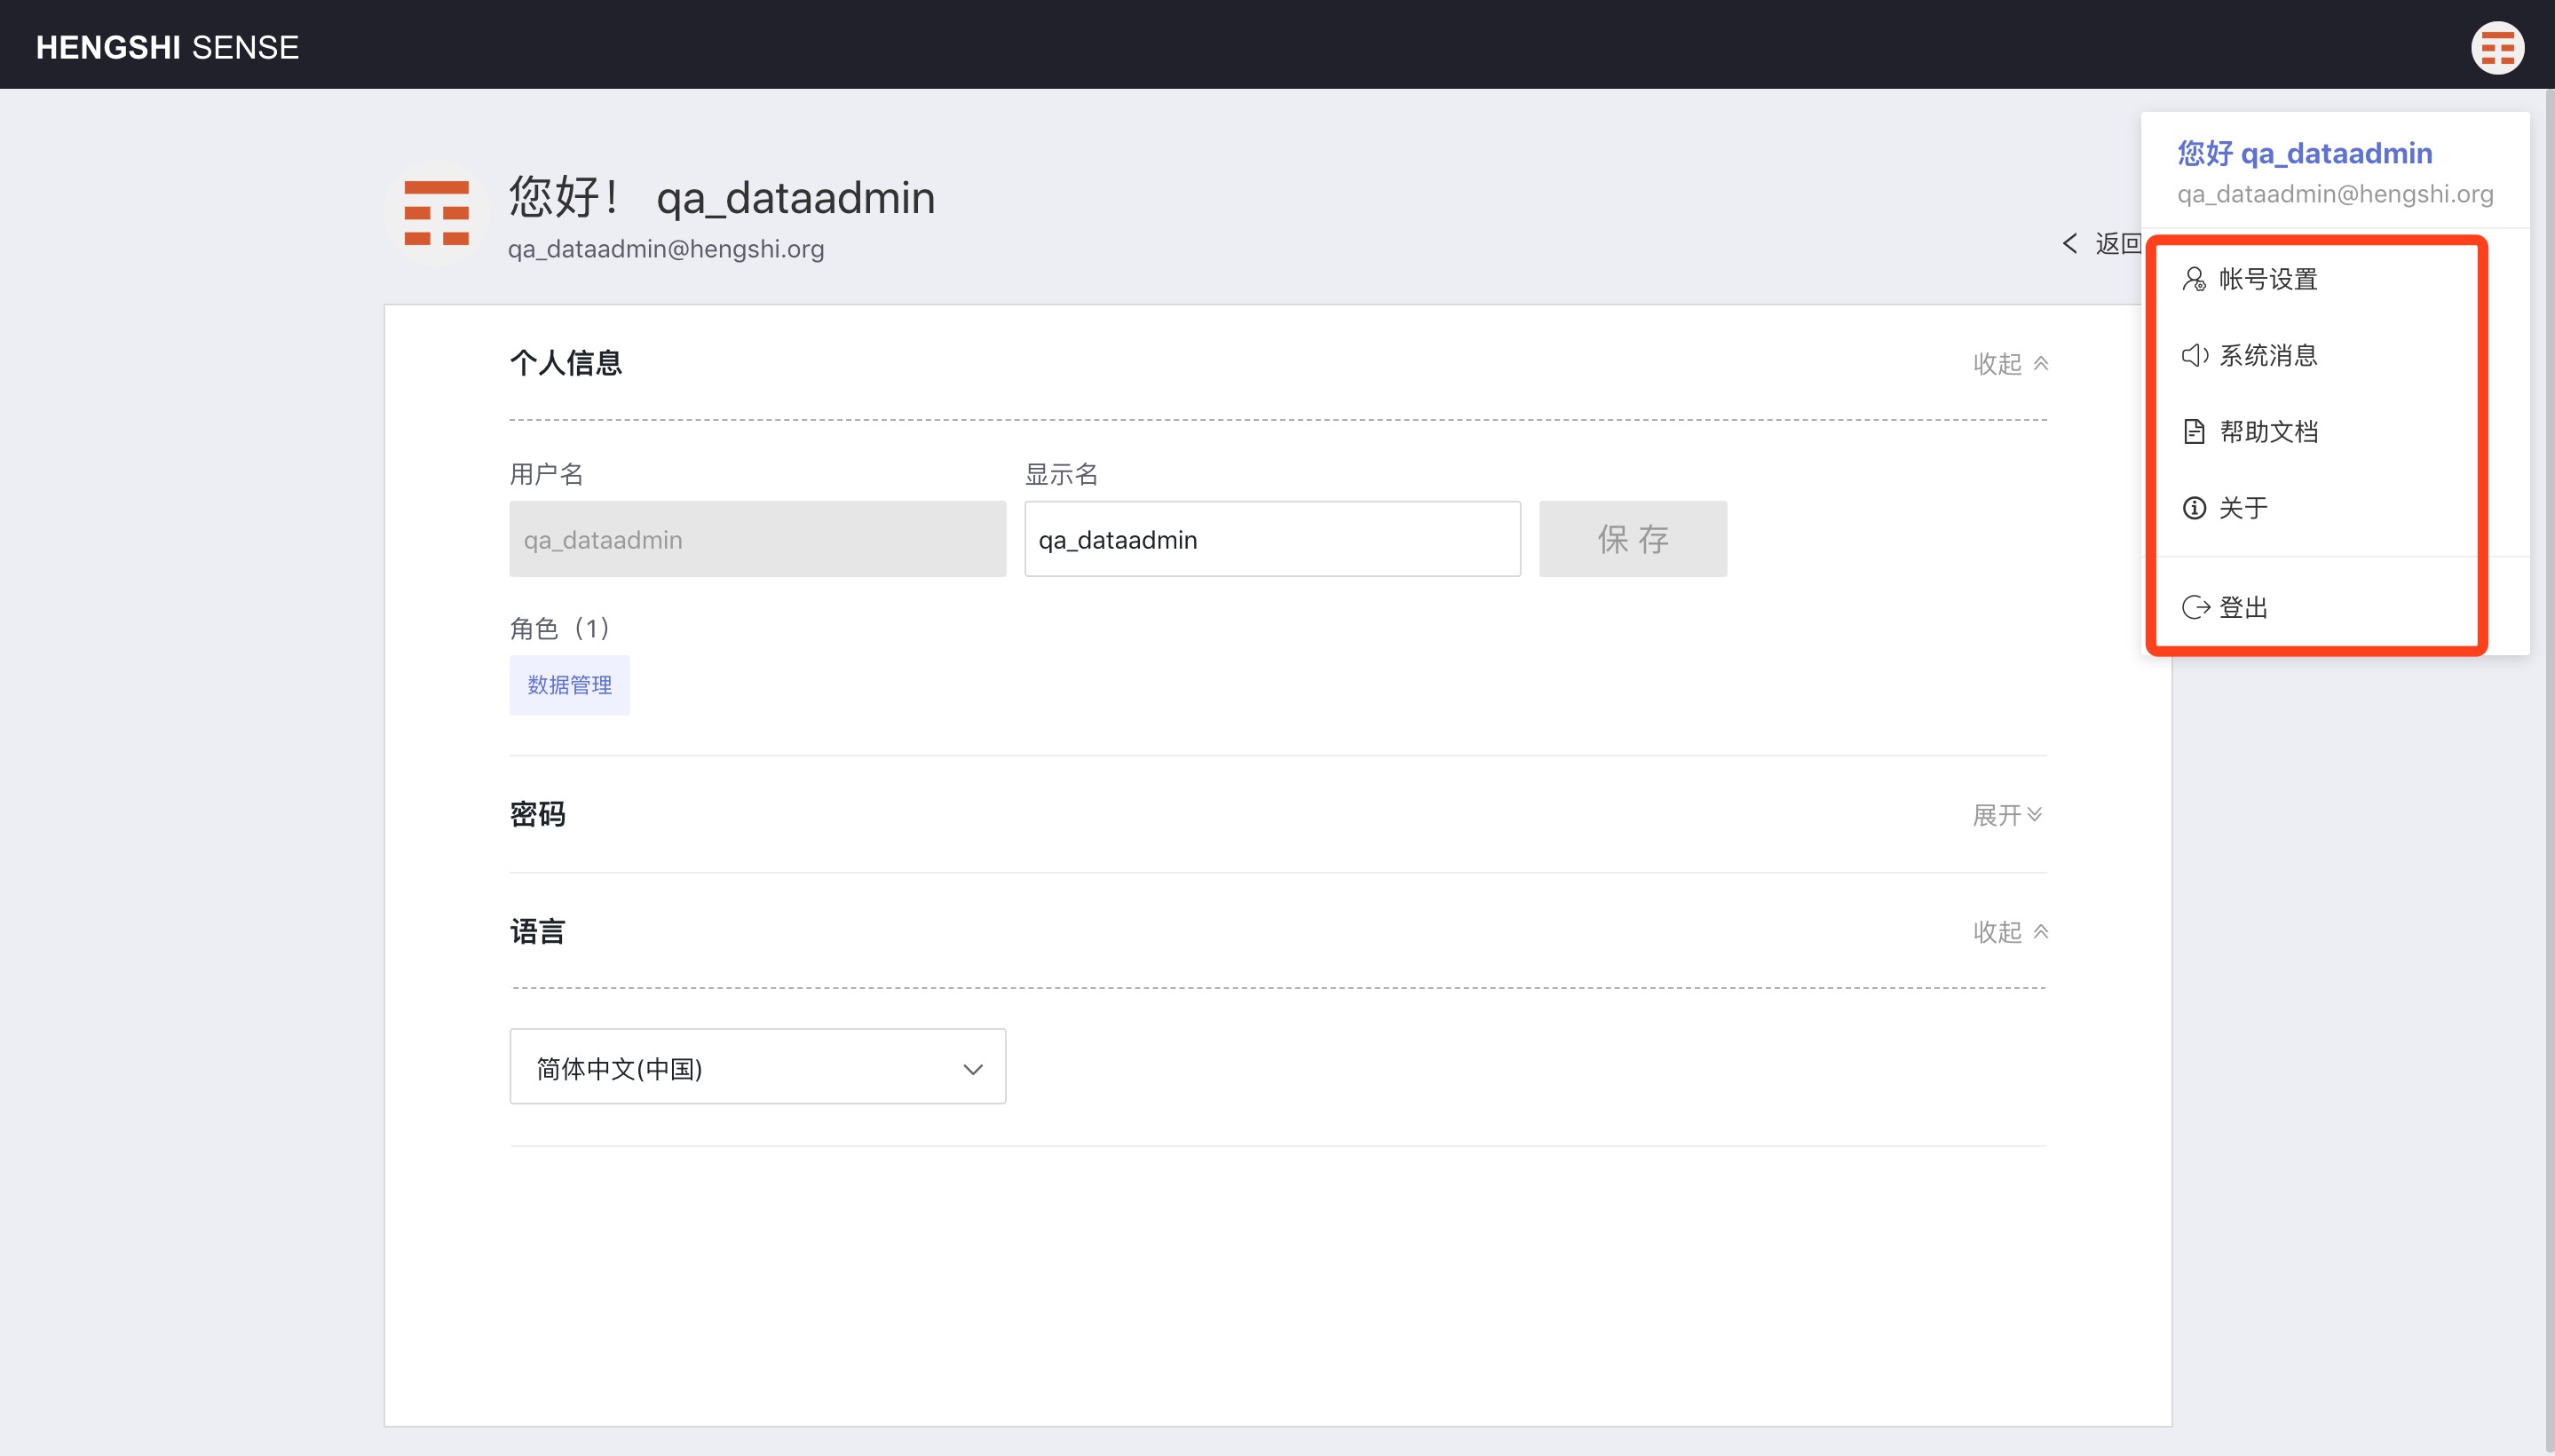
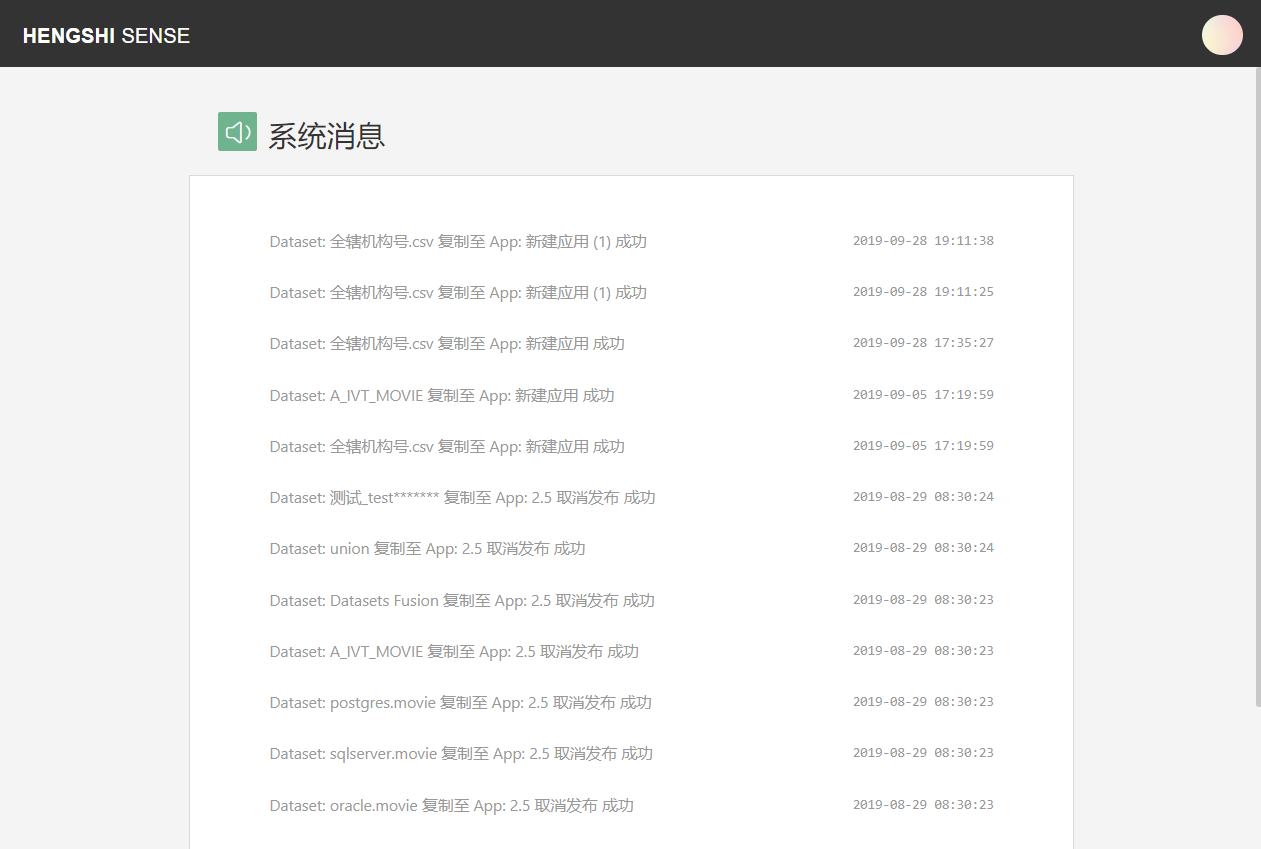
System Messages
Operations such as app collaboration, dataset copying, and users being disabled for not logging in for an extended time will generate system messages. Users can view these by clicking on the avatar -> System Messages in the top right corner.
Retrieve Password
There are two ways to retrieve a password:
- When the system has not configured an SMTP account, system administrators can change the password of all other users in the system through the
Configuration -> User Managementpage. - After configuring an SMTP account, HENGSHI users can retrieve their passwords through the
Forgot Passwordoption on the login page. The password will be sent to the user's login email. At the same time, the administrator's function to change other users' passwords is disabled.
Non-HENGSHI users, i.e. users who log in through authentication methods other than HENGSHI, cannot retrieve passwords in the HENGSHI system.
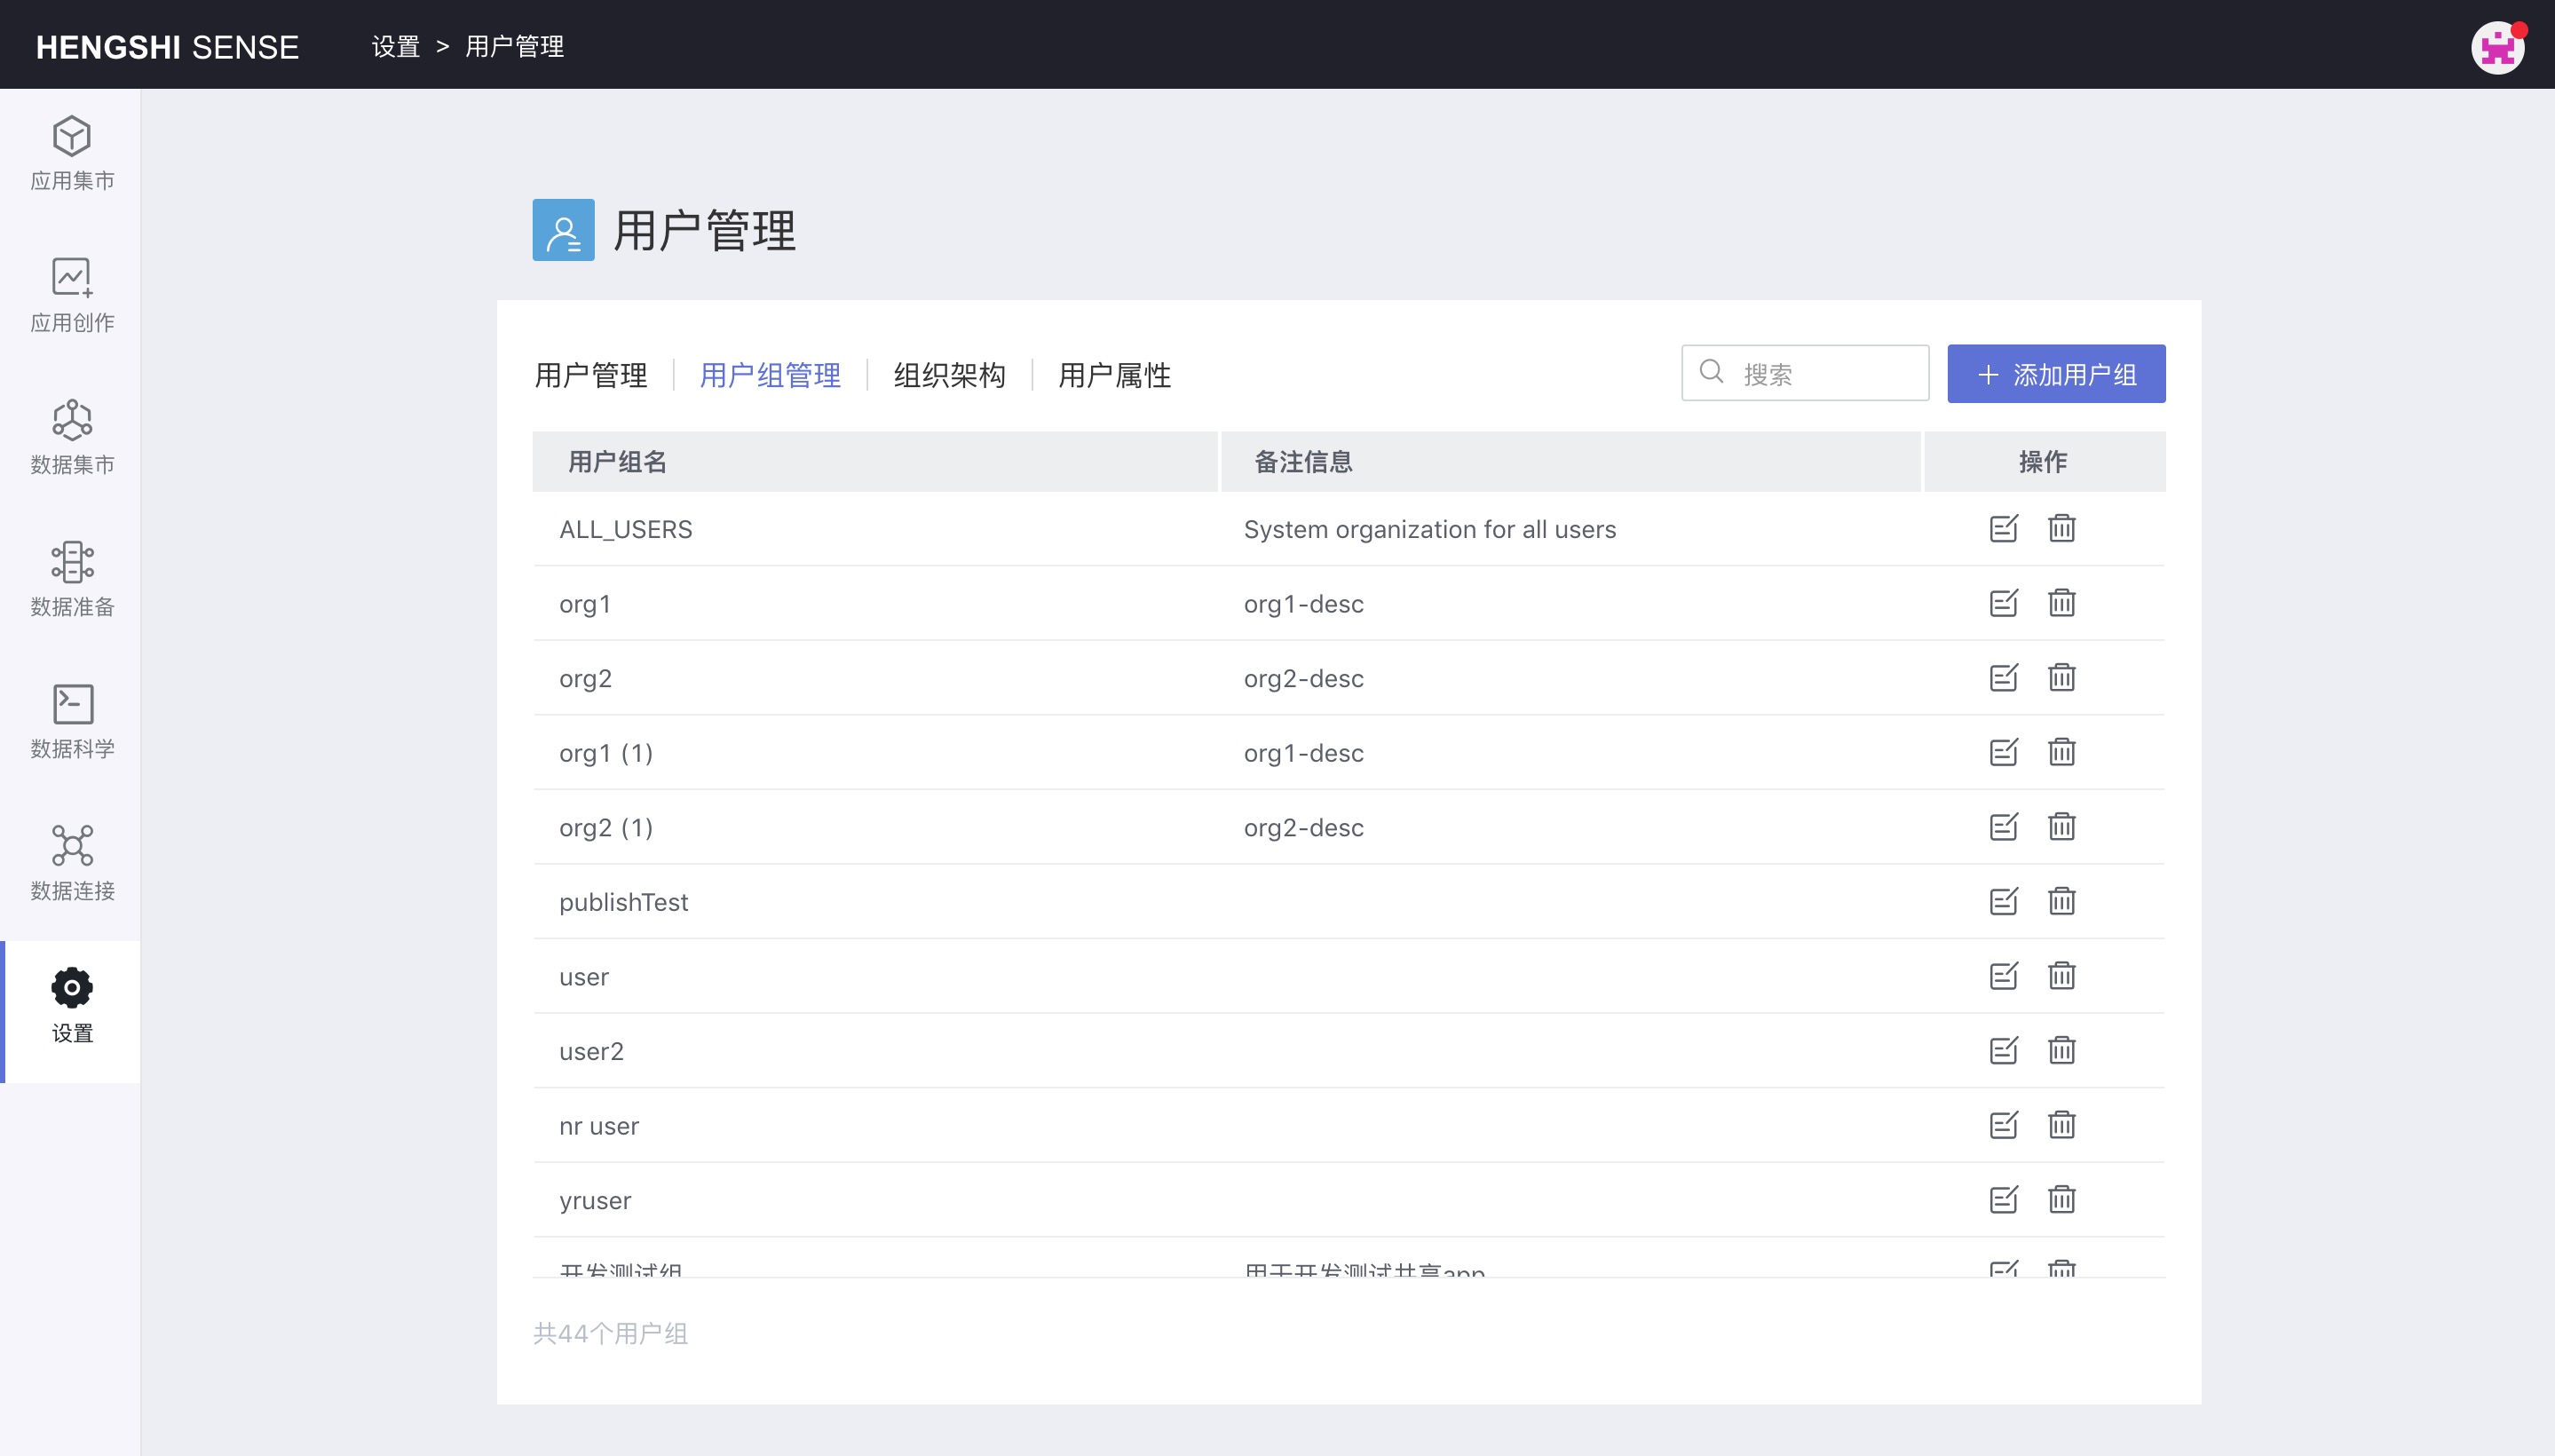
User Group Management
User groups are equivalent to folders. Adding users to a user group allows you to perform operations such as authorizations in bulk at the group level. For example, when choosing to authorize users in connectivity permissions, you can directly select a user group to authorize all users within it. By adding or removing users within the user group, you can quickly implement user permission distribution.
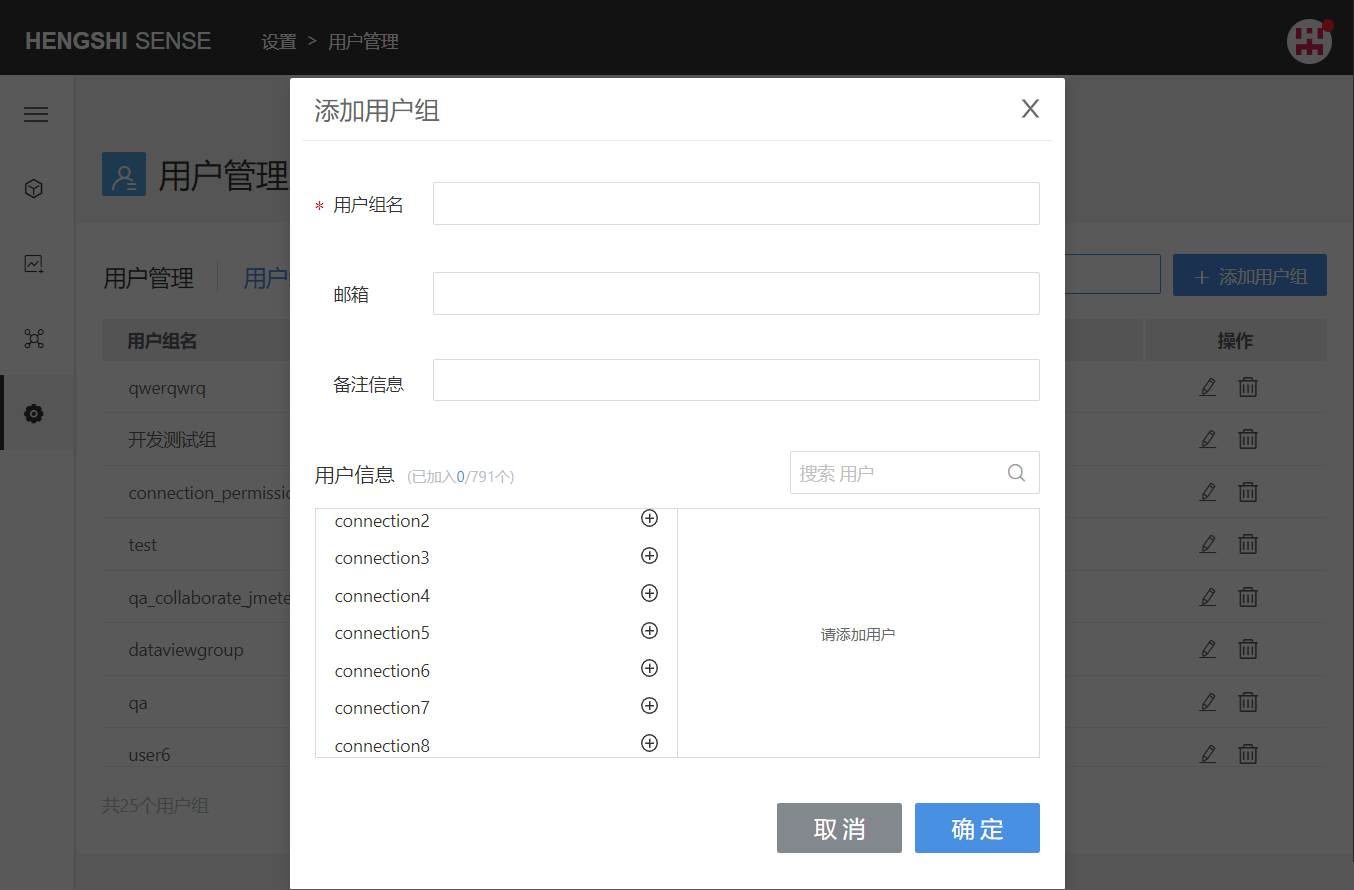
Add User Group
When adding a user group, enter the User Group Name, click confirm, and a new user group will be generated.
View User Group
View the information of the user group and the users contained within it.

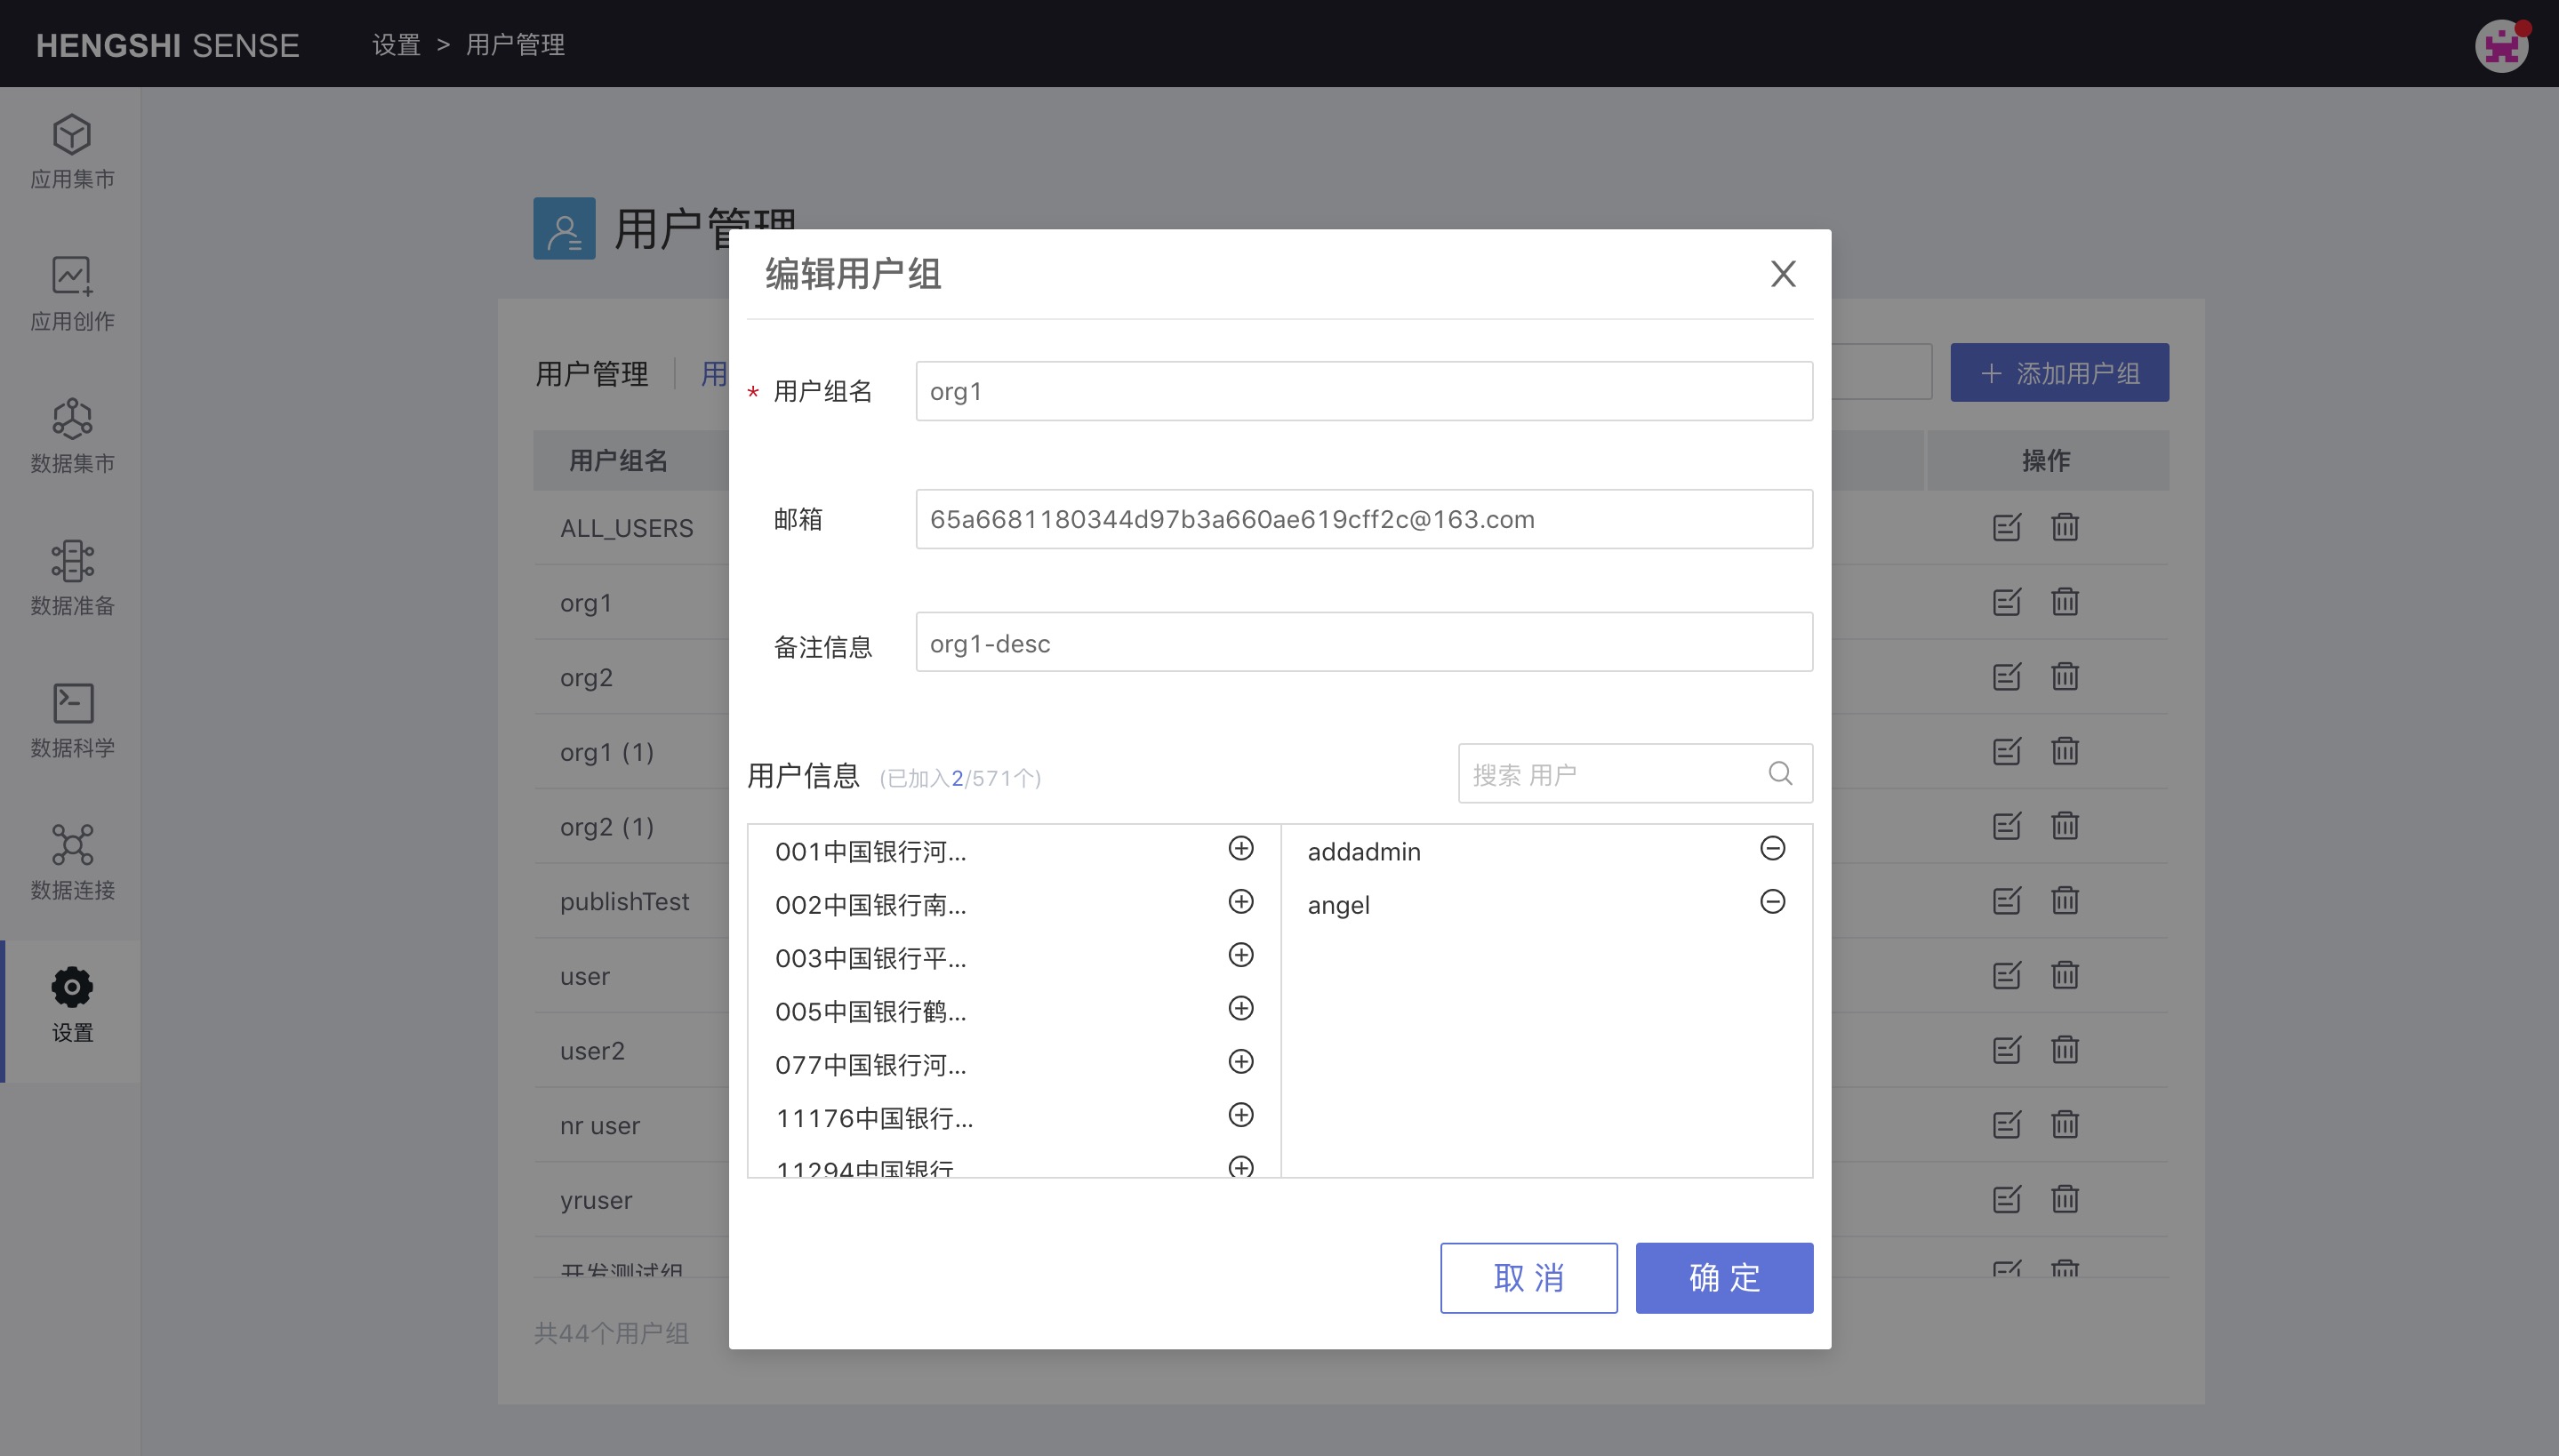
Edit User Group
You can modify the user group name, email, and remarks, as well as move users into or out of the user group.
Delete User Group
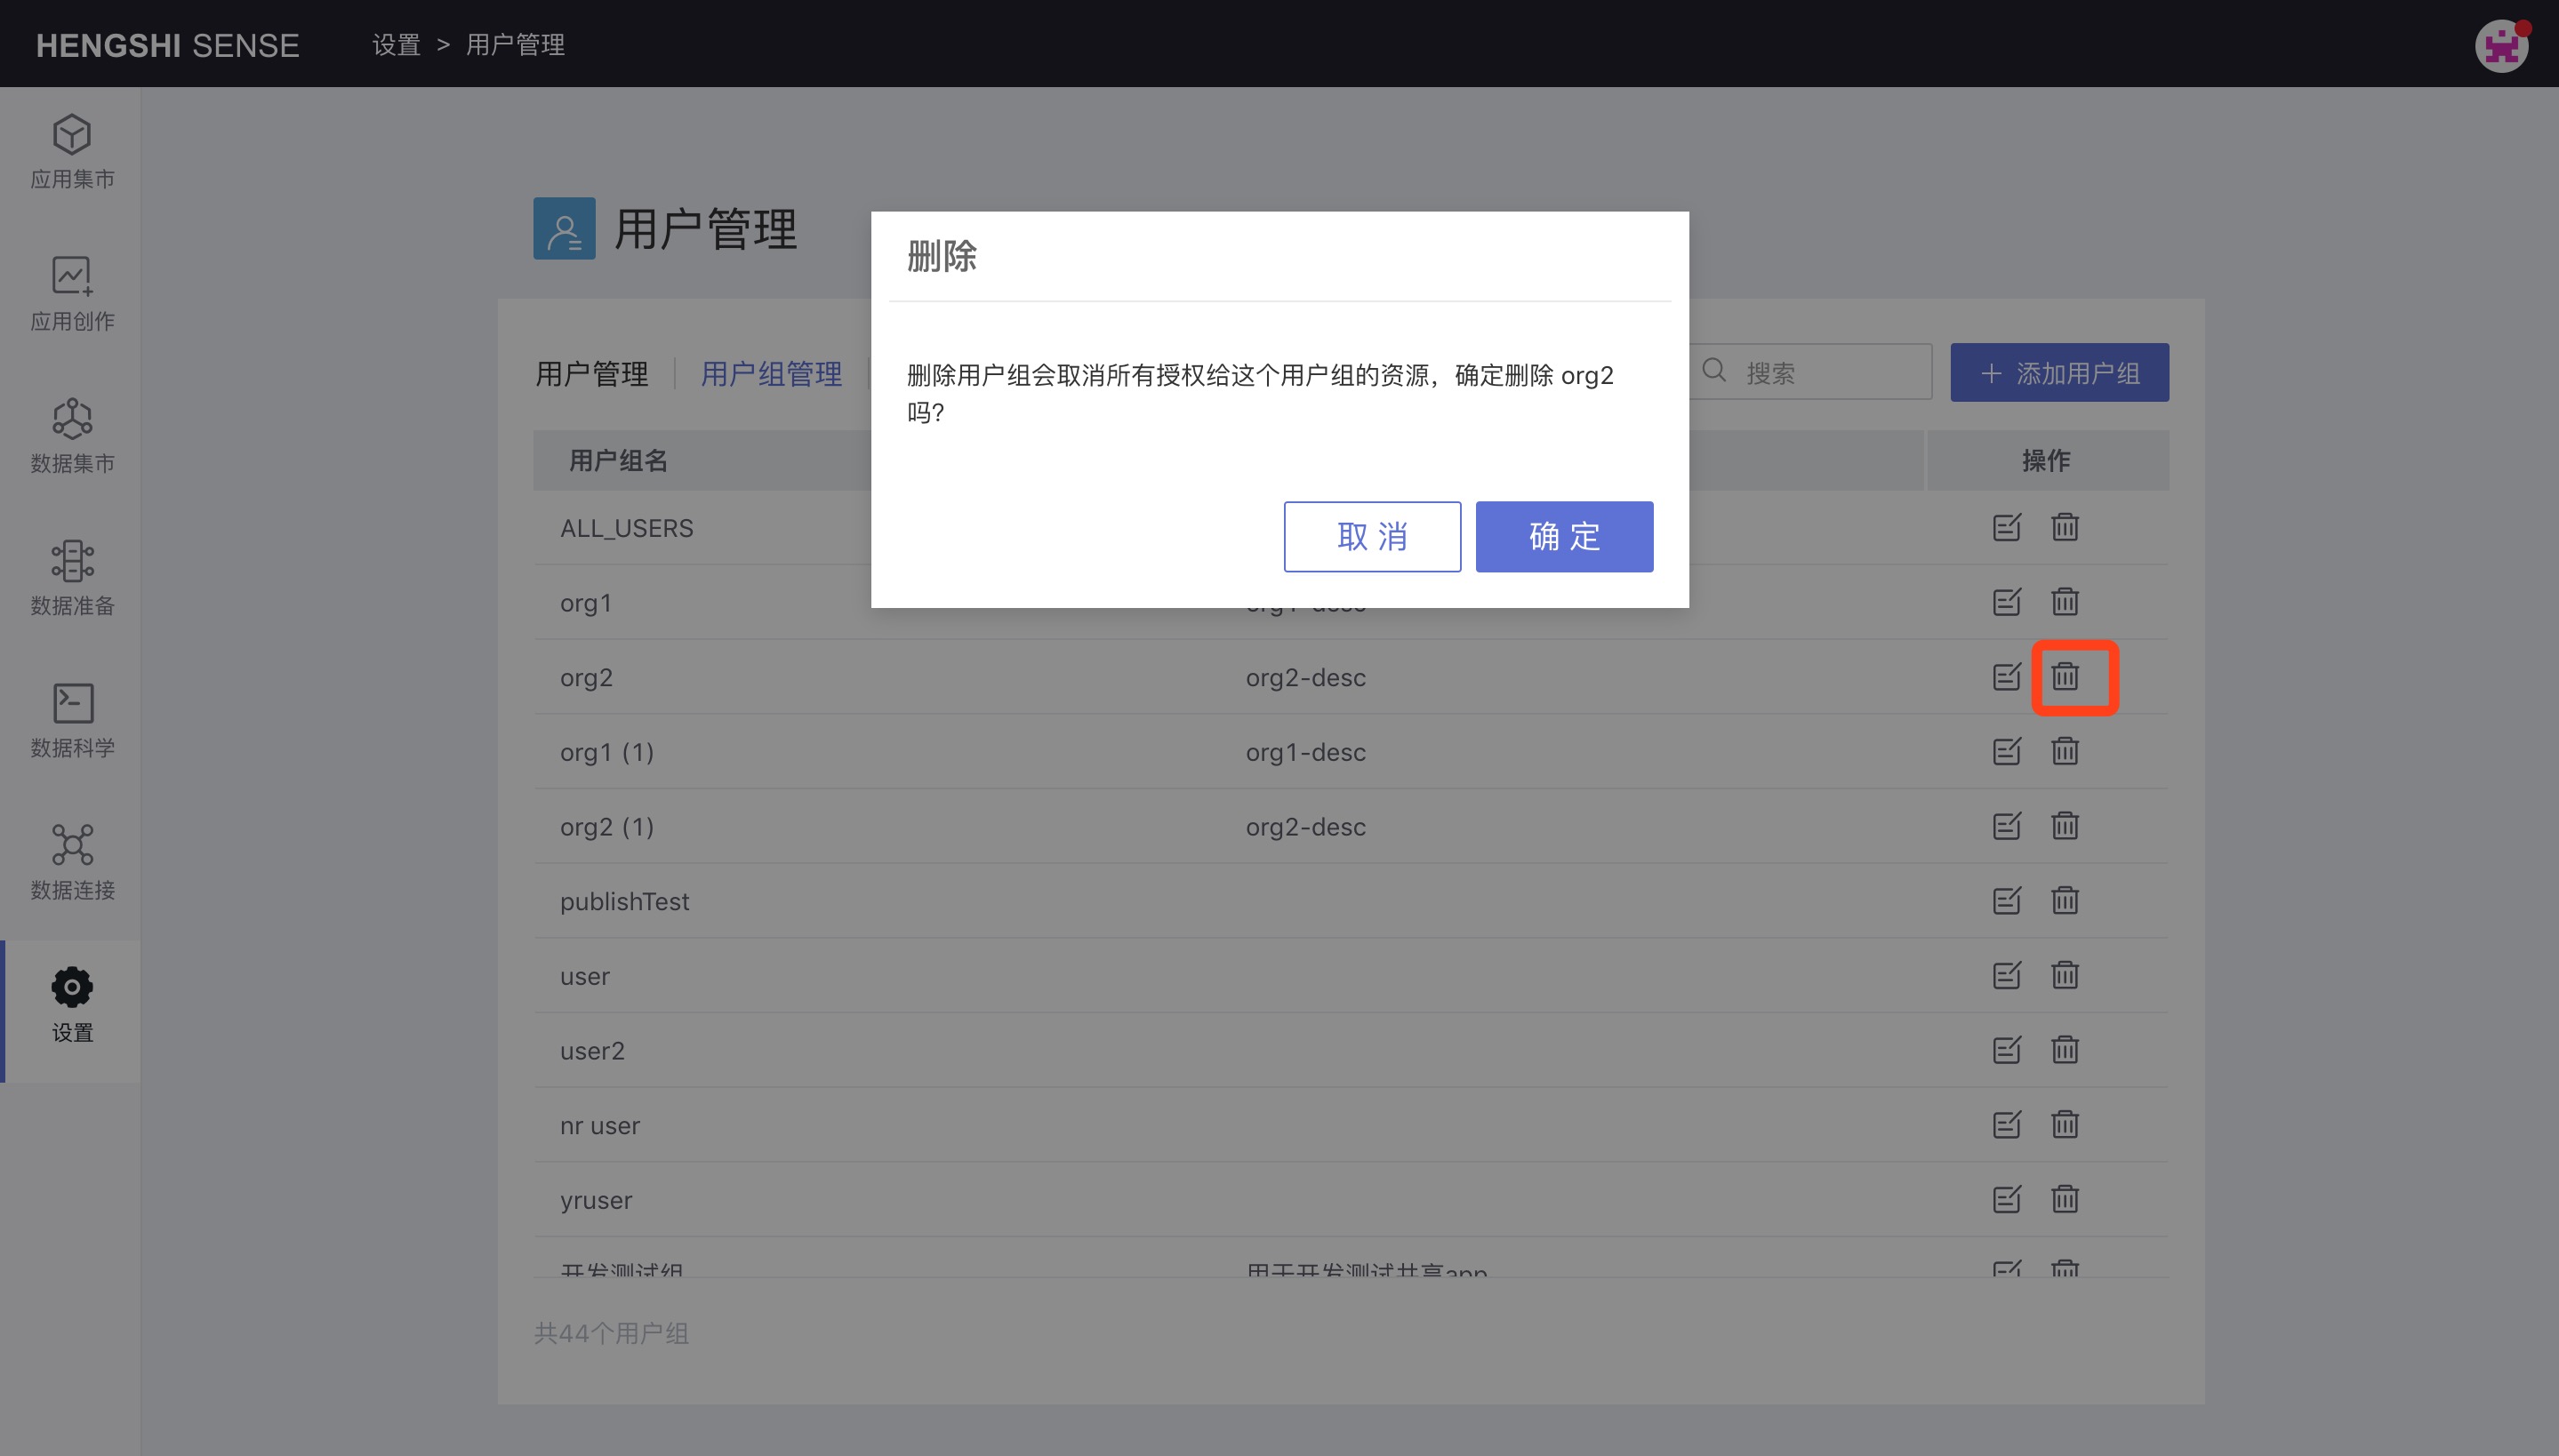
Deleting a user group will cancel all resources authorized to that user group.
Organizational Structure
Enable Organizational Structure
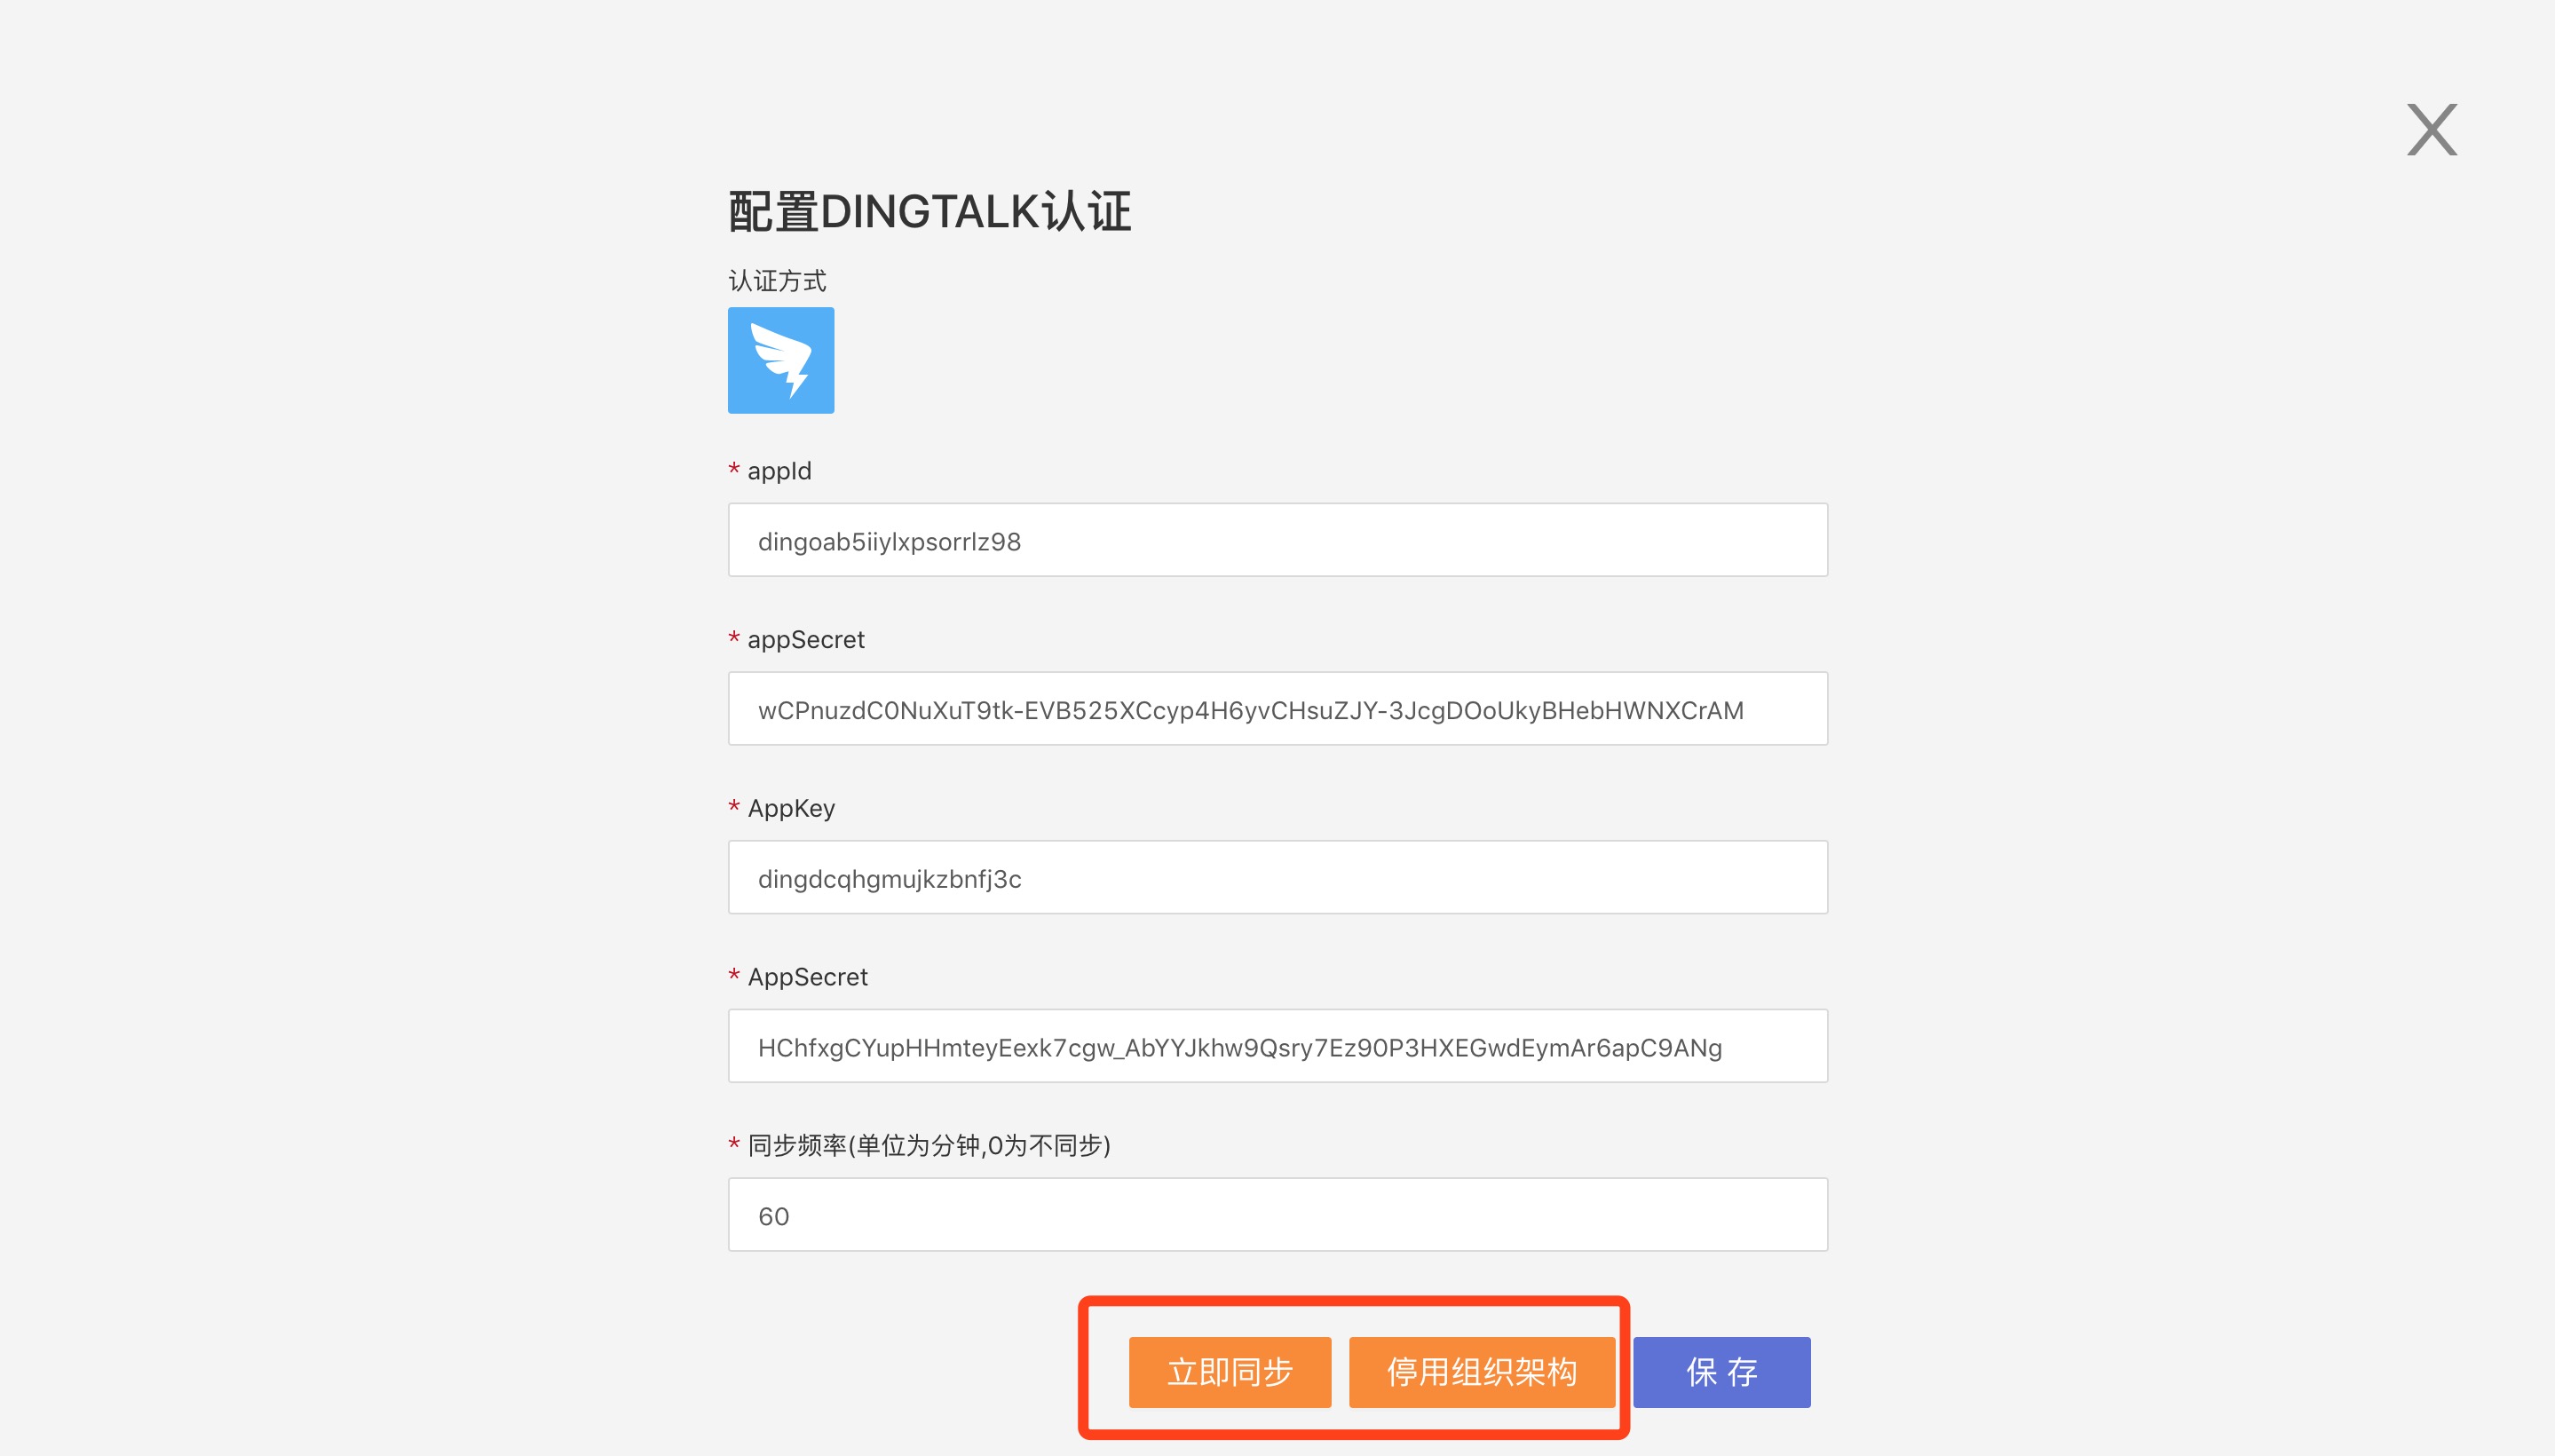
Open Settings -> Authentication Method, choose DINGTALK, click Configure.

Enter the sync frequency in sync frequency, click Sync Now, then click Save.
View Organizational Structure
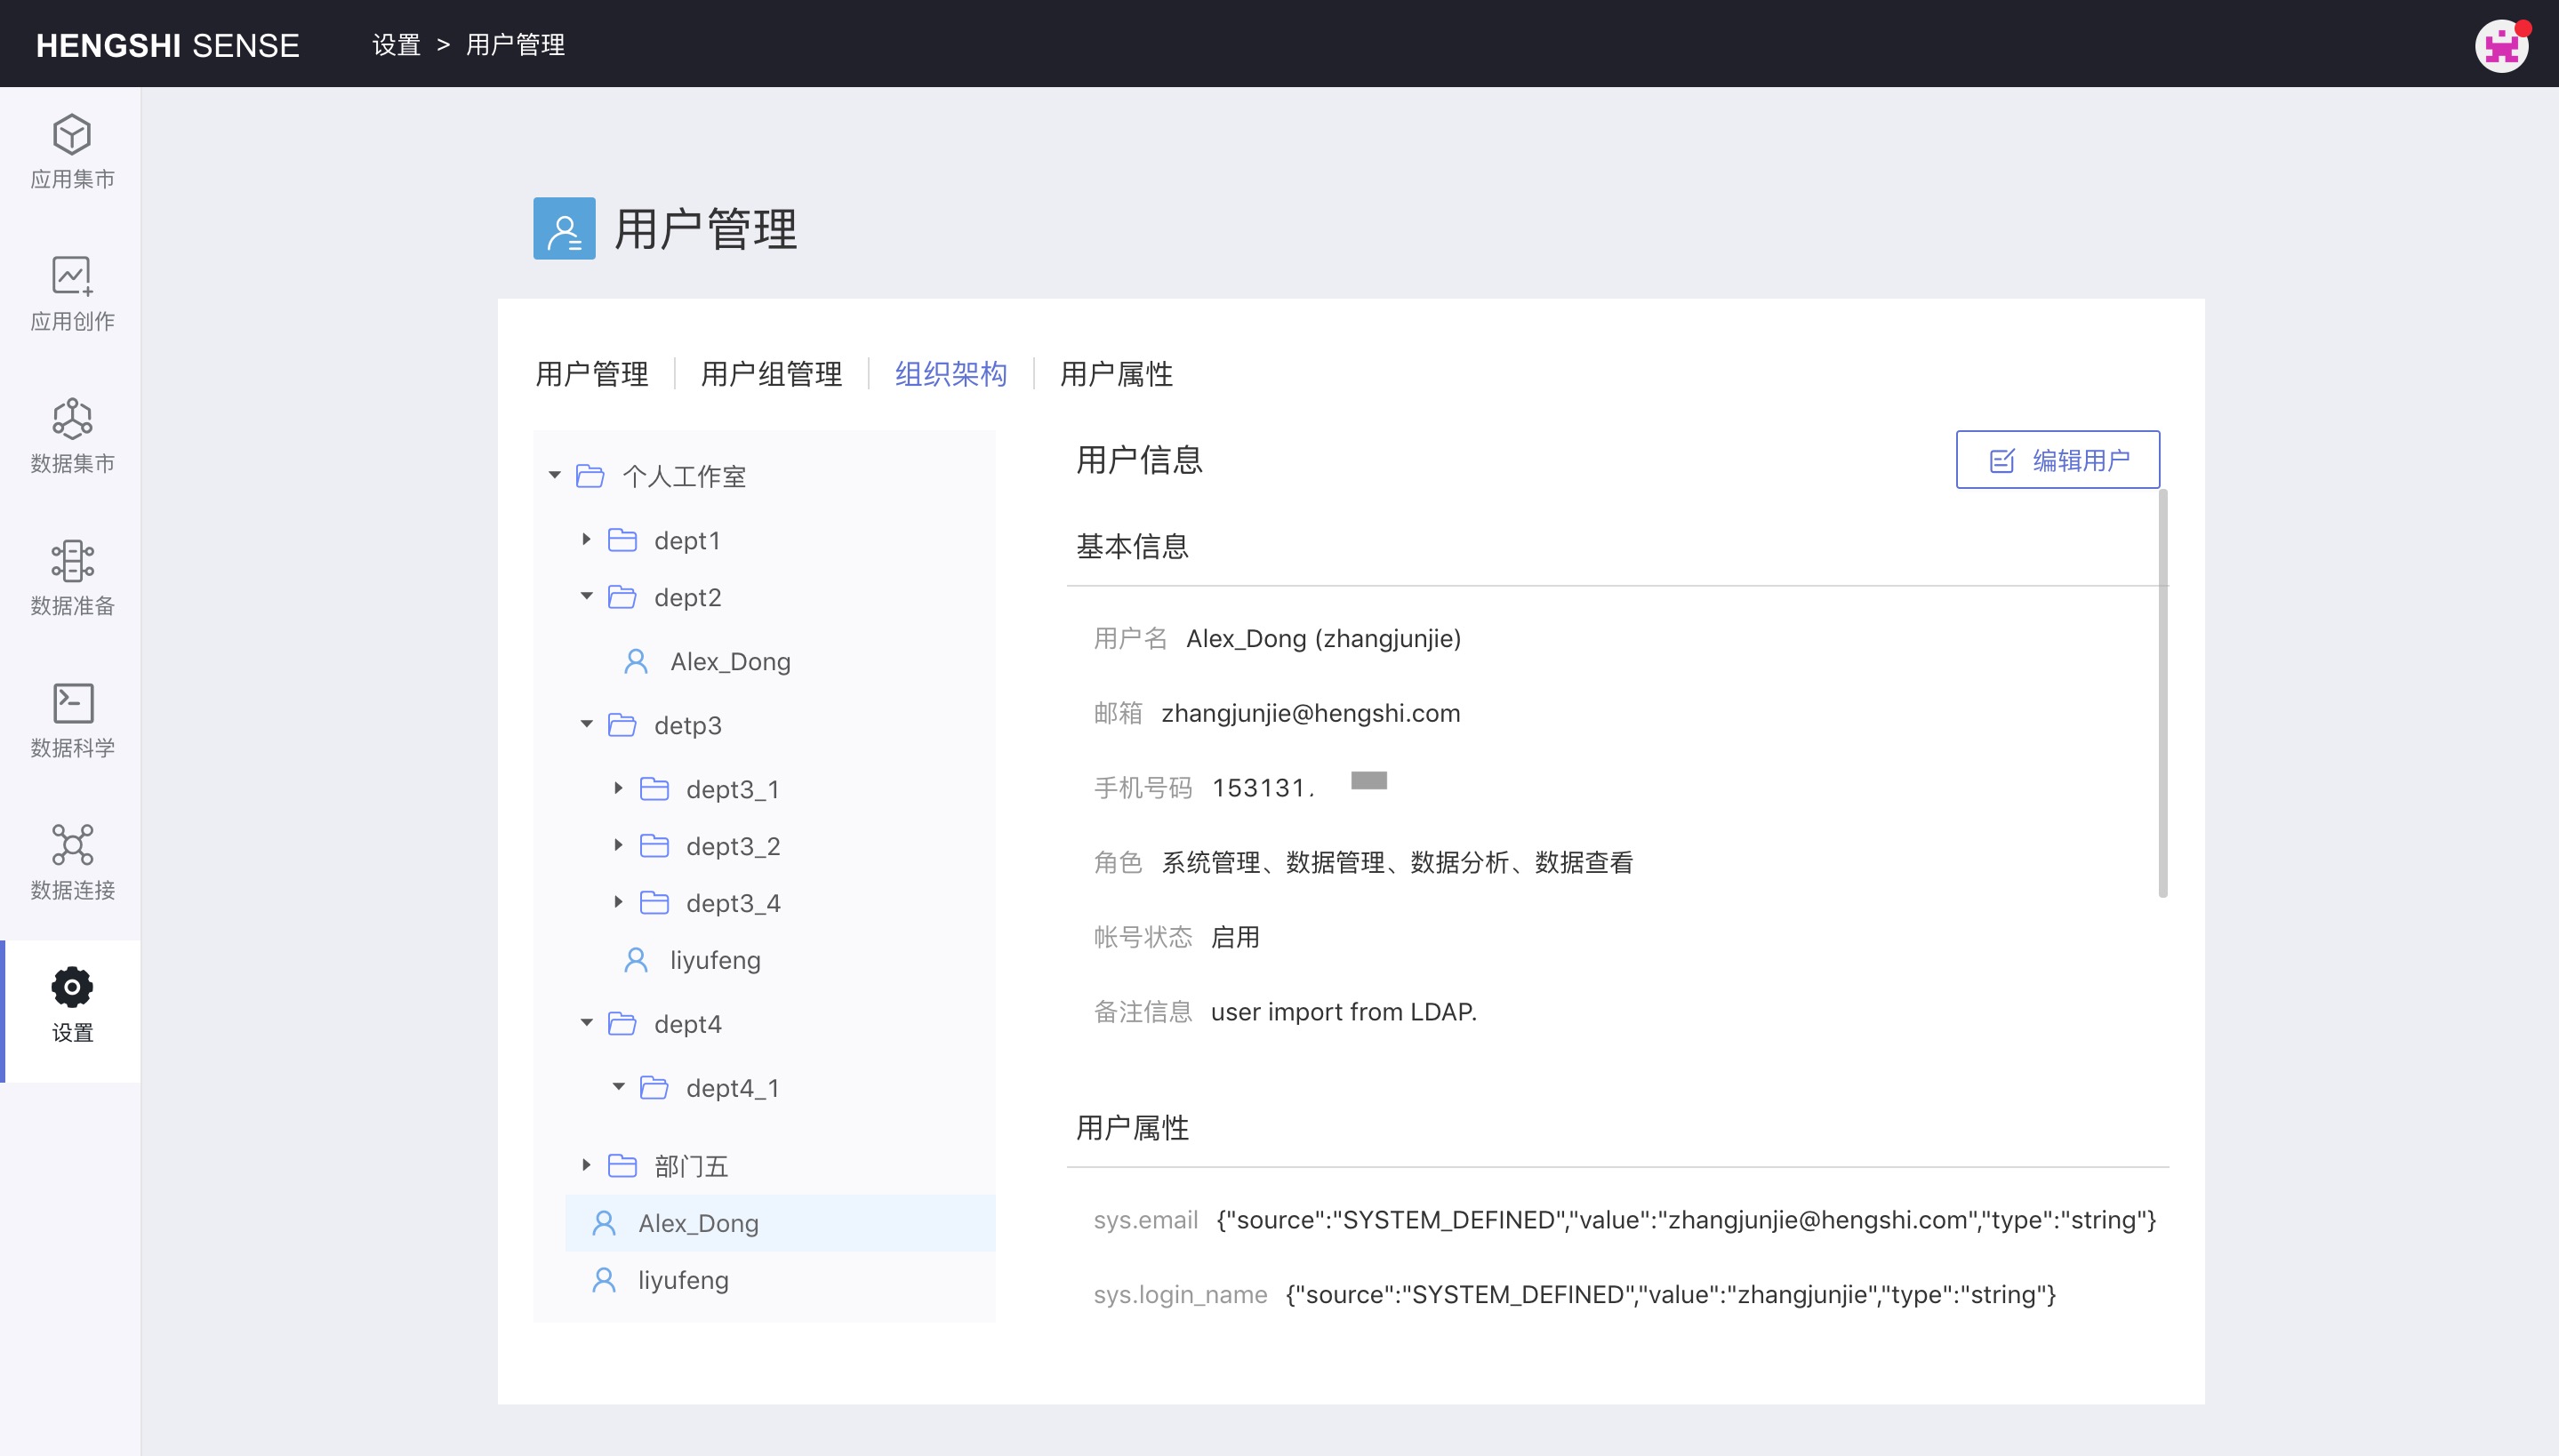
Open Settings -> User Management -> Organizational Structure.
System administrators can expand the organizational structure to view and edit each user's information.
User Attributes
User attributes are divided into system attributes and custom attributes.
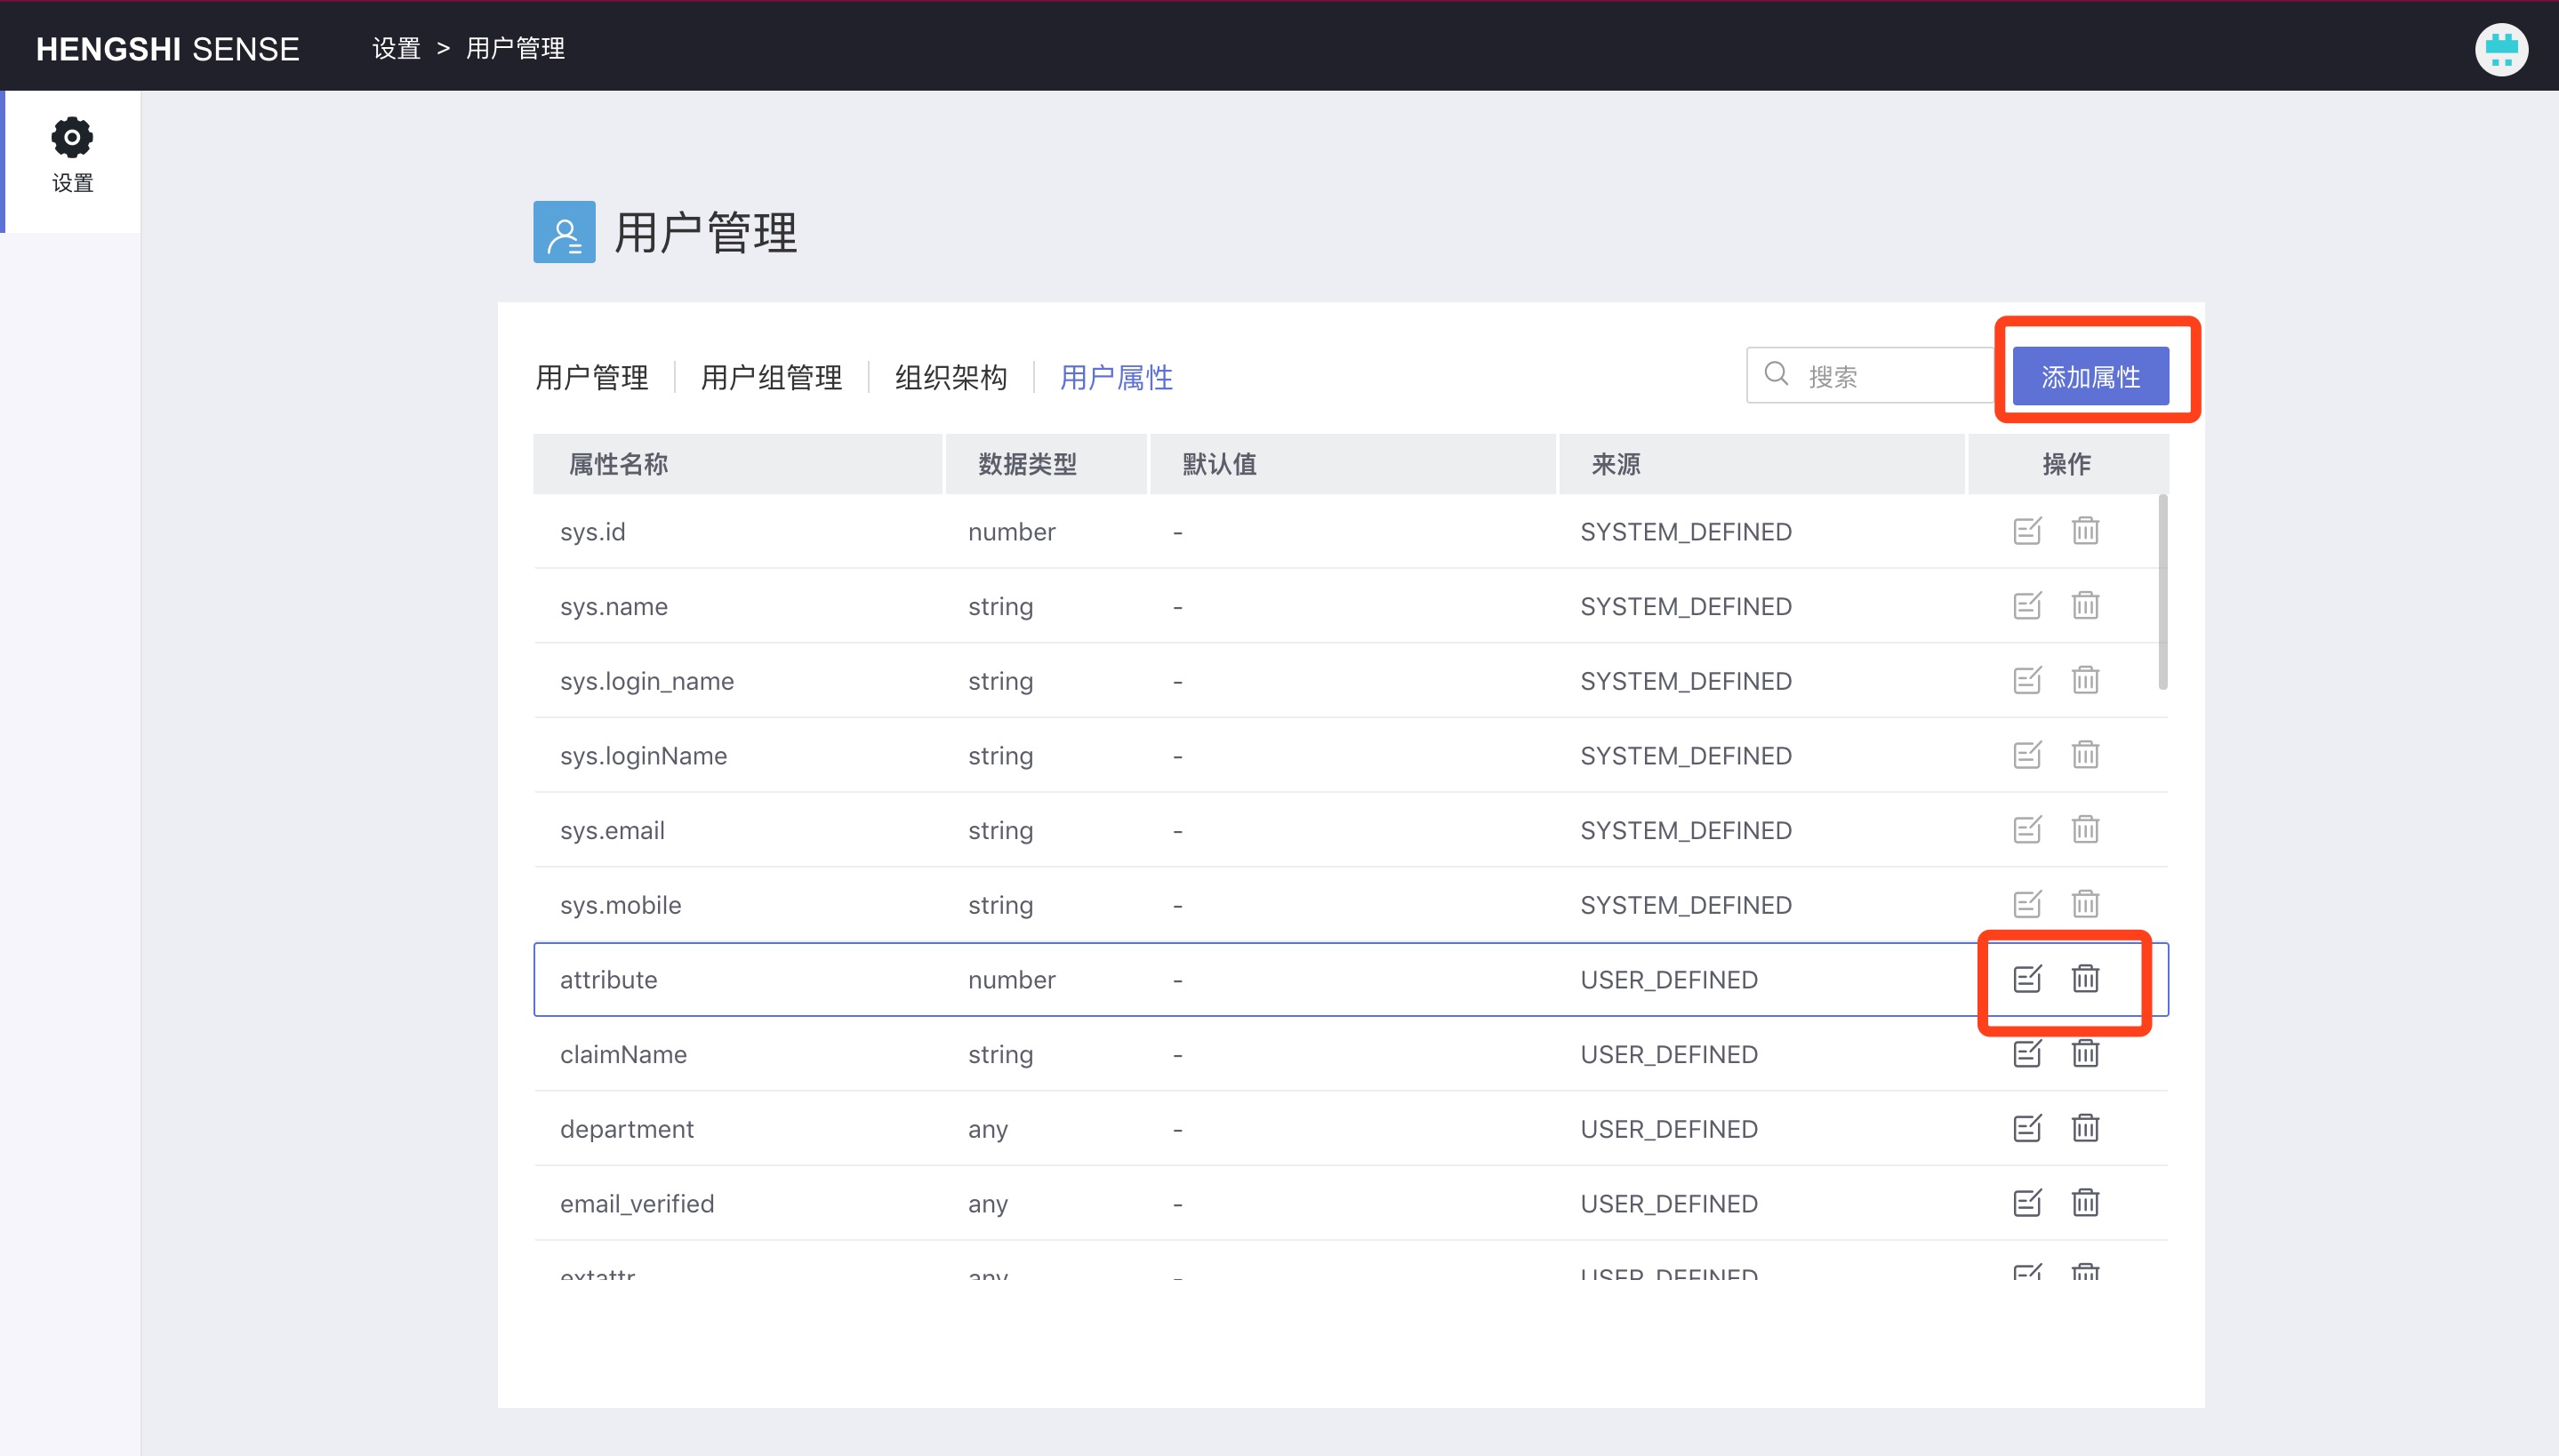
System Attributes
System attributes have the prefix sys., are provided by the system, and cannot be added, edited, or deleted.
Custom Attributes
Custom attributes are added by the users themselves and can be added, viewed, edited, and deleted.
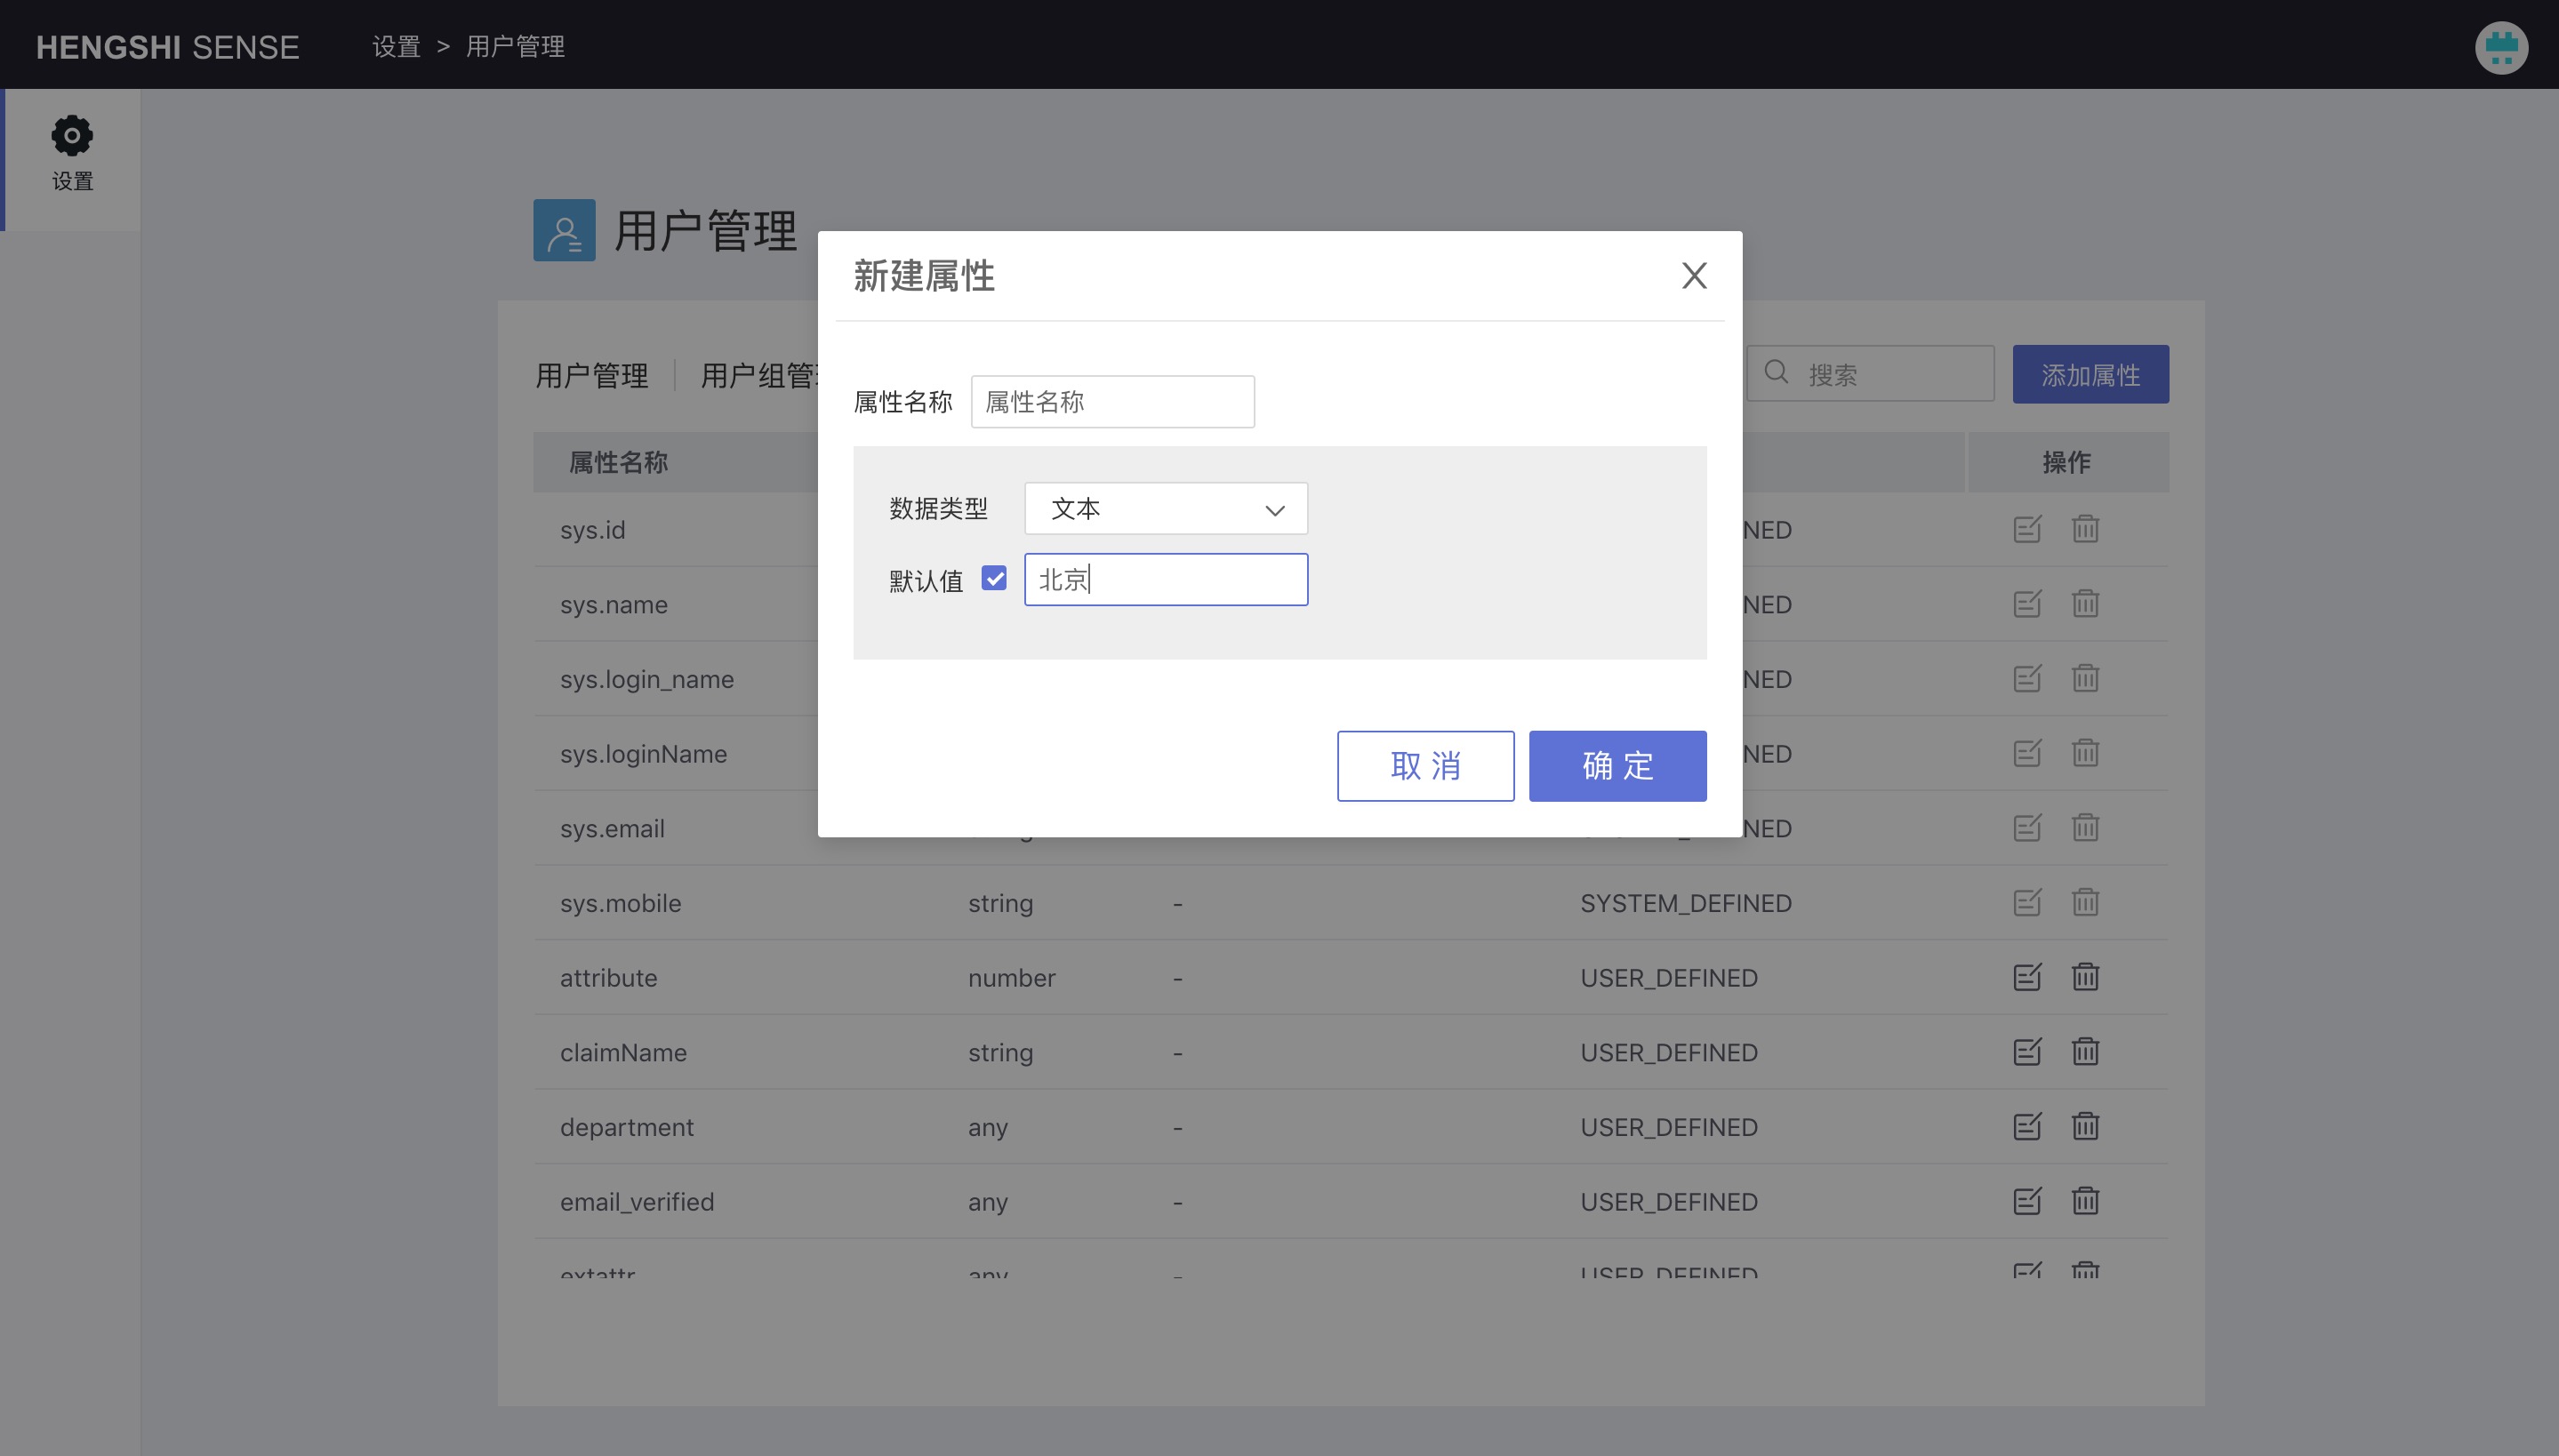
User Attribute Types
The following are the types of user attributes:
- Text: Replace user attribute operation with text string
- Number: Replace user attribute operation with a numeric string
- Date: Replace user attribute operation with a date string
- Any Type: Can be converted to any type; for example, you can enter [1,2,3] as an array to use in the user attribute value.
Add User Attribute
Enter the attribute name and select the attribute type.
In tenant management, platform administrators and tenant administrators can define user attributes, and the definition of the user attributes themselves is not isolated; once defined, administrators can see it.
View User Attribute
You can view detailed information about custom attributes.
Edit User Attribute
Edit custom attributes.
Delete User Attribute
Delete custom attributes.
Using User Attributes
Users can use user attributes in the following scenarios:
- Creating data connections
- Choosing the table for creating direct connection datasets
- In SQL statement for creating SQL query datasets
- Creating dataset filtering conditions
- In the expressions for adding fields or metrics
- In the filters for charts and dashboards
- In the settings for reference lines
Usage of User Attributes
| Usage | HE | Expression |
|---|---|---|
| User attribute | {“kind”: “attr”, “op”:”User attribute name”} | {{User attribute name}} |
| User attribute value | {{$$User attribute name}} |
When using {{User attribute name}}, the backend will perform type conversion; do not add quotes when using it.
When using {{$$User attribute name}}, the backend only performs text replacement; you can add quotes as needed.
In HENGSHI's advanced expressions, such as field addition expressions, metric addition expressions, and chart/filter expressions, you must use {{User attribute name}}, which will be converted into an HE expression and calculated by the backend. Elsewhere, use the user attribute value: {{$$User attribute name}}, which queries the value of the user attribute directly and then performs text replacement.
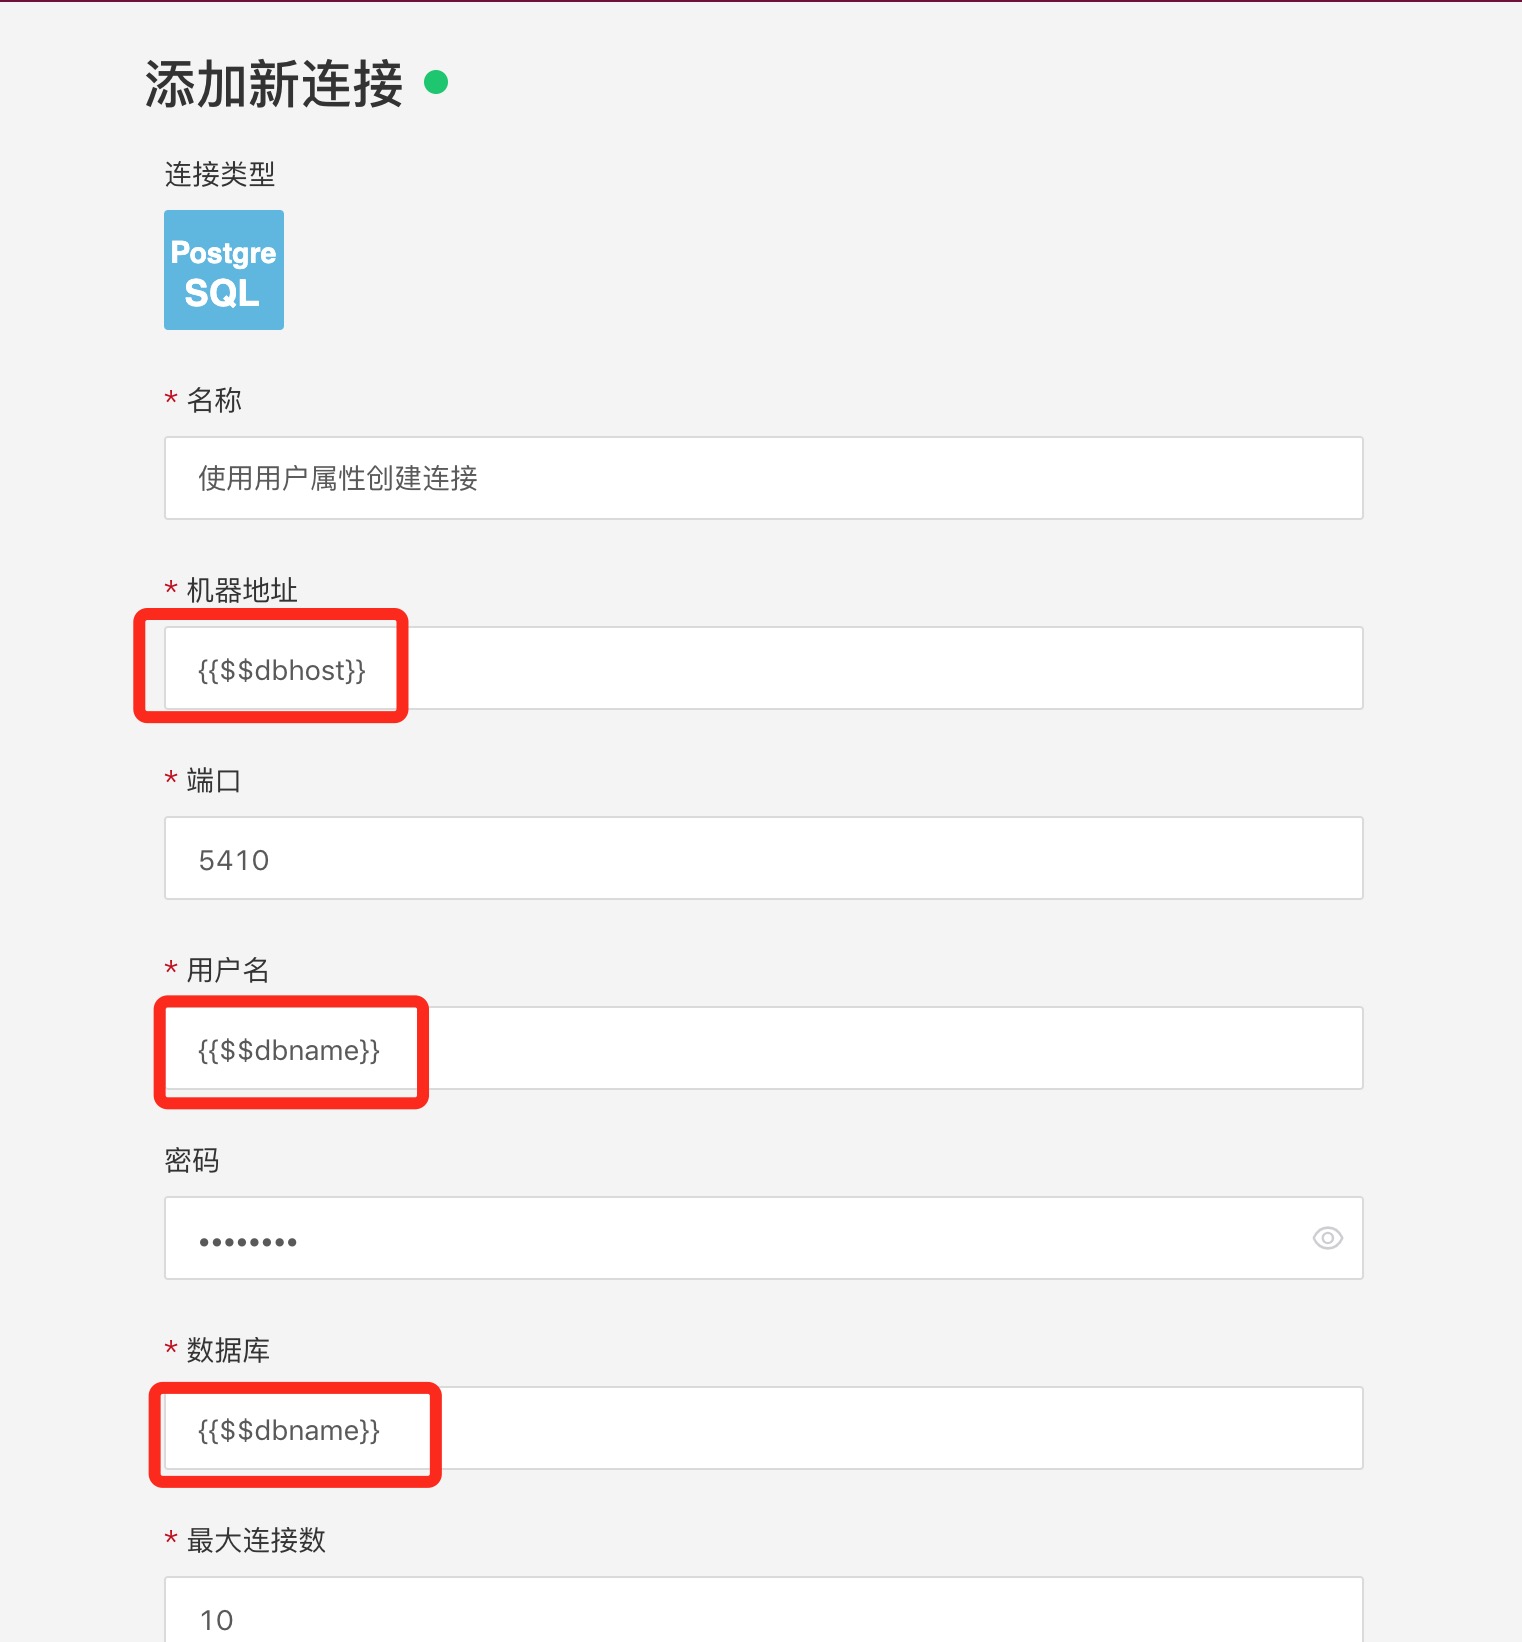
Using User Attributes to Create Data Connections
User properties can be used to create data connections, but parameters cannot, because parameters belong to the application, while user attributes belong to the system.
When creating a connection, you must use the User attribute value form.
When creating a connection, only the user password cannot use user attributes; other places can use user attributes. The user password is what is input and will not be converted or calculated.
The dbhost and dbname in the image are user attributes.
Using User Attributes to Create SQL Query Data Sets
Creating an SQL query must use the User attribute value form:
select * from movie where id > {{"$$User attribute name"}}
select * from "{{$$User attribute name}}"
Using User Attributes to Create New Fields/Metrics
When creating a new field or metric, you must use the User attribute form:
{price} + {{"$User attribute name"}}
Using User Attributes in Filter Expressions
In the chart filter expression, you must use the User attribute form:
{region} = {{"$User attribute name"}}